You are using an out of date browser. It may not display this or other websites correctly.
You should upgrade or use an alternative browser.
You should upgrade or use an alternative browser.
Steve's 330 gal Work Tank/475 gal system
- Thread starter sarens
- Start date
muttley000
MTS Sufferer!
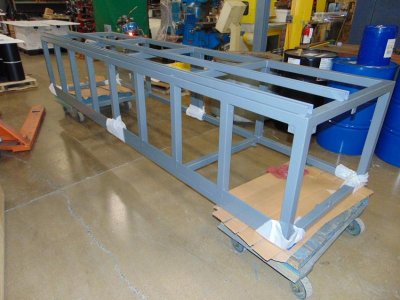
my big screw up... you think a guy (me) that designs machines and other items can get two rectangles correct, well no; lesson learned draw the side view also just to be sure, even on something as simple as two rectangles, very humbling I made my stand too wide for the tank, would of only had minimum amount supported on front and back panes, added in 3" wide stock so ok now but back to powder coat:mad2:
-now I will just make a 4" wide corian trim instead of 1.5" wide
-at least I got my stainless splash pan installed and checked to be sure I have no issues
Lol, I work in a machine building shop also, some of the little things that get missed on a million dollar project just make you shake your head. Glad you caught it when you did!
sarens
Member
so Tuesday the 10th is the big day, tank is coming in the morning
-almost ready:
-stand is powder coated
-light braces made from 80/20 extrusion are built
-top board made from double layer 3/4" plywood is built, primed, painted and holes cut in from plumbing
-bottom boards cut, primed and painted
-lower stainless steel tray is built and fit
-made rear plywood to hang vertical on the uni-strut on the back to mount items on, put holes for cords and primed painted
-moved snow all day so there is path for us to get stand and tank in thru the outside window in the front of the building


muttley000
MTS Sufferer!
Getting close! It all looks good Steve, let us know how it went!
A_CoupleClowns
New member
Wow already have drains hooked up your making progress! Can't wait to hear/see more ")
sarens
Member
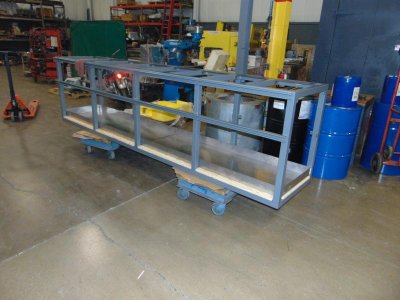
plumbing today
plumbing today
got the apex with two EB8's installed, I have the display just on a temporary board until my face unit with doors is done
-have 3 of the 4 EHIEM pumps and 2 of the 3 UV units all plumbed
-have the main drain and the emergency drain done, need the 3rd done and I can start to fill, hopefully tomorrow!!!!
A_CoupleClowns
New member
got the apex with two EB8's installed, I have the display just on a temporary board until my face unit with doors is done
-have 3 of the 4 EHIEM pumps and 2 of the 3 UV units all plumbed
-have the main drain and the emergency drain done, need the 3rd done and I can start to fill, hopefully tomorrow!!!!
Wow that is so crazy your already about to fill it! You don't mess around. Keep up the progress!
sarens
Member
Wow that is so crazy your already about to fill it! You don't mess around. Keep up the progress!
my RO is filling my sump right now, should be putting water in the tank starting tomorrow, will test pumps and overflows between just the sump and overflow tomorrow also


sarens
Member
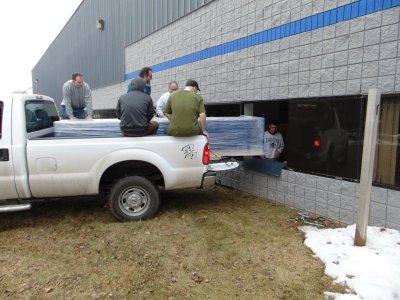
pictures of the move
pictures of the move
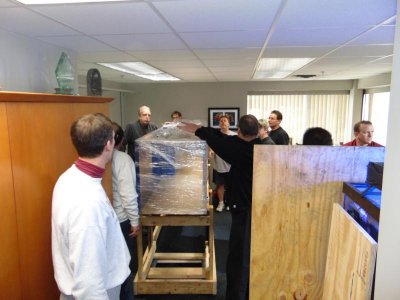
this is the hole we had to take the tank and stand thru

taking the stand in

driving the tank around to the window

moving the tank from the truck thru the window

we made a roller stand on furniture dolleys, used that to hold the tand and roll in front of the metal stand, we matched the height +1/8" and then just slid it over

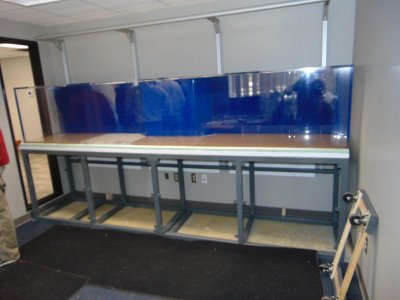
here is the tank on the stand after the move in

pictures of the move
this is the hole we had to take the tank and stand thru
taking the stand in
driving the tank around to the window
moving the tank from the truck thru the window
we made a roller stand on furniture dolleys, used that to hold the tand and roll in front of the metal stand, we matched the height +1/8" and then just slid it over
here is the tank on the stand after the move in

A_CoupleClowns
New member
That's awesome! I was going to say some pretty large first fish
When are you going to start aquascaping?
When are you going to start aquascaping?
muttley000
MTS Sufferer!
Looks great! Hard parts done now!
sarens
Member
That's awesome! I was going to say some pretty large first fish
When are you going to start aquascaping?
tell me what you think of my plan:
1) finish filling (I'm running directly from my RO into the tank)
2) add salt
3) add live sand, I'm only doing about 1/2"-3/4" layer
4) then do aquascape, this is where I hit an issue, I already know I don't posses the eye/talent to do even a decent job at it, therefore how do I drill and rod or epoxy knowing full well I will have to change it... stumped on this one!
-how is yours coming, fishroom almost done?
Similar threads
- Replies
- 4
- Views
- 220