Didn't need it for strength, but the 3/4" was cheaper than 1/2" and a lot easier to work with than 1/4". I already had the 1x to make the trim, so all I had to buy was a sheet of 3/4". The only extra weight will be the 4" and 6" or so strips added around the corner posts and top and bottom rails. The rest of the 3/4" will be used for the hood. The doors will be 3/4" raised panels. Again, I already have the wood for those except for some bisects to join the boards together to make the wide panels.
You are using an out of date browser. It may not display this or other websites correctly.
You should upgrade or use an alternative browser.
You should upgrade or use an alternative browser.
What would you do?
- Thread starter sphinx105
- Start date
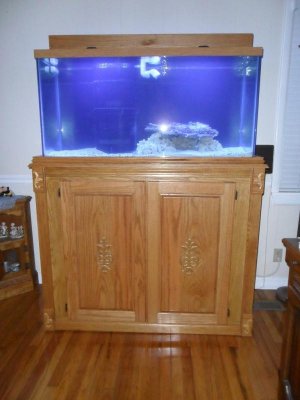
Here is the stand with some of the trim. I was not pleased with the way the plinths turned out at first, as they are offset to the outside to cover the fluted trim, but it is starting to grow on me. This is the first time I tried to make fluted trim, and if you don't have perfectly straight material to start with you will get wavy flutes. So don't pay attention to the flutes in on the back corners!
I thought about adding some scroll saw cut-outs of seahorses to the top plinths on each side. We have a scroll saw but have not used it much. I will try to get my son to try his hand when I find a pattern to use.
I need to finish the trim on top to hide the tank frame. This tank has a 1 3/4" tall frame rim; more than I expected so I have to add at least one more inch of material to cover it.
It has now got too heavy for me to manage by myself so it is setting on a furniture dolly for the remainder of the construction until it is time to do the water and weight testing, but that will be a while yet.
Wow it has almost been 5 years since we started the 90 gallon build. I'm sorry I haven't updated the log. To keep things short, life happens, we now have some time to get back to the tanks.
Now for a qUick update - pics to come. The stand is finished and the tank tested and moved into the living room. We have had it setting there for 4years. It housed baby koi one winter until the pond was ready. Then a short attempt with fresh water angle fish. Then empty for 2 years. We worked on a sump off and on, and bought an ASM skimmer, tested the sump, but did not fill the tank until yesterday. Almost 5 years from the time we started this project.
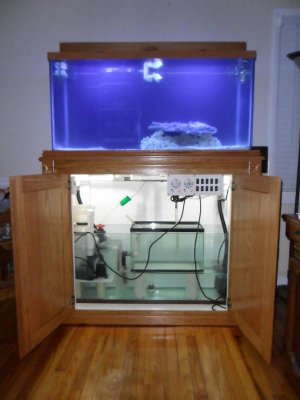
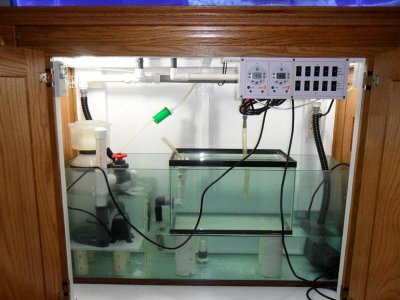
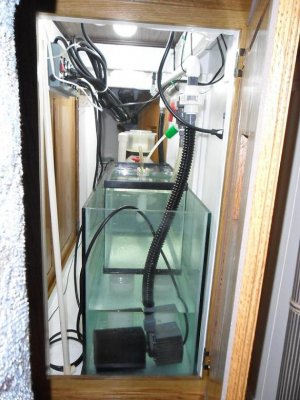
We are using an older thick glass 55 as the sump with no cross brace so the whole tank is usable, the skimmer is set on a 5" raised plate with a baffle to keep it in 8" of water. At the other end is a mag 9.5 o return the water to the display. We placed an econo 10 gallon tank inside the 55 on pvc legs with a drilled overflow as a refungium <sp>. Only a small piece of live rock propped up on 3 pieces of base rock and 100# sand are in the main tank. We are waiting till the tank settles then slowly add the inhabbitants from our 2 smaller tanks including the rock and sand.
We still need to finish the lighting and upper canopy. Last year we purchased 2 250w electronic ballast, reflectors, sockets, etc and 2 55w T5s and reflectors for the lighting. Right now we have 4 36w PCs in an oak strip light that was used when we had the angle fish on the tank. This is enough light to aqua scape without any livestock in the tank.
Now for a qUick update - pics to come. The stand is finished and the tank tested and moved into the living room. We have had it setting there for 4years. It housed baby koi one winter until the pond was ready. Then a short attempt with fresh water angle fish. Then empty for 2 years. We worked on a sump off and on, and bought an ASM skimmer, tested the sump, but did not fill the tank until yesterday. Almost 5 years from the time we started this project.
We are using an older thick glass 55 as the sump with no cross brace so the whole tank is usable, the skimmer is set on a 5" raised plate with a baffle to keep it in 8" of water. At the other end is a mag 9.5 o return the water to the display. We placed an econo 10 gallon tank inside the 55 on pvc legs with a drilled overflow as a refungium <sp>. Only a small piece of live rock propped up on 3 pieces of base rock and 100# sand are in the main tank. We are waiting till the tank settles then slowly add the inhabbitants from our 2 smaller tanks including the rock and sand.
We still need to finish the lighting and upper canopy. Last year we purchased 2 250w electronic ballast, reflectors, sockets, etc and 2 55w T5s and reflectors for the lighting. Right now we have 4 36w PCs in an oak strip light that was used when we had the angle fish on the tank. This is enough light to aqua scape without any livestock in the tank.
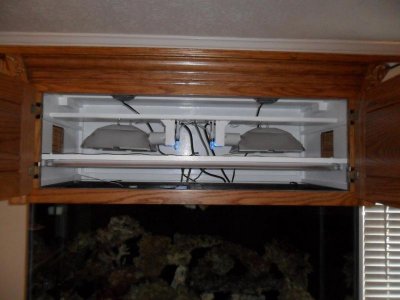
Update time. I have been working on the hood the last couple of weeks. I have the structure complete with doors. I still have to finish the painting of the inside. Then mount the fans, metal halide ballasts, T5 ballast, and "moon" lights. I decided to go with two Ushio 250 watt 20,000k on coral vue electronic ballast. I also added two 55 watt T5HO actinics. Moon lights will a couple of C7 LEDs either cool white or blue. I understand the coral vue ballast may not drive the bulbs to thier fullest potential, but bought them over a year ago before I did my ballast homework. So Ill use them for now. I have dual timmers to set the lighting cycles. Ill try running the T5s an exta hour at startup and shutdown and adjust the halides to get the best results without too much heat buildup. Each timmer has a reverse cycle to power the moon light and the light on the refugeium. Im getting excited once again about the tank. Once the new lightning is running,we'll move the occupants fron the 45 gallon to the 90 gallon. Ill get updated pics posted this weekend.
Finally after 5 years!!
Finally after 5 years!!
I took the advantage of being off for the Thanksgiving Holidays to finish the light hood and set it up. :bounce2:
Tank:
90 Gallon All-glass
80 lbs sand
50 lbs rock (more to be added latter)
The lighting:
2 Ushio 20,000K 250W MH
2 CoralVue LuXcore electronic ballast in the standard wattage position
2 TRU 03 Actinic 54W T5HO
1 Advance Quad T5HO Program Start Ballast
2 GE C7 Blue LED Night Light Bulbs (Moon Light)
1 TRU 10,000K 36W PC bulb on refugium (Phillips Electronic Ballast)
2 6,500K Compact Florescent Under Cabinet Lights
2 4" Fans exhausting out top of hood.
Circulation/Filtration/Heating
55 Gallon sump tank (about 30 gallons usable with refugium tank in place)
MAG 9.5 main return
2 Aqueon 700 circulation pumps
ASM G-3 Skimmer with gate valve mod
2 300w Hagen heaters
10 gallon tank inside 55 as refugium (leader size 10" wide tank)
Refugium is plumbed off the main return line with a ball vaulve to limit the flow to a few gallons per hour. Estimated flow through main return is about 550 gallon per hour considering the plumbing and head.
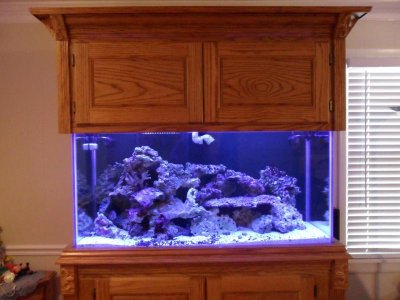
The tank has been running about 5 months now with 4 36W PC bulbs. What a difference the MH made! We can start slowly moving the leathers, zoos, polyps and keyna tree corals from the smaller tank.
This has been a long project with many interruptions. We bought some live rock over 5 years ago in placed it in a 45 gallon tank to keep it while we set-up the 90 gallon. Well the 45 turned into a more permanent home than we originally planned. The rock is still in the 45 (most of it anyway) and now can be moved to its intended home.
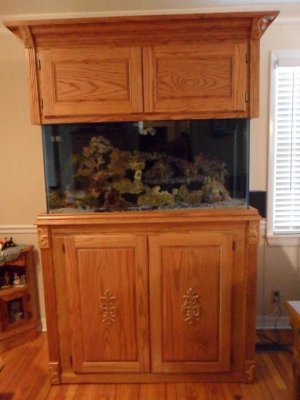
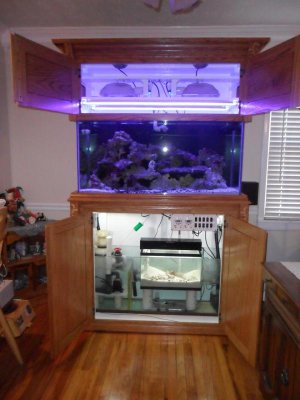
The cabinet is mostly oak (outer portion anyway) on a pine skeleton. There are 3 parts, stand, back and hood. The back section sits behind the tank giving about 6" of air space where the ballasts are mounted. The hood covers the tank and the back allowing the wiring to be routed to the hood with easy access as the back portion has a small door on each side big enough to get my arm in. I still want to add some trim to the hood doors to match the cabinet doors.
Finally after 5 years!!
I took the advantage of being off for the Thanksgiving Holidays to finish the light hood and set it up. :bounce2:
Tank:
90 Gallon All-glass
80 lbs sand
50 lbs rock (more to be added latter)
The lighting:
2 Ushio 20,000K 250W MH
2 CoralVue LuXcore electronic ballast in the standard wattage position
2 TRU 03 Actinic 54W T5HO
1 Advance Quad T5HO Program Start Ballast
2 GE C7 Blue LED Night Light Bulbs (Moon Light)
1 TRU 10,000K 36W PC bulb on refugium (Phillips Electronic Ballast)
2 6,500K Compact Florescent Under Cabinet Lights
2 4" Fans exhausting out top of hood.
Circulation/Filtration/Heating
55 Gallon sump tank (about 30 gallons usable with refugium tank in place)
MAG 9.5 main return
2 Aqueon 700 circulation pumps
ASM G-3 Skimmer with gate valve mod
2 300w Hagen heaters
10 gallon tank inside 55 as refugium (leader size 10" wide tank)
Refugium is plumbed off the main return line with a ball vaulve to limit the flow to a few gallons per hour. Estimated flow through main return is about 550 gallon per hour considering the plumbing and head.
The tank has been running about 5 months now with 4 36W PC bulbs. What a difference the MH made! We can start slowly moving the leathers, zoos, polyps and keyna tree corals from the smaller tank.
This has been a long project with many interruptions. We bought some live rock over 5 years ago in placed it in a 45 gallon tank to keep it while we set-up the 90 gallon. Well the 45 turned into a more permanent home than we originally planned. The rock is still in the 45 (most of it anyway) and now can be moved to its intended home.
The cabinet is mostly oak (outer portion anyway) on a pine skeleton. There are 3 parts, stand, back and hood. The back section sits behind the tank giving about 6" of air space where the ballasts are mounted. The hood covers the tank and the back allowing the wiring to be routed to the hood with easy access as the back portion has a small door on each side big enough to get my arm in. I still want to add some trim to the hood doors to match the cabinet doors.
Attachments
Last edited:
Similar threads
- Replies
- 5
- Views
- 337
- Replies
- 4
- Views
- 261