You are using an out of date browser. It may not display this or other websites correctly.
You should upgrade or use an alternative browser.
You should upgrade or use an alternative browser.
120 build started!
- Thread starter pascal32
- Start date
plumbing looks great! your moving fast, not only on the bike
good ideas, i am learning for my basement setup
what size is your sump? will it handle all the extra water, from both the 20gal and 120gal display, when power goes out?
The sump is 40 Breeder 36 3/16 x18 1/4 x16 15/16
with baffles at 9" I have 6 1/2 to the inner lip. Which is close to 18 gallons.
I measured the 120 as 2 1/2" from bottom of return to 1/2" above bottom of grates which is 12.5 gallons. that leaves 3 gallons for each of the 20's
That is worst case. On my 72 i use a locline return which is bent up and back down. I'd be hard pressed to drain more than 2 gallons from it with that bend.
so I'm hoping it will work! Would you like to witness the power failure test :blown: ?

Looks very well planned out,nice builds.
Cant help drool alittle over the bike,more so with the sudden nice weather .
thanks! Most of it is planned - some things just need to fall into place!
haha - I'm i reading into your user name to much assuming you have a Yamaha R1 ?
It's been a tough week to make progress. I was in VA for an awards ceremony over the weekend which was a refreshing break from the day-to-day stuff.
Good news is that the order from glass boxes arrived so off to drill the sump!
I marked the hole and left about 1/2" of space from the bottom edge of the tank. The return pump is going to pull from the tank inbetween the supports for the 20's above the sump.

After marking I added an additional outline along the outside of the bulkhead so that it would be easier to see where I was drilling

plumbers putty and some RO water from the fridge so that the tank feels well treated. off to drill!

I started at an angle and slipped around a bit. once I got the edge in a bit I leveled out and very slowly started drilling away. The cordless Dewalt was on low speed and the trigger was less than half way in. I let the weight of the drill do the work and patiently cut away.

as the end got near I found out that the drill wasn't as level as I thought it was. I had to straighten out a bit which is quite possibly why I still had some chip-out on the back. Nothing the rubber seal on the bulkhead can't handle. Found out that focusing on glass is tough so i went manual. pic makes it look worse than it really is.

Dry-fitting the bulkhead!


So I'm having second thoughts on the dedicated refugium. The initial thought was to keep the return area of the sump large in case the ATO fails. Problem is that i never calculated the salinity change that would go with a several day failure of the ATO. as such, in the event of an ATO failure i would rather stop the return pump and let the powerheads in the tank keep the water moving.
With this in mind I'm re-visiting moving the refugium into the sump since I have space. I would likely place the refugium on the left hand side, skimmer in the middle with the return on the right hand side.
Return water would be primarily directed into the skimmer area, with a 1/2" on a ball valve controlling the refugium area.
any thoughts?
Good news is that the order from glass boxes arrived so off to drill the sump!
I marked the hole and left about 1/2" of space from the bottom edge of the tank. The return pump is going to pull from the tank inbetween the supports for the 20's above the sump.
After marking I added an additional outline along the outside of the bulkhead so that it would be easier to see where I was drilling
plumbers putty and some RO water from the fridge so that the tank feels well treated. off to drill!
I started at an angle and slipped around a bit. once I got the edge in a bit I leveled out and very slowly started drilling away. The cordless Dewalt was on low speed and the trigger was less than half way in. I let the weight of the drill do the work and patiently cut away.
as the end got near I found out that the drill wasn't as level as I thought it was. I had to straighten out a bit which is quite possibly why I still had some chip-out on the back. Nothing the rubber seal on the bulkhead can't handle. Found out that focusing on glass is tough so i went manual. pic makes it look worse than it really is.
Dry-fitting the bulkhead!
So I'm having second thoughts on the dedicated refugium. The initial thought was to keep the return area of the sump large in case the ATO fails. Problem is that i never calculated the salinity change that would go with a several day failure of the ATO. as such, in the event of an ATO failure i would rather stop the return pump and let the powerheads in the tank keep the water moving.
With this in mind I'm re-visiting moving the refugium into the sump since I have space. I would likely place the refugium on the left hand side, skimmer in the middle with the return on the right hand side.
Return water would be primarily directed into the skimmer area, with a 1/2" on a ball valve controlling the refugium area.
any thoughts?
solRNY
New member
nice hole, looks alot better than my cracked 10gal 
i think i understand what you saying, if the ATO float switch fail to level up, then more RO water will get pumped into your system, so how would you know this failure occured? by having a second float switch? probably by this time the RO water has made its way to your display already. i think to help midagate the ATO failure you can put the ATO pump on a timer, or have the secondary level closer to the primary level, or even get a third, maybe a smaller RO resavior?
can you write code for the RKE to do something like this, of course the process for the returnPump should by alot more complex:
if ((atoPumpTimeOn > 5min) AND (primaryFloatSwich = 0FF)) then returnPump = 0FF;
Willistein
Active member
Looking good!
I've seen a solution to the ATO stuck on scenario. Basically you have a small compartment of the sump that the ATO dumps into. The small compartment in the sump is connected to the rest of the sump with a couple very small holes to limit the water exchange. I'm talking 1/8" diameter holes or so. Now when the ATO gets stuck on the small compartment fills up, the small holes can't keep up and the water level reaches a bulkhead that runs to a sink or floor drain. While the small ATO compartment eventually becomes all fresh water, the small amount of water exchange through the 1/8" holes limits how much fresh water gets to the tank and gives you days to notice the problem.
I know someone who lost a ton of corals because of an ATO getting stuck on and he did this with great success.
Hope that makes sense. I had a drawing of it somewhere if you want it.
Willistein
Active member
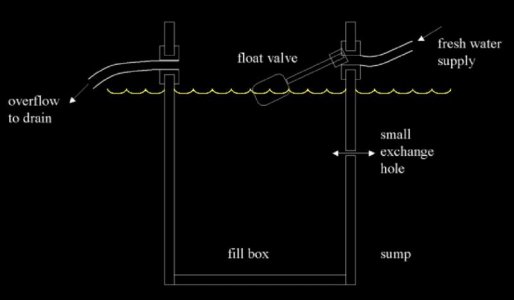
here's a pic:
That is a neat idea, though I question how well the RO/DI would mix.

Willistein
Active member
Nice, looks like the same tank I ended up getting - Marineland, right?
The top off thing works perfectly, even if the small chamber stays almost completely fresh water it doesn't matter. Not sure what you mean by mixing? As the sump requires water it will slowly flow though the tiny holes and mix in the sump. it's no different than a 1/4" line dripping into your sump.
The top off thing works perfectly, even if the small chamber stays almost completely fresh water it doesn't matter. Not sure what you mean by mixing? As the sump requires water it will slowly flow though the tiny holes and mix in the sump. it's no different than a 1/4" line dripping into your sump.
After a little bit of drama with the current 72 tank work continued on the 120 build!
My wife graciously offered up the crystal display china cabinet as the new home for the 120. The location is nice, the major downside is that the tank will be centered between supporting walls and is running lengthwise with the joists. additional support will need to be added.
with the china cabinet moved, first order of business was to mark the exact location of the tank in the basement. I selected roughly centered on the tank and used a trick the alarm installer showed me. The nice part about this is that you can do it through almost any material and no-one will ever see the hole.
take a copper coat hanger and cut a straight piece as long as you need/want. on one end cut at an angle with a set of wire cutters. Intall the other end into your drill and you have a really long drill bit for free")
after checking for electric and plumbing I drilled the marker hole.


As with any good project there will be obstacles. The wall behind the tank is obstructed by a heating duct. I should have realized this as I put it there when i cut back the wall 2 years ago to open up the front entrance of the house.

I ran a second hole straight down to mark the closest point to the wall I could be once the stand goes in.
I was hoping to run electric through the wall, but no such luck. As an alternative I am going cut back some of the carpeting near the wall and run through the floor for water and electric. When we move down the road I should be able to put the carpet back with minimal visible impact.

and finally drilling of the holes for two 1" lines and electric

My wife graciously offered up the crystal display china cabinet as the new home for the 120. The location is nice, the major downside is that the tank will be centered between supporting walls and is running lengthwise with the joists. additional support will need to be added.
with the china cabinet moved, first order of business was to mark the exact location of the tank in the basement. I selected roughly centered on the tank and used a trick the alarm installer showed me. The nice part about this is that you can do it through almost any material and no-one will ever see the hole.
take a copper coat hanger and cut a straight piece as long as you need/want. on one end cut at an angle with a set of wire cutters. Intall the other end into your drill and you have a really long drill bit for free
after checking for electric and plumbing I drilled the marker hole.
As with any good project there will be obstacles. The wall behind the tank is obstructed by a heating duct. I should have realized this as I put it there when i cut back the wall 2 years ago to open up the front entrance of the house.
I ran a second hole straight down to mark the closest point to the wall I could be once the stand goes in.
I was hoping to run electric through the wall, but no such luck. As an alternative I am going cut back some of the carpeting near the wall and run through the floor for water and electric. When we move down the road I should be able to put the carpet back with minimal visible impact.
and finally drilling of the holes for two 1" lines and electric
With holes in the floor it's off to plumbing. A local reefer strongly suggested use of spa-flex. at $2.20 a foot it's not cheap, through the ability to arc the piping will reduce loss through the fittings. I headed to Lowes who carries the product. Turns out they had one 30 foot length and one 19. Not ideal since I needed two 30 foot lengths. I talked them down to $1.50 a foot and loaded up the cart.
NOTE: the clay Lowes only stocks 1" spa-flex. the Cicero Lowes carries 1" and 1.5"
The piping is flexible for what it is and went in surprisingly easy
For electric I made a nice discovery. Lowes sells armored cable with the copper wiring already in it and it is very affordable. When i put the panel in by the sump I fished through stranded 12/2 which was tough to fish over a 12 foot or so length, this run is about 20. The armored cable is needed as I will be putting the electrical outlet for the dedicated line inside the cabinet due to the heating duct obstruction noted earlier.
Added baffles to the sump. The left is a very small refugium. the center is a very large skimmer/GFO/heater area and the right is the return.
baffles ar 1/4" glass. three of them have polished edges, the fourth I sanded the sharp edge with emery clots to smooth it out (works very well!)
I realize this is not an ideal sump design. in a year or so i will probably re-do with a center return area.

baffles ar 1/4" glass. three of them have polished edges, the fourth I sanded the sharp edge with emery clots to smooth it out (works very well!)
I realize this is not an ideal sump design. in a year or so i will probably re-do with a center return area.
Similar threads
- Replies
- 19
- Views
- 966
- Replies
- 3
- Views
- 419
- Replies
- 8
- Views
- 703