300 gal reef re-do

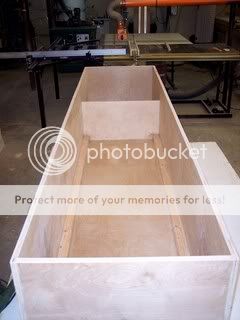
Power Point simple sweet and efficent. I love the bigger sump.

I think your manifold will need to be higher. I am sure Johnathan will enlighten us. WHile you are at it Johnathan If I put my OM4 above the tank form my return will that work like a manifold to avoid the drain. I think I have something wrong in that plan. Sorry to Hijack Pcostanzo. You can reply on my thread if you have chance Johnathan.
 
Eric: OM4 does not make a manifold to help reduce the risk of a flood unless all ports go to nozzles above the surface of the tank water.

As far as the plan above, the left bubble trap will also trap detritus. If you feel you need baffles, I would only use two, the right one and the middle one, and leave room so that you can vacuum the entire area.

I would also put a ball valve on the right end of the manifold for later expansion. You never know when you might squeeze in a frag tank, etc. and one extra like shown is not enough IMO.

As far as manifold placement, it all depends on how the returns are built into the tank. We have already discussed this via PM and I think it's OK based on our discussion to have it wherever it is convenient.
 
I would love to do it with no baffles and just short 1/2 baffle on each side to keep the sand separate. Do you think the bubbles will disburse over the 8 feet? I know I had to have them in my 4 foot sump.
 
well, don't get me started on the sand now! :lol: I would guess that just out of the 3 baffles on the left, just using the right one alone would be enough. If it doesn't work well, you can always drain it and put another one in you know. :)
 
thanks :D awh cmon Jonathan he was just asking :cool: . you don't think the chiller return back into main display would be better then keeping the display temp stable. should this be better then sump temp stable.
 
Bart- Thats the way I have it now returning to the display. Actually I just disconnected it yesterday to start re-plumbing (I was inspired after seeing your plumbing picture again.) The Chiller takes a more reduced flow to work efficiently. I can dial it back to under 1000gph and keep the 2 return lines as high as possible to maximize flow back in the display. The sump and tank should exchange enough to keep them both the same temp. I can monitor both and make any adjustments.

Jonathan- Thanks. Thats the way I will start and we'll see how many bubbles make it. Once the macro grows in, that should help. Also I will drain it through fiber cloth, that should help. I just ordered that washable stuff from Aquatic Ecosystems.
 
UPS guy came

100_1445.jpg


100_1421.jpg
 
Here's the real fun part. Since I am a cabinetmaker, I decided to make my 180gal sump from wood. I've seen this many times and years ago I built a utility sink like this. I had the wood and equipment, a friend down the street from me is a boat builder so I got some West Systems epoxy from him. I will topcoat the inside with "fish safe" epoxy I ordered from Aquatic Eco-systems. Here it is before the epoxy and fiberglass cloth goes on.

Wood for sump and new sump stand

100_1422.jpg


Built and sanded. Ready for Fiberglass

100_1446.jpg


100_1447.jpg


I will have only 1 baffle in the front to separate the skimmer area

100_1448.jpg


I left the rest open. I am going to forget about the sand bed and fill with live rock and macro
 
Here you go Nexdog. Sorry about the glare. The live rock is attached to pvc with zip ties. Then anything visible was covered with Thorite to blend into the rock.

100_1449.jpg
 
Thanks Bart. The sump is 96x24x18. Oh, thats a Powermatic in the back. It saves a lot of time when you have to cut down 20-30 sheets of plywood for a project.
 
Thanks guys

Sanosuke- The plumbing parts are from www.savko.com Those are the sch 80 valves and bulkheads.

Eric- Its 3/4 birch. I have a ton of this stocked in my shop for cabinets.

Bart- The sump is 96x24x18. The skimmer section is 24" before the baffle. The large 72" section will hold live rock and macro. So far I cut the sheets down to size, glued all seems with construction adhesive and screwed with 2" deck screws every 3". I reinforced the seam with 2x2 glued and screwed from the bottom and side. I filled the exterior screw holes with epoxy. Today I will start to fiberglass. I will post photos later on.
 
Back
Top