Acrylic fabrication questions? I can help!

For the valve, this is a piece of equipment that you don't skimp on. Get a spears dual union ball valve or a gate valve. you only need one, just for the siphon. Spend the extra money you will be happy you did, trust me.

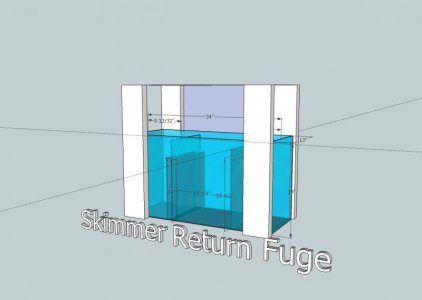
As far as the top goes, the reason I asked if you didn't care is that in order to make the top opening bigger, you're going to have to reinforce it. The first thing is that slot cutout in the back is ridciulously small, not sure what purpose that was supposed to have served unless you wanted to use your kid to reach in and get something. But expanding that out is going to weaken the structure, so I would plan out how big and where you want the cutout to be, then I would expand the existing hole to that size and then laminate another piece of acrylic over the top of that new hole. You should not need to laminate across the entire top, but if you did, you might also be able to expand the larger opening.

I would need a top-down shot to see where you could expand to and what new euro you would want to laminate on to it.

As far as making it look pretty, it is easy to give it the nice polished edge look afterwards.

you will need some scrap acrylic to double-stick-tape (intertape brand) to the inside underneath and then a 1/4" flush trim bit (spiral upcut, if you can get it) to make the cuts. Don't freehand it - asking for trouble IMO.


Turbo knows acrylic well. Good advice from him on your original thread.
 
Hi! I'm planning on building my own sump (after many years of living with a bad modded glass sump). The design is below (except smaller details like an intake trap and a few probe mounts). Basically, the footprint is 34"x13"x19" and it will be filled to about 14" or about 26 gallons of saltwater (excluding rock, gravel, etc).

My question is do I need to use 3/8" Acrylite FF for this, or would thinner acrylic (with/without a lid/brace) be sufficient? If so, how should I design the lid/brace?

Any other comments on the design are welcome (I'll probably make the return section smaller and do an automatic topoff). Thanks in advance!
 

Attachments

  • 70gal-tank-stand.jpg
    70gal-tank-stand.jpg
    28.4 KB · Views: 5
With the baffle where they are, you can probably do this with 3/8" extruded with no problems, if you go down to 1/4" it should be OK as well, but the incremental material cost is really negligible to go to 3/8".

A brace is optional, but will really strengthen and solidify the tank, even if it's only a thin perimeter brace. extruded is probably fine vs cast, it will bow more though.

Just make sure you follow good construction techniques: prep edges properly, square the end pieces properly, clean edges before bonding, bond using the pins method and allow for a lip for fillet & flush trim, and allow joints to cure for the proper amount of time prior to handling.
 
Your reading just about the only place all this information is disseminated. Go back to the beginning of this thread (there are 2 splits, 3 threads) and take a few weeks to read it. Better than any "book"
 
There are a few videos on You Tube about acrylic tank construction using solvent and a few pdfs about plastic fabrication out there but essentially thats it.

Ive found nothing on building big tanks using material over 1" with polymerizable cement but have met several others who build this way. Most fabricators safeguard this information although the processes involved are pretty straight forward.

I had to learn thru experimentation, trial and error and by piecing bits of information together over the years.

As mentioned earlier, if you have questions this is the thread...
 
I havent seen/heard James around in awhile.

I've got a few things Id like to ask him regarding the thicker stuff and 40/42.
 
Ok I got this quote from reefs dot org where James chimed in 2006 for materials 1.25"
........

You can use either 40/42 or solvent, some of this will depend on how precise you can machine your pieces. If you are able to machine your pieces +/- .005" or so - you can use wires/pins. We use the exact same process for solvent gluing this thickness as 1/2" so that part doesn't change - just the weight and manageability of the pieces.

If you cannot get the pieces machined that closely, then 40/42 is the best method.

If machining is good then between the two above processes, use the one you are most comfortable with. Both will work just fine.

I would *not* use #16 for such a tank at all.

BTW the "pins" method *is* the capillary method - just using surface tension to wick the solvent along, the wires or pins just make for a larger gap.

Out of curiosity, what are the fill dimensions of the tank and what size are the flanges / crossbraces.

HTH?
James
 
Last edited:
If you want to write out your questions, I'll ding him to jump in and respond. He has a lot on his plate right now. I would probably like to hear the answers as well.
 
Floyd,

I would like to also hear from Jame regarding bonding two pieces of acrylic side by side. I know two others on this site that did a 12ft tank. They both bonded a 8ft and 4ft piece to form the 12ft piece.

I read both threads and would like more info on this process. Would a 42Gun work better with this type of application or could we use 40? I would think the 42Gun be easier to apply.
I would love to see how this is done.
 
I would love to see how this is done.

Based on the threads that I have read and the pictures (definitely worth a thousand words), it seems fairly simple.

Do a straight cut or a 45 degree cut on both sheets. Make sure they are aligned properly (which i guess is the hardest part and takes the most prep time). Tap up the sides so that not too much 42 leaks out and makes a mess. Apply 42 and let dry. Buff is many, many, many times till clear.

But would like to hear from James on tips and tricks to make it as perfect as possible.
 
Thx Floyd. Id like to hear James advice on this also. Seaming thick material using polymerizable cement seems to be like sorcery (the dark arts) with little to no information out there. Hell..., there's more information on how to build a time machine or light saber. Thank's for asking about it. Hopefully we can all learn more about this from an industry perspective.

Im actually planning this now using the gun to mix 42 to seam two 8x4 sheets end to end to form one 16ft sheet. Each of the ends has been milled 5 degrees using a CNC router. The material is 2.250 thick.
The ends will be butted together leaving about 1/16th gap at the bottom of the V. The void is then cast with 42 and overfilled using aluminum foil tape to form the dams. After the cement is dry, the sanding and polishing begins. Using granite slab lifters, gantry cranes and two 45 degree hinged tables to maneuver the panels. Each weighs around 500lbs.

My question is: Will the small machine marks left by the cutting bit effect the clairity or will 40/42 fill in the irregualities caused by the bit and render these invisible when dry. Since it's cement Im hoping the small ridges will give the cement something to "bite" into and still provide an optically clear joint when dry . Or should I scrape them perfectly smooth? If this was solvent , I know it would need to be perfectly smooth. But its not.

On smaller projects, I've used the gun to squeeze 42 into a syrenge and apply it that way. Have found this helps alleviate some of the bubbles. I've heard of mixing 40 in a small bottle and spinning it with a drill as a centrifuge to remove bubbles also but havent tried it. The applicator gun method works pretty well so far.

dattack:The edges can be kept within those tolerences, however the weight of thick material increases the chances of breaking a wire off beneath a panel in addition to air pockets forming from the greater surface area. Pulling pins on a 16ft section of thick acrylic is tricky business. Im not skilled enough to even attempt this.
 
Last edited:
Phixer,

Why did you decide to join the sheet with a 5 degree cut? The two members that I know of that made a 12ft tank, one did a straight 90 degree bond and one did a 45 degree bond.

Is there any reason for choosing the straight 90 degree or in your case 5 degrees
 
super, because if you bond 2 surfaces directly together with WO40 such that they are a "perfect fit" the joint will push out the WO40 and you will end up with a dry joint.

If you read enough of this thread, you will see references to angles on the pieces to create the void. This I believe is the proper method. It is in this thread, you have to really search for it though. Try using the search function on this thread only for the term "40" or "42" and you might find it, also go back to the splits I think it's buried there.

Phixer, in reference to you question here is what James e-mailed me

> James, I got my acrylic back from the fab shop today.
> It's 2.250 Polycast and was machined using a CNC router.
> The edges came out pretty good but are a little rough with some very small pits.
> Im able to scrape the edge down about .010 and remove them but this is a lot of work.
>
> Will this matter if I bond the edges with 40/42?
> Will it fill in these tiny pits to produce an clear seam or should I continue to scrape the edges smooth?
> Im concerned about it crazing later on.

we don't worry about crazing on simple machined parts, and no amount of sanding or scraping you do will *anything* to alleviate potential crazing locations. Crazing is simply not an effect of surface preparation in and of itself, nor lack thereof. Crazing is the material relieving itself of excess accumulated stresses in the material.

Pitting is generally from @#$%-poor workmanship by whomever set the CNC's cutter and feed rate, and possibly from the condition of the cutter. Either the fab shop used the wrong cutter or the wrong feed rate.. but in my honest opinion - CNC routers have no business machining 2+" material, it's not their intended purpose.

That said, the pitting will leave air inside the pits themselves and when you apply the 40/42 - those air pockets will manifest themselves as air bubbles making for ugliness.

Choice is to either sand it all down or take it to a good fabricator who can simply run through a good router and give you good edges.
 
Back
Top