Acrylic fabrication questions? I can help!

Is it just me, or is that tank friggin huge?

Well, our pacu are huge. At 5'1", I'm vertically challenged and need the step ladder to get in and out of the tank.
stepladder.jpg


My husband and stepson built a large addition to the house for the 15' x 4' x 4' tank. BTW, the stand is constructed with 3 1/2" tubular steel. We had to haul it an hour away to get powder coated.
t-2.jpg


After 4 years of planning, illness, surgeries of the principal players, many delays and corrections and redos, our backgrounds are almost ready to finally be installed. I wish I had removed the paper on the acrylic five years ago :(

tank3_zpss14gumbi.jpg
 
Wow.

Well, if the paper is that hard, I am thinking that you might have to sand and buff. Fortunately this is not a horrible process but it's a bit of a pain. Done right it will look brand new.

Is the damage limited to only a specific area? Looks like back panel, bottom edge?

James, any words of advice beyond sand and polish?
 
On a totally unrelated note: James, got a question for you:

Rimless acrylic tank of 36" x 20" x 12" - What's the thickness to use?
I'd use 3/4". 1/2" will hold but bows more than I like to see.

James, any words of advice beyond sand and polish?
Actually, the GooGone has served me pretty well over the years for this. However, I would definitely try on a piece of scrap first. There are a coupla varieties of GooGone it seems, and seen one of them craze acrylic, just can't remember the kind or reason.. but worth a try :)

Another thing you might try is a little heat, perhaps from a hair dryer, not a heat gun - far too hot. The heat seems to loosen up the adhesive. We used to put smaller parts in a microwave to remove *old* paper.

HTH,
James
 
Wow.

Well, if the paper is that hard, I am thinking that you might have to sand and buff. Fortunately this is not a horrible process but it's a bit of a pain. Done right it will look brand new.

Is the damage limited to only a specific area? Looks like back panel, bottom edge?

James, any words of advice beyond sand and polish?

top of the tank/external overflow boxes are the worse :(

Most of the top, the two sides are covered with a nasty white paper which is dried on. The back has some brown paper which peels off nicely in addition to areas of the nasty white stuff. Luck that the front panel was 3/4 covered with brown paper.

IMG_20160520_103000196_zps460hmwmy.jpg


IMG_20160520_103239609_HDR_zpssapynxcj.jpg
 
Last edited:
I've always heard kerosene will dissolve the glue through the paper and not hurt the acrylic, though I've never tried it. And since this is already indoors I'd be even more hesitant.
I've had the best luck with heat, a plastic scraper and lots of patience. I use the Goof Off for Plastics to get the last bits.

Sent from my SCH-I545 using Tapatalk
 
PM kalk reactor repair

PM kalk reactor repair

So I purchased a used kalk reactor off of flea bay a while back. When I went to use it I noticed that the joker I bought it from had siliconed part of the mixing pump back to the acrylic cylinder. I have spent a bunch of hours cleaning that off and removing the clear glue from PM that held the piece in place using a grinder - doing a little bit at a time to keep from heating the acylic to much.

This is what I am left with... no cracks in the acrylic, just a scratch from the grinder that looks like one...

IMG_4502_zps62iug73v.jpg


IMG_4503_zpsp45bybq3.jpg


IMG_4504_zps92wfmqvb.jpg


So my question is what is going to be the best way to reattach this pvc plumbing piece back to the acrylic tube and is there any additional prep work I should do?
 
You could also ask the manufacturer


Thanks everyone for your responses. Today I contacted FishtanksDirect and spoke with the owner. He forwarded my emails and pictures to Sun Coast Aquariums who built the tank. The owner of Sun Coast called me. He said that Goo Gone is what they use, and that it will not hurt the acrylic. He answered a lot of questions I had, regarding using epoxy in the tank.
 
IPS Weld On 40, it will attach it just great!

I happen to have 42... at first I was thinking 10 but the scigrip selection chart says 16 or 42 for pvc to acrylic.

The only thing I guess that still concerns me is if I got all of the silcon residue off... I can't believe that knuckle head did that and that I'm blind enough to have missed it on initial inspection...
 
yeah I'm going to use the 42... but have to get a new dispensing gun first. The gun I bought from SD Plastics is definitely not for WO42... Here's hoping that they will own their screw up and exchange for the right gun..

I purchased it back in 8/14 and then got unemployed for a while..so put all of my projects on hold... now I bought my 50ml tubes of 42 and....

no fitty... tube won't fit in dispenser and no way one of those plungers is fitting...


I think the wrong gun was in the box...
 
Thoughts on this tank RC, it is a 6-7 year old 8x2x2 Abyss Systems tank. It is .5" acrylic all around with corner overflows. Some scratches, but not much bowing at all. The tank does look like it is bowing lengthwise due to no water in it (8th or 16th of an inch).

A local member is selling it, I still have to find a place for it in the house. Posting since i've never had an acrylic tank and curious about the seams.
 

Attachments

  • IMG_2721.jpg
    IMG_2721.jpg
    40.4 KB · Views: 4
  • IMG_2722.jpg
    IMG_2722.jpg
    36.2 KB · Views: 6
  • IMG_2723.JPG
    IMG_2723.JPG
    94.5 KB · Views: 4
My thoughts on this:

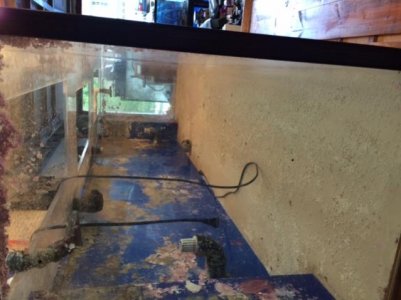
The corners on the cutouts are very small radius, meaning the stress is going to focus here and it's going to be prone to cracking out here. This is probably the #1 mistake made when doing the euro cutouts

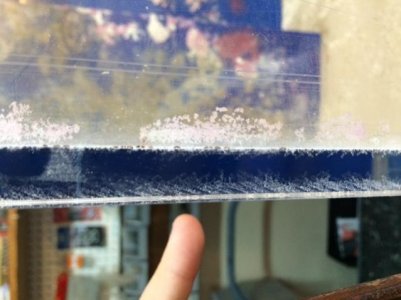
In that 2nd pic, the seam looks like it is starting to fail, either that, or it wasn't very good to begin with. The pattern of air however is not what I normally see with a seam that is coming apart, but rather it looks like the edges were not routed but rather saw cut, because you can literally see the saw cut pattern where the air bubbles or crazing has occurred (hard to tell, low res pic)

Used acrylic tanks are a gamble because what happens is that a tank will settle into the stand that it's on and all it's imperfections. It will adsorb water and expand slightly over the first 4 months. When you take the water out this process reverses somewhat. and the tank can change shape a bit. If you then take that tank and put it on a different stand (even a better one) then the tank can go through another settling process and all of the stress that it was "used to" has now changed, and that could (repeat, could) result in some kind of failure down the line. The advice I typically give with used acrylic tanks is therefore to get the stand that came with the tank, or at least, get a really good look at it and make sure it was done right so that if you build one right, you have a much better chance.

Overall though I would walk away. That seam raises many red flags about the construction of the tank, or the stand that it was on (something has resulted in undue stress somewhere)
 
Back
Top