Acrylic fabrication questions? I can help!

Safety Precautions and Temperature

Safety Precautions and Temperature

James, and anyone else who knows, I have some questions.

First, related to safety. I have noticed that the worst smelling procedures are not the solvent welding (except for the acetic acid smell) but rather cutting and routing, in particular flush trimming and routing teeth are particularly noxious. I got hold of a top-of-the-line respirator, as well as some chemical cartridges. What I noticed is that I don't smell a thing while wearing the respirator, and the second I take it off I can smell that smell and woo hoo does it smell. This tells me that I made the right choice in getting the respirator. Is there a particular cartridge (brand or type) that should be used? I'm pretty sure I got the right one, because the smell is gone, but I suppose that doesn't mean everything is getting filtered out.

Second, I live in a cold winter climate. Today when I got up, it was 27F. Supposed to get a snowstorm on Monday. I currently do everything in the garage, so old man winter showing up is screwing up my shop.

You have mention in this thread that ideally you like 75-80 temp and low humidity, and that colder weather makes for more brittle joints. I am wondering exactly how much of a concern this should be. I have AA to add in, so I can slow the bonding time to compensate. Does this mostly resolve the potential problem, or is there a minimum temperature that needs to be maintained no matter what?

Lastly, combining these two, I am currently looking into space heating. The wife's Dad gave us one of these portable electric fireplaces (not just a cheapo plastic space heater - this one is really nice, but we have no place for it - yet) that uses little energy but gives off a lot of heat. My concern is that any heating technique in conjunction with whatever is offgassing from cutting/routing/welding would potentially increase some kind of health and/or safety issue. Are the gasses release something that could be flammable, or made worse if passed over a heating element, even a low-power one?

I will probably be installing some kind of exhaust vent and fresh air intake system at some point, but I wanted to hear input on this anyways.
 
Floyd,

Either I can't smell it anymore or you're doing something different than I, as I really can't smell acrylic at all when working with it - at least not to the point of it being pungent. Acrylic does have a distinct smell, and every brand/type is a little different. Do you have dust collectors working on gathering the shavings and dust?

As for temps, the shop is 70-75 all year, 24/7 unless it's warmer in the summer. And yes, this is a concern and adding more and more acid doesn't work. The material needs to warm and the gluing has to be done in a warm environment.

Any off-gassing from MC or AA won't harm anything more if warmed within limits. Certainly getting these to 800F will hit a flash-point but standard heaters won't hurt and lotsa shops use strip heaters and ovens, so nothing to worry about in this regard. We've used propane blast heaters in the shop before - no problems.

James
 
Hmm. This really is screwing things up for me now. I dug up an old post of your from the RC archive, 7/10/2004 http://archive.reefcentral.com/forums/showpost.php?p=3150996&postcount=1408

Cold weather/material produces weaker, more brittle joints. The solvent works by a chemical reaction breaking down the material, the warmer the weather/material - the more chemical reaction thus more "breaking down" of the material. When the weather is colder, I add more acid, slowing the reaction down just a bit to allow more reaction time. On colder days, you can lengthen the soak time as well, but this can produce more ooze and or solvent runs which is not wanted.

Some solvents "blush" when the air is humid, in these cases the joint ooze can start to turn white. I'm not sure of the exact reasons for this, my guess is it has to do with moisture and evaporation rates. But by adjusting tha ratios of solvents used, this can be avoided as different solvents evaporate at different rates and the amount of acetic acid in the solution affects this greatly as it doesn't evaporate quickly by any means.

If the weather is too warm, then the absolute humidity goes up (warmer air holds more moisture) and this can cause blushing as well.

For 99% of all projects much of this is a non-issue in reality, but some projects/customers (esp museum exhibits) are very picky.

It can be a fine line and it ends up being kinduva "feel" thing. I find the the best temp/humidity to be right around 75-80F and low humidity.

James

That's what I was recalling when I mentioned adding acid. So when you say "on colder days" I guess this is relative. How cold it "cold" when it comes to acrylic?

What effect will working with materials at 60 degrees, for example, have with respect to joint strength?

With a solvent welded joint, is there any way to tell just by looking at it whether the joint is not good enough due to bonding under too low of a temperature?
 
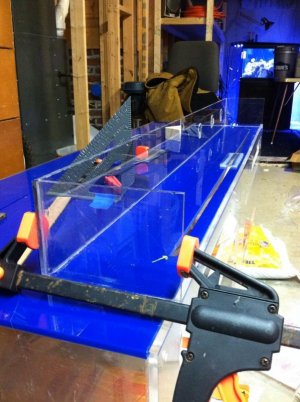
The tank is used. I was thinking of doing it in the back center of the tank. I'm not quite sure if I want to do a slot or punch a few holes to allow water to flow from the inside weir to the external overflow. In the external overflow, I will be adding the "bean animal" style plumbing. I've attached a picture showing how the top brace of the tank looks.

Sean, I'm attempting the same thing that you are also considering. See the attached photo.

Floyd R turbo, I got ahead of myself and cut a slot along most of the back of the tank and had to go back and weldon a piece of acrylic reinforcement. You can see it in the photo. I may need to reinforce more in the end, we will see.
 

Attachments

  • photo.jpg
    photo.jpg
    76.9 KB · Views: 9
mls228,

It seems from the picture that you are attaching the pieces directly to the tank. I was thinking about making the box first and then attaching the entire box onto the tank. Any reasons why you chose to do it your way as opposed to making the box first?
 
Last edited:
Sean, that is what I would have done too. Not saying there is only one way to do it, but better to make the box and make sure those joints are solid, then adhere to the tank. That way the flat panel you are bonding the edge of the box to is facing up, and you can wick the solvent in.

mls if you try to put the back panel on the top of the box after it's built, with the tank in the position shown, you're going to have a hard time getting the solvent into the joint since it will just run down the vertical walls. How did you plan on doing it?
 
Sean & Floyd,
Both great comments. This is my first time working with weldon and acrylic. I didn't realize that gravity could pull the thin weldon out of the joint like it does. I'm considering standing the tank up to it's normal position and jigging it that way. Also note that I've followed up all joints with a bead of Weldon #14 (or whatever the thicker number is).
Wish me luck this weekend. I'll follow up.
 
That won't make the situation any better, maybe worse even. This is assuming you're using the pins method to force a gap for the solvent to wick into - the solvent will run right out of the joint. You can wick the solvent into a flush joint, sure, but you'll end up with tons of tiny bubbles most likely, and the joint will usually not be as strong as it could be.

The flat panel (that the edge of the other panel is being bonded to) needs to be facing up. So your joint to the back of the tank is in the right position, it just would ahve been better to have been done last. What really needs to be done is to have the tank on it's back, with the box now facing down, then you need to rig up something to keep the box back panel flush enough with the edges of the bottom and sides of the box so you can wick in the solvent, then push it up to close the joint (after you remove pins) like with shims or something. Laying the tank on it's back on a flat workbench should do the trick, then a shorter bench under the box's back panel.

#16 is what you are talking about and it's not really a gap filler, it evaporates out to the same profile as #3/4 essentially. You'd be better off with a slightly oversized back panel and using pins method to get a good fillet, then flush trimming. If you can't do that, your joint will probably be ok, probably.
 
I am using the pins method, I have a bunch of tables in my work area down there. I'll look to orient the tank as you suggest. These details become more apparent now that I have worked with the solvent more. Thank you.
 
Glad to help. Using the pins method will get you a long way towards doing it right, so you've got that going for you.

If you end up with any joints that look in doubt, even after the #16, you can always add a gusset in the corners. Better to do that before you put water in it. Just make sure it's in full contact with both adjacent panels and the bead in the corner is not pushing the gusset out of place.
 
Hmm. This really is screwing things up for me now. I dug up an old post of your from the RC archive, 7/10/2004 http://archive.reefcentral.com/forums/showpost.php?p=3150996&postcount=1408

That's what I was recalling when I mentioned adding acid. So when you say "on colder days" I guess this is relative. How cold it "cold" when it comes to acrylic?
Correct, it is a relative term. To me, 70 is cold for acrylic acrylic gluing. Not saying it can't be done, but for best performance, material and ambient temps should be 70+
Adding more than 10% acid is bad for a coupla reasons; it makes the joints look "grainy" and may craze the material as the reaction may overstress the material.
What effect will working with materials at 60 degrees, for example, have with respect to joint strength?
if you're asking me to be definitive and quantify it, I can't. The colder the material is, the less the solvent will bite into it.

With a solvent welded joint, is there any way to tell just by looking at it whether the joint is not good enough due to bonding under too low of a temperature?
yes and no ;) Yes, if compared to a "normal" joint - the joint can look worse. But to the untrained eye - may be no difference at all.

Gluing acrylic cold can still work, just won't be *as strong* as a "warm" joint.

James
 
Last edited:
So far, I haven't added much more than 5% AA, but I've watched the joints very closely, and I think I know the 'grainy' effect you're talking about. It seems to get clearer as the joint cures, but if I look really, really closely, I can see it.

So, I guess the only way to tell if a cold joint is strong enough is to test it.

So, on that subject, if I've got a nice, clear, bubble-free joint like this one

DSC02955.jpg


which was set below at or 70 degrees, IIRC, with no more than 5% AA, no crazing, and only a little 'grainy' look to it, if that joint fails, is it going to be a catastrophic type failure, or will there be signs before it start to happen?
 
depends on the load.. generally speaking, joints will almost always tell you before they let loose.. but if the load is heavy enough, that tell-tale sign will happen quickly.

James

Just to add... built properly, our tanks will *never* see the pressures required to pop a joint catastrophically. So while your cold joints may not be as strong as a warm joint, that doesn't necessarily equate to a popped joint. Hope this makes sense :)
 
Yes I remember you stating that before in reference to the weld-on 40 joint strength vs solvent topic. That does put my mind at ease somewhat, but I will be firing up the space heater. I'm a bit of a perfectionist...I guess that's a good thing in this regard!
 
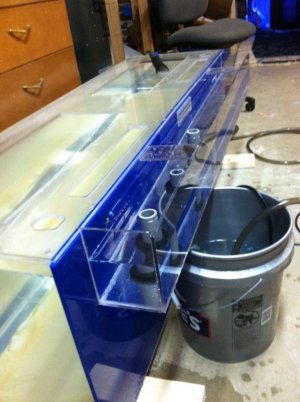
Everything went well this weekend despite the order in which I assembled the overflow. Thanks for everybody's suggestions. I ended up leaving the tank on it's face and lowering the final panel on to it. I ended up with very few bubbles. The joints look hazy since I liberally applied weldon #14 to all of the seams.
 

Attachments

  • photo.jpg
    photo.jpg
    61 KB · Views: 7
So quick Acrylic question, is it true Acrylic will absorb some water and expand? If so how significantly?

I ask because I'm going to be attempting to use Acrylic pressure locking baffles in my sump. I realize some poeple have tried them before and not had much luck getting them to lock in place over any significant period of time but I'd like to at least try them out at first until I'm happy with how my sump is setup.

If it doesn't work I'll just silicone them in and I'm out $5 of weather stripping, no big deal, but what I'm really afraid of is waking up one morning to a sump that's exploded out due to the Acrylic absorbing water and cracking the glass.

Is this really a significant risk? If it is would it possible plan for it with a slightly smaller cut and to pre-soak the baffles before placement?
 
From my experience the pressure lock doesn't work with wide sumps. I felt like I was really forcing the baffle in there. Well at 18 inches wide and about 12 inches of water the pressure was such that the baffle bent and popped free. Now I may not have used the best material (I got it at HD and now realize it may not have been the best), but if your material bens much IMHO it won't work. IIRC the expansion is 1% or less, but someone will correct me if I am wrong.
 
i've done a few smaller acrylic projects like sumps and overflowes and i have decent tools,table saw,router,ect and i know how to use them so now i'm thinking of building my first tank. i want a shallow lagoon type tank probably around 24x30x14, it will be viewd from the top so i'd like to make it rimless with mabie some corner braces and one or two corner overflows. so i have a few questions before i get started, i can get cast acrylic localy but would like to know what brand you recomend for this project, it's been a few years since i did any reaserch on this so i'm not very current. is my rimless plan realistic or will i need more bracing? what thickness material do i need? i was just thinking of having my distributor bend a 14 inch wide strip into a square leaving the last corner square for the seem and this corner will be wear my overflow will be, what do you think of this idea? it would save me the trouble of joining three corners and i like the idea of rounded corners
 
Back
Top