Acrylic fabrication questions? I can help!

Interesting I grew up in Brooklyn park. Thanks! I'm going to give them a try for sure.

So should I do 1/2" on the bottom and 3/4" for the sides since I'm going 12" deep? I was planning on going rimless.
 
I originally built the tank per spec for an LFS here in town and bowed like crazy and started to crack out in one of the corners so we added a coupla crossbraces to it and it lasted several years until the shop shut down a few years ago. All in all, the tank lasted probably 10 years or so. The tank was 72 x 24 x 12", 3/4" vertical walls and 1/2" bottom.

As for deflection tolerances, you're wise to keep them down. The more a tank bows, the easier it is to scratch, and since scratches are the biggest complaint with acrylic - best to keep the deflection to a minimum. I shoot for 1/8" total deflection but can live with 3/16". And when you build tanks to a tight deflection tolerance, strength is inherent so we don't have to worry about that *as* much :)

James

"Started to crack out in one of the corners"...see this is certainly a good element of acrylic at least...it didn't catastrophically fail all of a sudden...it gave warning and was rectified to last a good long time. This actually worries me somewhat though as one of my clients, a LFS in VA, has several rimless frag tanks built by another builder that are I believe around 60" long, 36" wide, and 16-18" tall and they are built with 1" acrylic (Polycast). I will have to now check what their deflection is to see if we need to do something with them.

I couldn't agree more on the deflection to a minimum. As said this is particularly my goal with the Saltwater guys since they generally have more substantial amounts of cleaning/scraping to do. But overall I prefer keeping it as low as possible on all builds so I sleep better at night =).
 
Depends on how many you are going to do and how much bowing is "acceptable" to you. Personally, if it was just 2 then I would do them at 5-6". If doing 3 then 3-4" would likely work just fine.
 
Also haven't seen one more than a year or two old that wasn't scratched to H-E-Double hockey sticks.

I should see if I have pics of this tank when I took it over. N > 800, P >10.0, and looked like Zorro had attacked it. Up and down all across the front. It was my first attempt at sanding & polishing. 40 hours later, I now know how not to do it

+1 on James' mention to do BEFORE you build the tank. Cutting off a whole side of a tank cause you goofed is not fun. Also, routing a slot in 1" thick acrylic is a hair raising experience. That acrylic looks so sweet and innocent until you start digging away at it with that router and it can become pretty violent if you don't have your material properly secured.

Of course make sure you make a good template out of MDF FIRST for machining the slot. Use a flush cut bit and route out all but the last 1/16 or so FIRST then make a second pass to get the rest and give you a nice edge. Have your template attached to the material with strong double sided tape (I use double sided carpet tape) and don't skimp on the tape. You don't want the jig "walking" as your routing...you can't put material back if you cut too much ;). Make sure the jig is attached even before you make the initial rough pass just in case the router gets away from you.

I have a slightly different take on this, I make a template to the exact specifications out of 3/8" acrylic, not MDF. I also use Intertape 3/4" wide double-stick tape, because it's razor thin and very strong, so the template will not move on you when using the flush trim bit. IMO the carpet tape has too mcuh 'wiggle' for me, it has a fibrous body to it instead of being thin like masking tape. Also, I have had a hole template made of MDF move on me because the material has some dust on it and the tape didn't hold. Trust me, having a template fall off while you are routing a hole for a 3/4" bulkhead for a CLS in a completed tank is not something you ever want to happen. Which is why I don't route holes in completed tanks anymore. Luckily, I was able to make the hole bigger using another template and made it work for a 1" bulkhead.

Using double-stick tape on an unmasked acrylic template to a paper masked working piece is so strong that you have to take a plastic paint scraper and get under the template and pry it off. I have even had to take a razor blade to get under it then slide the paint scraper or in some cases a screwdriver in between to get the gap big enough to start taking the pieces apart.

I would rough cut material so that your but doesn't have to pass through cutting on both sides too much. I have routed holes using the template technique and just drilled a pilot hole and then routed with the template, and when the cutout piece breaks away, having a loose piece of acrylic next to a bit spinning at 26,000 RPM is a nice setup for a projectile distance experiment, with you being the subject of impact.
 
how does acrylic cut with a lower rpm ? when i used to work at a machine shop that did plastics we typically cut plastics under 2500 rpms {on a manual machine} and it never gave any real issues with digging and stuff .... curious on how it would be if a router was slowed down to make that groove .
 
Its good to see your take on it as well Bud as the world would never improve and evolve without having a Million and one ways to skin a cat =). I too experienced what you mentioned about having a taped MDF template move while routing. My building experience has certainly come from the "school of hard knocks". As James said many years ago in this thread, people can read all they want and watch all they want, but you learn this business by doing and learning from your mistakes most definitely. As a matter of fact the time I had an MDF template move on me was a similar situation to the one camaroboy is trying to undertake. I was routing a 1" deep 30" long "slot" in the back wall of a tank for an external overflow. I taped down the template, made my rough cut leaving about 1/16-1/8" of material then took to it to flush it out. Probably half way through the cut the template shifted on me and I didn't even notice as it moved gradually until I was almost all the way through the flush cut. Luckily, it only moved about a 1/16" so I was able to set it back up and have a 1 1/16" slot as opposed to the originally planned 1" slot. It was then I learned not to skimp on the double sided tape =P.

The reason I like MDF templates is that with the variety of custom work I am doing they are cheap to make as many of my templates may very well be only one time use. For templates that will be used regularly I couldn't agree more that acrylic is the way to go for them. And yes...3/8" at least. A 1/4" template is a risky proposition as the bearing may not ride properly.

As for the tape, I still like the carpet tape, but learned from the prior error to not be stingy with it. Its cheap and readily available right up the street from my house.

The other thing here though is as you mentioned with the tape you are using it is very hard to get off...sometimes requiring a screw driver or razor blade to pry apart... That worries me; again due to bad prior experience. I have spent many hours sanding/buffing acrylic because I accidentally scratched it...for that reason I wouldn't want to get near it with a razor or screwdriver. With the carpet tape as long as you use enough and dont apply excess pressure (such as trying to flush off 1/4" of material) it hasn't moved again on me since. Then when done, the templates come off relatively easily. =)

As for routing out small holes and having projectiles I also couldn't agree more that rough cutting should be done first. Sometimes in this case I will use a slightly undersized hole bit to make the rough hole and then route the remainder with the template...now no projectile potential. However, when routing a hole on an independent sheet that isn't currently attached to a build I have a real nice hole cutting jig that I got from Jasper Tools that you should check out. Link is below. It does holes from 1"-7 1/2" and every possible 1/16" increment in between. This jig is PERFECT for cutting bulkhead holes...especially when you factor doing holes for both Sch40 and Sch80 fittings in almost every conceivable size it is truly an all-in-one jig that has paid its $25 price tag 50 fold.

http://www.jaspertools.com/products...&prod=Model-400 Circle Guide&cat=Circle Guide
 
how does acrylic cut with a lower rpm ? when i used to work at a machine shop that did plastics we typically cut plastics under 2500 rpms {on a manual machine} and it never gave any real issues with digging and stuff .... curious on how it would be if a router was slowed down to make that groove .

No, this simply won't work on your material. The cut would not be clean and smooth nor look good at all.

With acrylic the higher speed is better. With wood, it depends on the wood, but many work better with lower speeds to avoid burning the wood.

My router goes up to 26000 RPM and though it has variable speed adjustability it very very rarely ever gets turned down.
 
Using double-stick tape on an unmasked acrylic template to a paper masked working piece is so strong that you have to take a plastic paint scraper and get under the template and pry it off. I have even had to take a razor blade to get under it then slide the paint scraper or in some cases a screwdriver in between to get the gap big enough to start taking the pieces apart.


When I can't get them apart I put denatured alcohol in one of the hypo bottles and wick it in between the pieces. The tape softens almost immediately and you can pop the template right off. I don't like prying at them :)
 
When I can't get them apart I put denatured alcohol in one of the hypo bottles and wick it in between the pieces. The tape softens almost immediately and you can pop the template right off. I don't like prying at them :)

LOL, nice innovative thinking MJB :lol2:. Doesn't matter how long you have been doing something, you can always learn something new.

Bud, you got a good link on the tape you use? This may just cause me to convert. I like how easy the removal is for the double sided carpet tape, but I don't like cutting the stuff up and the number of razor blades that it gums up with its adhesive ;)
 
if using the Intertape paper tape. Slam the stuck pieces on a flat surface, the tape will break free. :)

Adam, call around to local tape suppliers and ask for Intertape 591. Should run $3/roll or thereabouts. I buy cases of 1/2" (72 rolls/case) and 3/4" (48 rolls/case) and each roll is 36yds. The 3/4" is obviously more expensive ;) just make sure you get factory cut rolls and not local cut unless their blades are real good. I've bought local cut rolls in the past and if their blades aren't perfect, the tape just kinda shreds.

I've been using this stuff since ohhhh when time began ;)

James
 
As for routing out small holes and having projectiles I also couldn't agree more that rough cutting should be done first. Sometimes in this case I will use a slightly undersized hole bit to make the rough hole and then route the remainder with the template...now no projectile potential. However, when routing a hole on an independent sheet that isn't currently attached to a build I have a real nice hole cutting jig that I got from Jasper Tools that you should check out. Link is below. It does holes from 1"-7 1/2" and every possible 1/16" increment in between. This jig is PERFECT for cutting bulkhead holes...especially when you factor doing holes for both Sch40 and Sch80 fittings in almost every conceivable size it is truly an all-in-one jig that has paid its $25 price tag 50 fold.

http://www.jaspertools.com/products...&prod=Model-400 Circle Guide&cat=Circle Guide

That is killer, I'll have to check this thing out - thanks!!

My router goes up to 26000 RPM and though it has variable speed adjustability it very very rarely ever gets turned down.

Sounds like the Bosch one I have :)

When I can't get them apart I put denatured alcohol in one of the hypo bottles and wick it in between the pieces. The tape softens almost immediately and you can pop the template right off. I don't like prying at them :)

Mike you have been holding out on me. After all I have taught you. How could you.

Seriously though I hadn't thought of that, it's perfect

Bud, you got a good link on the tape you use? This may just cause me to convert. I like how easy the removal is for the double sided carpet tape, but I don't like cutting the stuff up and the number of razor blades that it gums up with its adhesive ;)

It's I ntertape 591 and I may have misspoke, the stuff I use is 1/2". They make wider but why bother. Lay it down, press it hard, pull the mask off, line it up and press hard and it won't move. I use this mainly on a squaring template I made and I can square 2 or 3 pieces before it loses it's stickiness to the point of pushing out of place.

I get it locally at a woodworker's supply store but they are out of stock very often because I think about every one of their customers uses the stuff

http://www.tapebrothers.com/591-Double-Coated-Flatback-Tape-1-2-x-36-yard-p/ip-591dc-5.htm
 
James or for that matter anyone ...
I bought a frag tank 60"x24"x 12" rimless. 3/4" sides and 1/2" bottom and the material is Spartech Polycast , at least that is what the bottom piece says. I have a couple of questions and always appreciate the help i have gotten here.
The corners were not routered flush and neither were the sides to the bottom. So my first question is what kind and size router bit should i use and direction of cut?
Also there are spots on the inside that look similar to a smear caused when you place a piece of wood that has glue on it, to another piece of wood and then remove it leaving a blotch behind. It is rough to the touch. Can it be removed and how? Thanks in advance, Neil
 
subshop, any 1/2" flush cutter will do the job, no need to buy an expensive one for this, unless you plan on doing more acrylic work.

I'm assuming you're using a handheld router, if correct - you want route going from your left to your right. I other words - counter-clockwise. If you go the wrong way, the cutter will grab and want to take you on a little ride.. you'll know real quick :)

How big is the blotch? probably someone sloppy with solvent and smeared some. If it's tiny, might wanna just live with it. But if you can't live with it, gonna need to sand it out. Without seeing it, I'm just guessing I'd probably start with 320 until the area is smoothed out, then 400, and so on until you hit around 2000. You can use a small buffing wheel attached to a drill after that with some Novus 2. It won't be the best, but it'll clear up fairly well :) just don't run the buffing wheel dry - might burn the material

Please note, I'm not giving the "display tank quality" way of doing this. I'm assuming you bought it fairly cheap and don't want to spend a bunch of hours and money to clean it up? Everything above except the Novus 2 is stuff you can get at any decent hardware store. Shouldn't cost more than $30 or so for everything :)

HTH,
James
 
the blotches are the size of a half dollar. i would like the finish to be as close to display quality as possible. I don't mind spending the time on it as long as i get the results i want. Are there any other steps i should do ?
 
the blotches are the size of a half dollar. i would like the finish to be as close to display quality as possible. I don't mind spending the time on it as long as i get the results i want. Are there any other steps i should do ?
IMO, MicroMesh.. just tedious but what I do here at the shop.
You'll want to sand it out til smooth like above, starting at 320, if that won't do it - start from 240 and work your way up to 1000grit, then do the MicroMesh kit.

The MicroMesh kit I'd recommend is available at www.micro-surface.com and search for kit #NC-78-1. Should run $50 or so and this is the best kit on the market for this kind of thing. There are others that would rather use a buffer and I have no argument to that either.. this is just what *I* do :)

HTH,
James
 
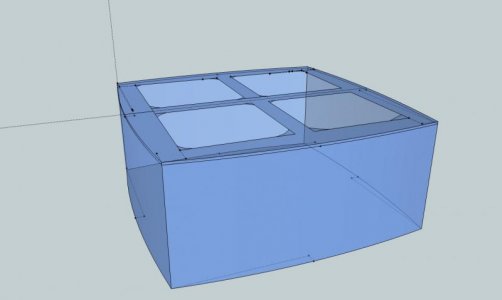
square four side bowfront

square four side bowfront

attachment.php


I am preparing to make a large acrylic tank after not building any for over 10 years. I have built about a dozen tanks but that was all some time ago.
I have been enjoying reading these threads and think the information here is really really great!!! Thank you all for this great information! Reading these posts I definitely see tons of great ideas that I wish I knew about back when I started.

I am working on a tank design for a 60" x 60" x 25" tank. I have a small stock pile of acrylic in my garage that has been with me for some time that I plan to use.
The tank would have 1/2" thick sides and the top and bottom would be 3/8 inch thick. All cyro acrylite gp that I have on hand.
In order to give the tank some character I am thinking of trying to make it have 4 bowfronts. I would attempt this by making the corners using a 10 deg flush Bevel Bowl Router Bit used for flush cutting sink openings on solid coutertops (Freud 85-171 10-Degree X 1-1/4"). This would make 100 degree corners and when put in place would give me ~2" bow on each side.

I would assemble it like a regular tank but use some wood blocking to add a 2" bow to each side until the top and bottom were attached.
Hopefully the picture I made conveys the idea. I think I can do it as long as I don't bust a seam trying to get the sides glued together. The radius of the sides would be almost 200" which is much greater than the minimum cold forming radius for 1/2 acrylic.
I would appreciate any feedback on this design. I know it is a little ambitious and might turn into a spring loaded mess.

Thanks,
Paul
 

Attachments

  • square tank.jpg
    square tank.jpg
    19.2 KB · Views: 7
pfox, that sounds like an awesome project! I can envision a ton of considerations that you will have to make, such as the need for jig and brackets to hold pieces together in the perfect position due to the complexity of bonding a bowed piece to another bowed piece, that's on top of bending the acrylic in the first place and then taking out the lip, getting all the seams to line up (esp the last one).

Now I just read that you are going to use wood blocking to hold the panels in a bowed position before the top/bottom are bonded on. I would think that this would stress the freshly-bonded seams over time as this seems like enough pulling pressure to cause gradual separation of the seams. Though without access to an oven I don't know what else you would do.

Cyro GP should be good since it's before the switch to China. 25" is really at the limit though. But it's not like you're going to get more bowing out of it LOL.
 
Paul, if this is to be a reef tank, you *may* wish to re-think it? Acrylic bowfronts are a royal PITA to scrape coralline from and you will likely get far more scratches than a straight tank; and you've got 4 of those panels to clean.. just thinking out loud :)

I'd form the pieces though if you want to do this. Even parking the pieces on a form in a hot car will help. Cold forming and bonding 1/2" - may not turn out as you wish.

James
 
Back
Top