bean vs herbie overflow

SaltwaterAdict

New member
I'm going to be drilling my new tank and would like to drill the least amount of holes as possible.

I see herbie has originally came up with the idea of implementing a gate valve/ball valve to control the flow from the drain to make it a full siphon.

Would I be fine with using just 2 holes rather than 3. The gph will be roughly around 900gph, but I can tune it down if need be. I found this on brs and was thinking something like this. http://www.youtube.com/watch?v=6Pv3u0Sa1tk&feature=player_embedded

I also don't want the internal overflow box to be as long as the tank. I'd like to make it as least noticeable as I can. I was thinking a box around 12-15"x3"x3".

Please lmk what you think and if you'd suggest me do something different. This is my first attempt at incorporating this type of overflow and anyone with experience with one willing to share their input would be a big help. :)
 
Beans is alot safer, as there are more safeguards. If on the Herbie, your siphon gets blocked, you have just that open channel to accept all the water. On the bean,you have the 3rd for safety.

I use the Bean setup, and my siphon failed a couple weeks ago due to a stupid snail. Water was overflowing into the 3rd channel- for some reason the normal open channel was not accepting the full amount of water. Had I just 2 channel, it would have flooded.

Properly drilled and spaced holes won't weaken the glass much, and a siliconed overflow helps brace the area.
 
I use a Herbie o/f and like it. My backup drain is 1" and when testing it, it could handle the flow of my 1262.
 
Beans is alot safer, as there are more safeguards. If on the Herbie, your siphon gets blocked, you have just that open channel to accept all the water. On the bean,you have the 3rd for safety.

I use the Bean setup, and my siphon failed a couple weeks ago due to a stupid snail. Water was overflowing into the 3rd channel- for some reason the normal open channel was not accepting the full amount of water. Had I just 2 channel, it would have flooded.

Properly drilled and spaced holes won't weaken the glass much, and a siliconed overflow helps brace the area.

Thanks for your input. I'm not going to have a great deal of flow and if I can get away with only 2 holes then that would work out nicely. I know what you're saying for having that extra hole as a back up. I guess time will tell. Still deciding on 2 vs 3. lol
 
I use a Herbie o/f and like it. My backup drain is 1" and when testing it, it could handle the flow of my 1262.

I'd also like to make the overflow box as least noticeable as possible. How big is your overflow box? Do you happen to have any pictures or could take some? It would help out a lot.

thanks
 
I have been running the herbie style overflow for about 7 months and never had a single issue with it.

I turned my gate valve all the way shut and let my return pump go full blast. My extra 1" pipe handled the 500gph with ease. I have a strainer on my drain pipe so it can't get clogged unless I neglect it for a long time. All I have to do is take the strainer off and scrub it down real quick. I have done that once in 7 months.

I personally see no reason for a third pipe unless you are extremely paranoid of a flood but, I can't argue against one, redundancy is key in this hobby.
 
Herbie for sure. I've had mine running for 2 years and the bottom one has clogged a few times, but the top has always been ok. I travel a lot and I never have to think about it because the probability of that second one failing after the first is very, very low.
 
I have the herbie and it is dead silent, running 1 1/4 drains with a screen. Don't forget gate valve, makes it much easier to adjust. Only running 500 gpm (ehiem 1260)
 
I'd also like to make the overflow box as least noticeable as possible. How big is your overflow box? Do you happen to have any pictures or could take some? It would help out a lot.

thanks

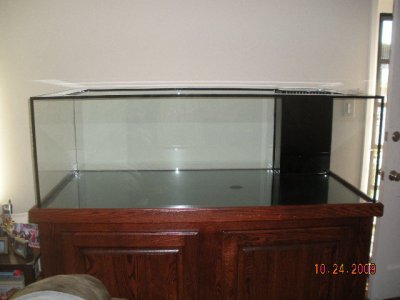
Here's what it looks like empty. I think it's 12 x 6. I actually have 3 holes in there. Main drain, B/U drain and return
 

Attachments

  • DSCN3988.JPG
    DSCN3988.JPG
    87.6 KB · Views: 4
I believe Bean's design is just a redundant Herbie..

His first is a full siphon, just like herbies.. The difference between Bean and Herbie, is that Herbie, we adjust to a perfect match of input flow to output flow.. While Bean let's his adjustment be a little under matched.. Causing the slight left over to flow down the second drain. This allows for the minor adjustments that you have to constantly make with the single to be forgotten about.

Essentially if you are pumping 1000 GPH, it will always fluctuate, whether from head pressures, to voltage differences... you will never pump exactly 1000 GPH. So just run your first full siphon at about 950-975 GPH and let the remainder flow over the second drain. The water flowing thru the 2nd drain is so minimal that sound typically is not an issue. The 3rd in Beans is just another backup. Since he's utilizing part of his 2nd backup to handle that extra 25-50 GPH.. These numbers are all relative, it could be as little as 3 GPH going down your 2nd drain.. It could be 200... It all depends on how you adjust the valve on the first drain.

Bottom line, Bean is paranoid.. ;)

I personally prefer the cleanliness of the minimal piping and run a herbie with only 1 hole...! I still incorporate a back up thru that 1 hole as well..
I also developed a way of minimizing the continual fine tuning of the herbie using a smaller gate valve.
 
I personally prefer the cleanliness of the minimal piping and run a herbie with only 1 hole...! I still incorporate a back up thru that 1 hole as well..
I also developed a way of minimizing the continual fine tuning of the herbie using a smaller gate valve.

That's interesting. Do you have pictures of your setup?
 
I wish I had some pics of it all hooked up.. I have a few of the inital build of the lower portion.. The part that controls the water flow 3 different ways thru 1 bulkhead.

I have 2 holes in my overflow. A 1-1/2" for my drain and a 1" for my return.

My drain incorporates a Herbie style setup with an overflow built in and a way I came up with to fine tune the herbie. It may not have the redundancy of Bean's setup, but I have yet to have any kind of issues with overflowing, plugging, etc. etc. and I can push the water level in my tank to the brink of overflowing and still have control over it, so much that I do not fear it ever overflowing. I could overflow it on purpose, but accidentally, nearly almost impossible..

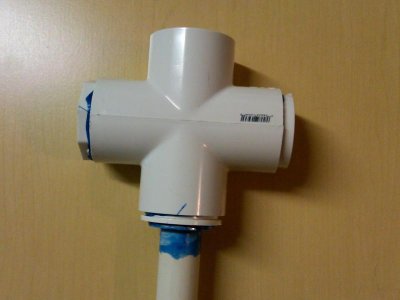
The concept is this.. Take a 3 or 4 way T or Cross (respectively). I prefer the cross. On one end, you will glue in a short piece of 1-1/2" pipe and then either glue on a threaded end or leave it open. Depends on if your bulkhead is threaded or slip fit. I prefer the threaded so I can dismantle the drain and not have to rebuild it if I need to move the tank. I used a slip fit on my first one and had to cut it off and rebuild the lower portion after my tank move.
On the opposite end of this one, 180 degrees away.. you will glue in some reducers to go from 1-1/2" down to 1" or 3/4".. I use 3/4" as I have not tested it with a 1" backup and do not know if the 1-1/2" cross with the modifications will leave enough cross sectional area for water flow.. Obviously this depends on how much water flow you are running thru your sump. I use the 3/4" and am running just over 1000 GPH thru this setup just fine..

Now, here's the tricky part.. The hardest part of building this drain.. You must gorge out the fitting/reducer you just installed to accept the pipe and then some.. Let me try to explain this better.. When you glue a piece of pvc into a fitting, it can only be pushed in so far and it bottoms out.. The glue takes hold and your done.. We need to go beyond that. You need to gouge it out enough that you can put your glue on and slide the pvc into the fitting and push it through an extra 1/2" - 1".. You also have to be sure that even though it has pushed beyond it's normal stopping point, it is glued well enough that it will not leak.

Now, assuming you got that down and are able to accomplish this step, you need to glue on a coupling fitting on the (now buried in the middle of the cross) end of this pipe.. This is your backup drain. My pictures should help understand this concept..

The other two (side) outlets are where you will glue in whatever piping and or reducers you need and direct your waterflow out to your sump and/or fuge, with gate valves installed inline...

Hope this all makes sense.. I will attach pics now of the lower portion build and give a little info on each as I do so.

If anyone is curious and wants to talk about this, please feel free to shoot me a PM with your number and I'll gladly give you a ring.
 
These pics are mid way thru the build, but should give you the idea..

In this picture, you can see the backup drain coming thru the bottom of the cross.. The two sides have reducers glued into them, one is for a 1" gate valve, the other for a 1/2" gate valve.. The use of the smaller gate valve is the idea I came up with to control the continual adjustments of the Herbie that everyone always complains of.. Not the back up drain idea.. That Ifound here on RC somewhere..

The top side is where I would glue in a piece of 1-1/2" pipe to be connected to the bottom of the bulkhead..
 

Attachments

  • IMG00002-20100228-2056.jpg
    IMG00002-20100228-2056.jpg
    32.4 KB · Views: 6
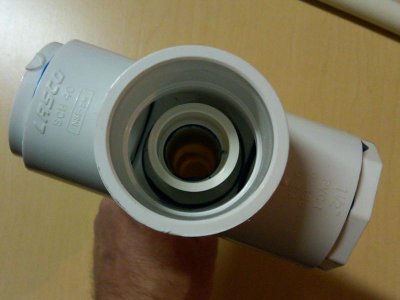
Here's a picture looking down into the contraption.. The 3/4" coupling inside there is glued onto the pipe that is coming in from the bottom..

This is the back up drain and it extends right up thru the middle of the bulkhead fitting, never touching it. The water that flows down around the backup drain cannot flow out the bottom of the cross, only out the two sides and thru the gate valves..

Just plumb that all up and you ahve a 3 way drain, 2 gate valves, and one 3/4" back up all plumbed thru one bulkhead fitting..

The idea behind the smaller gate valve is this..

Imagine draining a swimming pool thru a 12" gate valve.. One 1/4 turn of that gate valve is going to allow hundreds of gallons of water thru it.. Now imagine draining that same swimming pool thru a 1/2" gate valve... One 1/4" turn is going to only change that flow rate by a few gallons.. Actual physical size of the valve and the fact that a 1/4 turn on the smaller valve will only change the actual opening by so much, means more precise control of water flow thru the gate valve..

So what I do, is I run a 1", 1-1/2" can handle way more flow than I am trying to handle, a 1" suits my flow requirements just fine.. I adjust that 1" valve to handle 80% or so of my flow and directs it to my skimmer.. The other side, is the 1/2" gate valve handling the remaining 20% and directs it to my fuge.

Start by taking the majority of flow and setting that valve to the skimmer.. Now adjust the level of the water in the overflow on your tank by adjusting the smaller gate valve that controls the flow to your fuge..

The smaller valve lets you make easier adjustments to control the level of the water in your overflow.

Where most people struggle is they use a 1-1/2" gate valve (so many recommend the larger valve due to fears of it not handling the flow and your system overflowing, especially in the event of a blockage) The larger valve does nothing for you when you have to close it off to only allow so much water thru it to maintain your water level in the overflow.. So I use a smaller valve. The smaller valve, the less water flow that is affected by every 1/4 turn to the knob.. The easier to control the water level.

Some poeple turn the 1-1/2" valve the tiniest bit and the water goes either too high or too low and they just struggle with the herbie.. Bean only defeated that struggle by adjusting his valve slightly less than actual input from your return pump and then directs the tiny bit extra down a "back-up" drain.. It's usually so small that you just can't hear it...
 

Attachments

  • IMG00005-20100228-2057.jpg
    IMG00005-20100228-2057.jpg
    37.4 KB · Views: 5
One more thing.. I like Bean's idea, I actually adjust my herbie to trickle down the backup, making it even less often that I ever have to worry of adjustments of the water level..

I just can't stand the concept of 5 hundred drain pipes coming out the back of my tank..

Bean's concept is only a modified Herbie.. He is still using the Herbie concept to accomplish what he is doing.. People even goas far as to debate whether or not a siphon is a siphon depending on if the water has to be directed up before it goes down.. If you are running a drain at it's maximum flow rate and it does not ever get a chance to suck in any air, it is a siphon.

Priase to Herbie.. The one guy who actually made a difference in silencing drains on our tanks..
 
Back
Top