Big Tank Build in Tiny Apartment

hnnhflns

New member
OK, so for a long time people have been asking Chris and I (Hannah) to put our 300 gallon tank build up here. So, here we go...

The Apartment
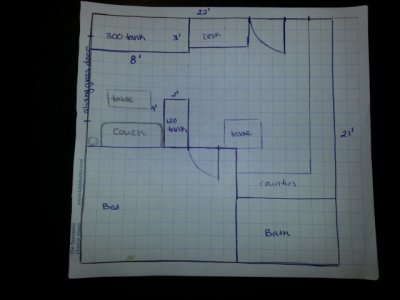
About a year ago we moved from a large 2 bedroom apartment to a tiny apartment (it's barely 256 sq ft). However, our love of aquariums seems to have gotten the better of us in the smaller apartment. We have a "œliving room" that we thought was kind of boring and needed to be arranged in such a way that it was divided of from the rest of the living/dining/kitchen/study room (See the pictures below). The space set aside for living room is approximately 88 sq ft.

The idea we had was to have 2 tanks set up so that when you sit on the couch you have a tank in front of you against the far wall, and another smaller tank set up as a peninsula to divide you from the rest of the apartment.

The 120 peninsula tank was set up when we moved in, and until a few days ago housed all of our coral. When the second tank is completely done, it will hold most of our softies except for the really nice zoas (Chris says that the really nice zoas will be moving there too, but we'll see about that). All the SPS will remain in the 120.

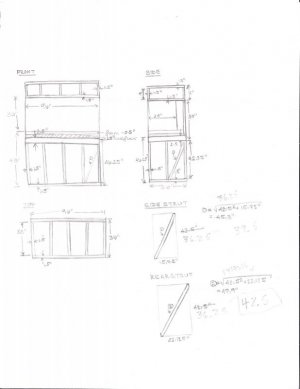
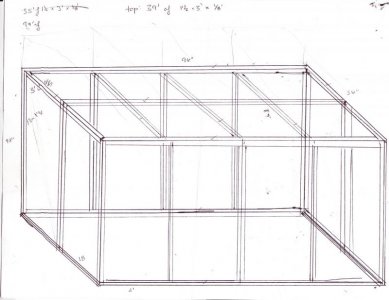
The big tank is a 300 gallon plexi, and don't worry. We have concrete slabs for subflooring covered in linoleum (which makes it great to clean up any spills) and live on the first floor, so weight isn't a problem.
 

Attachments

  • plans.jpg
    plans.jpg
    83.5 KB · Views: 6
And those are just the salt water tanks... we have 2 other tanks in the house (turtles and a fresh water shrimp tank)
 
The Stand
We knew that we needed a heavy duty stand for a 300, so we went about designing one from scratch. Literally.

We wanted the tank at our eye range because we would be looking at it the most, but we needed to keep enough room at the top for us to get into the tank. We designed the stand to be a foot deeper than we needed it to be so that we could have somewhere to stand when we worked on the tank (and in case that we ever wanted a 540 gallon instead). The stand ended up being 8 foot long, 3 foot deep, and 43 inches tall. We put plywood on the top and bottom of the stand so that it could absorb any deformities, as well as placing 3/4 inch insulating foam between the plywood and tank to keep the tank from sitting on any sharp points (an extra protection against cracking)

The stand itself is made from rectangle and square steel tubing. We made all the cuts and welds ourselves. The pictures below are Chris welding the stand. We painted the stand with POR 15 (rust-proof and self healing after dents) and then sprayed a clear matte finish over the top.

We also put in 3 GFI boxes (with a total of 8 sockets) since the circuits in the apartment didnt have GFI and we weren't able to put any in. Some are set up with built-in switches for lighting.

2qcmtk1.jpg

The stand in pieces

i5dqvb.jpg

Chris welding the stand

2rz2tm0.jpg

Just finished the last coat of paint

2mhspj7.jpg

Stand outside the apartment... it doesn't fit in the front door...

2dkzdjb.jpg

Setting up the wiring

2r451yx.jpg

Stand in the apartment with the tank.
 

Attachments

  • SCN_0001.jpg
    SCN_0001.jpg
    28.3 KB · Views: 4
  • SCN_0002.jpg
    SCN_0002.jpg
    55.2 KB · Views: 4
Hannah & Chris - I'm anxious to hear about and see pics of the counter you've described to me. The DIY projects are so satisfying!

Now that you've started, you must feed the photo beasts here... we want more!
 
Hannah is working on Updates and pictures in between homework and class. I have the sump mostly sorted out still working on the wiring and lights.

The rockscaping is the other chore. Next time I am going to do that before I fill it.
 
It's not quite done yet. We are still rock/sand-scaping. I can put up 120 pictures, but the 300 is too cloudy from moving sand, and the rock work won't be finalized until later this week.

Patience...
 
He is having a blast in the tank, though he does tend to topple the rocks occasionally. He is a little annoyed today because we moved a lot of sand and rock yesterday, so parts of his tunnel got filled in. Chris says he is being a menace to our rockscaping, so we are trying to work around him.

It turns out that we had another "engineer" of the same variety, and we had thought he hadn't made it because we hadn't seen him in so long. He is about 1/5 the size of the big one, so he isn't causing too many problems.

Hopefully, they get settled in new homes quickly and our rockscaping stays in place...
 
Occasional toppling of rocks is not good! :eek1:

While redoing your rockscaping, be sure to place your "base rock" in direct full contact with the bottom of your aquarium (then put the sand all around it), that will help provide a stable base foundation for the rest of your rock work.

Best of luck, looking forward to more pics as your build progresses!
 
We have tried. They just keep digging the sand around the base of the rock out and it causes the rocks to tip over. Right now certain tall pieces are being held up with string attached to the back of the tank, so if the sand is moved, then they wont fall. We are thinking of using clear fishing line as a permanent method of tying them up.
 
So I thought Rockscaping was supposed to be really fun. Well it was not at all. I will be doing it next time prior to filling the tank if I have any option. Because I have now tried and used two part epoxy putty, super glue, and hydraulic cement and none worked as well as I had hoped. In fact the epoxy out right was horrible. And the cement worked good but you do need liberal amounts it sure does not work like super glue. Also it is better if you have four plus hands or some way of holding the rocks while you mold your master piece.

I think this was mostly a pain because all my rock is live and I wanted to keep it that way. And pretty much none of my pieces could be ziptied. I could have done some pvc work and attached it to it but I really didnt want to.

And yes having three Engineer Gobies constantly redesigning your tank does not help much. But they were there first so they get to stay and I get to work around them.

Thankfully the largest pieces and most all for that matter are or were already sunk to the bottom of the tank. I cant remeber the thinkness but I am pretty sure I put a secondary piece of 1/4 think or more plexi under our 125lbs piece of live rock.

And yes there are some very hokey strings as safeties attached to a few rocks right now just in case something were to happen to keep it from becoming a major event. I will come up with a more permanent solution soon.
 
Great build. The only thing I would be most concerned with is humidity and noise. I had my 300 gallon display in the garage once and the humidity led to mold in one of my walls. The garage door always had condensation. With 1/4 of the area mostly water, you will have a tropical environment unless you keep that sliding door open.
 
Back
Top