reeftivo
Skim junkie
I found the magnets at Lowe's. They are at the end of the screws and hardware isle - assuming that all Lowes are set-up the same. I think I found the screen at Home Depot but I'm sure Lowe's sells it too. Look for the Pet Proof plastic screen. I think it was about $30 or $40 for enough screen to do our 6' patio door and enough left over for several other projects, and it really is pet proof - my cats climb it daily when the door is open.
CoolCorals - I think I have enough of the screen for another sump, PM me your address and I'll send you what I have to try it.
I zip tied the screen to the returns like the cd case. I did it this way to hide it a bit more. Not sure if attaching it to the teeth would make it even quiter. Though truthfully I prefer to hear the slight waterfall instead of just the fans and water rushing into the sump.
I think my water level in the fuge is at about 8" but I'll check tonight. If it isn't I'll get it to about 7.5" to see if that helps. The bubble problem does seem to come and go, well it really never goes, just gets better.
I think the design of the CAD sump is OK but I would really like to have enough space to put a good sponge/bubble trap in it. Not sure but I think if the section for the drain/skimmer wasn't divided there would be more area for bubbles to disipate before moving on the the next chamber.
I really like the design of the ADHI sumps unfortunately their smallest sump is 24" long. I sent them an email to see if they would do a custom fuge and what the cost would be.
what substrate if any do you have in your fuge?
I recommend a water level of at least 7.5 so if you're getting micros at 8 then don't go 7.5.
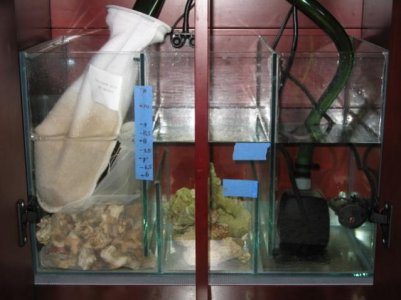
If your using the stock skimmer, run the return from the skimmer and the drain into a 200 micron filter sock together. and take out the batting they give you with the tank.
Also, if you are running rubble in the drain chamber, make sure the pieces are not too small. I've found that too small a piece will trap micros like the batting and they will push out under the weir right into the bubble trap.
If all that doesn't work then get very coarse black pond sponge. It is very porous and sturdy. you can cut that the width of your sump front to back and run a piece of that wedged at the top of the weir where the water goes back down to the return pump. The coarse sponge will still let sufficient flow through but will trap micros.
IMO the best thing is the filter sock and removing the divider in the first chamber.


")
")