D.I.Y. 20 long all in one Nano Reef

chaneyford

New member
Long time aquarist, but first project tank.
I've always thought these fancy "All in one" tanks were pretty handy. No exterior filters to leak, super tidy looking, almost all of the benefits of a sump with none of the mess. So with this in mind, and the phenomenal $1/gallon sale at Petco, I thought to myself, why not?
So begins my foray into the world of DIY!

My current stock list of parts (with pictures yay)
Internal power filter (salvaged from an old tank) for one end
Lifeguard 800 aquarium pump for the other end
Aqueon 50w preset heater for the power filter end
Old stand from a 60Tall (I think...)
20 Long tank
Marineland LED light (to be replaced with a real reef light, ideally a Fluval Sea Nano 20 watt)
I also went to my friendly neighborhood Lowe's for acrylic to BUILD the filter boxes.

That right, I'm building TWO. I figured I'm gonna want flow from both ends of the tank. I'm gonna want a refugium to hopefully promote copepod growth, and I'm also gonna want a skimmer at some point. Killing 3-4 birds with 2 "faux sumps" is just the natural progression for me.

I have kept a biocube as well as a 75 gallon reef. The biocube went amazingly and the 75 was a mixed experience. I mostly accredit the 'acknowledge of quality lighting for the 75g failures.

This WILL be a reef. I know I want duncans, because I LOVE them. I THINK with that light, and a 20*12*12 livestock area that I can have some of the SPS corals as well as the few softies and the occasional LPS . I'm 100% open to livestock suggestions, and I know there won't be a lot of fish.
a6352355d74a29fcc94667f270cd0b51.jpg
720fa8d4b18e5b869eb8fc98a33bbd0e.jpg
772337e8a49ffdde381cb1845db01028.jpg
bd8e11920c24198ff77e001e2ddb37c2.jpg
8b29ef2609339c49b7ddbfe145c05f6b.jpg
c5d4064366d9c22df1a334146d573bdc.jpg
2cbdab9afffc1bf7095e4922101cbef5.jpg


Sent from my SM-T670 using Tapatalk
 
Oops, I forgot my FIRST question!
I bought GE 100% Silicone in squeeze tubes. IS THIS SAFE for our hobby??
I'd hate to ruin the entire project from the start....

Sent from my SM-T670 using Tapatalk
 
Unless it specifically states that it is aquarium safe you are taking a chance.

If unsure, return it, and buy some from a reputable place that's guaranteed safe.
 
Yeah, I just read that anything that mentions mold mildew resistance is a no go. Back to the store I go lol

Sent from my Moto G (5S) Plus using Tapatalk
 
Yeah, I just read that anything that mentions mold mildew resistance is a no go. Back to the store I go lol

Sent from my Moto G (5S) Plus using Tapatalk

Not quite true. GE silicone I has been a long time standard used by many, including myself, without issue. Mold resistance is generally an inherent property of the material, not the result of some magic ingredient as the marketers would like you to believe.

You are not likely to find a silicone labeled for aquarium use at any big box store. Look for 100% silicone, like GE I. If it makes you feel better, you can also look to see that its FDA compliant for food preparation surfaces once cured. I know DAP at least used to label some of theirs as such.

If I were you I would ditch the cheap acrylic for the division/baffles. No silicone will bond well to it. Get 1/4 inch thick glass cut at a local shop and install with your preferred silicone.
 
Not quite true. GE silicone I has been a long time standard used by many, including myself, without issue. Mold resistance is generally an inherent property of the material, not the result of some magic ingredient as the marketers would like you to believe.


You are not likely to find a silicone labeled for aquarium use at any big box store. Look for 100% silicone, like GE I. If it makes you feel better, you can also look to see that its FDA compliant for food preparation surfaces once cured. I know DAP at least used to label some of theirs as such.


If I were you I would ditch the cheap acrylic for the division/baffles. No silicone will bond well to it. Get 1/4 inch thick glass cut at a local shop and install with your preferred silicone.
Actually just had a guy at SB Reefs tell me the same about the acrylic. Luckily, there's a glass shop right by the reef shop

Sent from my Moto G (5S) Plus using Tapatalk
 
Update

Update

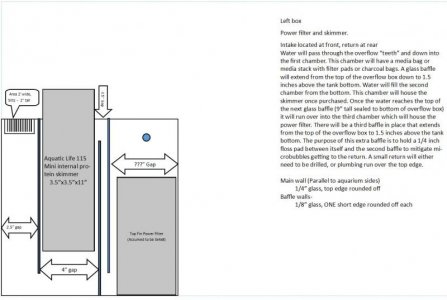
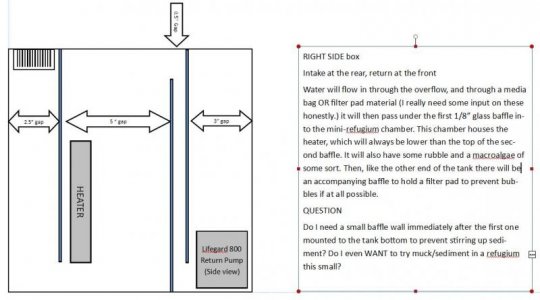
So, now that i'm going with glass structure instead of acrylic (the first waste of money in the project lol...) i want to run the dimensions by you all. I'll be re-measuring the inner dimensions when i get home, but here are a couple of diagrams for either side.
I'd really like to NOT buy a second pump to replace the power filter, but at worst it's another $20. Tell me what you all recommend!

My main concerns are-
How usefoul would a 5"x5"x9" refugium really be
Do i need to adjust the baffles
Is 1/8" glass thick enough for the baffles considering i'm using 1/4" for the main wall?

Note:
Those images show what it would look like if facing each end of the tank from inside it
 

Attachments

  • LEFT Box.jpg
    LEFT Box.jpg
    52.8 KB · Views: 1
  • RIGHT Box.jpg
    RIGHT Box.jpg
    48.9 KB · Views: 1
I like the idea of a DIY AIO. This is going to save someone a lot of money. My only concern is that the panels are acrylic and silicon will not hold the panels in place. You should look into glass which will help hold the panels better.
 
So I picked my glass up today, super excited!!
Now I have a question for all of you. Although this is a project tank, I'd still like it a bit more polished. Rather than leaving the overflow walls clear, I thought maybe I'd etch/frost them, maybe even with a design. What do you guys think?
If I did this, would I leave the refugium section clear, it would enough light make it through for the plants?
cea8bd3c7df4cfc9d7e17b9e95e7061e.jpg


Sent from my Moto G (5S) Plus using Tapatalk
 
So, while I have time to save up and get a GOOD light, anyone have recommendations? I WILL be having a duncan, because I love them. I'd like other similar corals, and maybe a tiny clam. That Fluval light has terrible reviews. The reef place I go to here in town sells these 2 though

Option 1
MIGHT not cover the entire tank with the same light, but that would mean I could have some softies in there
https://sbreeflights.com/sbox-nano-reeffuge/11-54-spar38-reef.html

Option 2
This'll cover the entire tank, but it's a good deal more expensive and has 2 cords.
https://sbreeflights.com/sbox-nano-reeffuge/7-sbox-sprite-reef-nano.html
a2407e09f38f26ab9cb67110eea70304.jpg
e1caa5376a3442641fb1af5731a43226.jpg


Sent from my SM-T670 using Tapatalk
 
Well folks, as we ALL know to expect, I've hit a tiny snag. My glazier mate a tiny mistake that's going to require.....creativity....on my part. As you can see in this pic, I went a little engineer crazy trying to make up for 1/8 inch gap all the way around. So I have this thought-
CAN I use the plastic stripping that's flat on one side, and has a u shaped groove on the other into which the glass edges could be inserted as framing for the pieces? I have "extra" silicone that I could put in the channel before the glass to create a seal, and silicone the plastic strip to the tank (and/or other glass panel in the case of the baffle pieces
7ef0b5cf2e4f5784371eefa806246480.jpg


Sent from my SM-T670 using Tapatalk
 
So glue day...
I ended up deciding to do one end at a time, and I'm thinking that was about the smartest thing I ever did. Lots of tape, I mean LOTS, and a ton of remeasuring later, I've got 2 baffles glued on one end each. Basically the two that don't touch the tank bottom are glued to the end of the tank. As I've never played with silicone before, I kinda decided to wing it on this first try. I set the tank on end, and put a good heavy bead along where the baffle would attach, and then stuck the panels in, and smoothed the ooze. For once I had a little foresight, and had a strip of tape ready to hold them vertical.
Haven't seen a lot of feedback, hoping I'm not botching completely [emoji28]
36781d2a5b08728e5018b5fbb7618016.jpg
e144d1093608e88edd2194a1dd26751a.jpg
111cc8c3189827ed09a49672260cceb6.jpg


Sent from my Moto G (5S) Plus using Tapatalk
 
Looks good.

I'm hoping you'll be topping off the water manually as this will be a nightmare to do it automatically.

The levels in both sides will vary hour to hour. Even with the same pump and exactly identical overflow dimensions your going to have differences with the plumbing and whatnot that will cause one side to pump more than the other.

If you were to put a balance pipe between the pump chambers of both sumps then all this won't be an issue.
You could use a dosing pump and figure out how much water you evap daily. Once you find that number you can replenish the same amount minus 5-10% daily with the pump. You would need a peristaltic pump to be precise enough for this but you would get semi auto ATO. And then just make up the 5-10% difference when you remember.


Sent from my SM-G955U using Tapatalk
 
Hey Chaney, just saw this and wanted to say I like it, but am a little worried about the dual sump idea. I have a 20G long diy as well. One end of my tank has the sump, in it, I keep the heater, purigen, carbon, and some bio media. With some lockline directing the flow of the return, I feel I am able to get enough flow around the tank so I don't need any powerheads. Ill post a pic of how mine looks, there is black acrylic cover the "sump" so it looks sleek. I used 100% GE silicone I with no anti mold so it's reef safe. I also built the stand. I love the world of DIY, I'm excited to see how yours turns out! :thumbsup:

[URL=https://s1078.photobucket.com/user/Ben_Barnhart/media/IMG_2451_zps2z4assvb.jpg.html][/URL]
 
Oh and I vote for the Bulb option! I have 2 Par 38 bulbs and one par 30 actinic in the middle, they are plugged into a black track lighting kit with black shelving brackets. https://www.rapidled.com/12-led-par38-bulb-mixed-color/ the previous pic I posted is from last year, I'm getting crazy growth with these bulbs. Let me know if your interested in any more pics of how the back chamber works.
 
Oh and I vote for the Bulb option! I have 2 Par 38 bulbs and one par 30 actinic in the middle, they are plugged into a black track lighting kit with black shelving brackets. https://www.rapidled.com/12-led-par38-bulb-mixed-color/ the previous pic I posted is from last year, I'm getting crazy growth with these bulbs. Let me know if your interested in any more pics of how the back chamber works.
Love. Your tank! I am kind of leaning towards the par38 option so I can kind of spotlight an area where I want more light. And absolutely add some pics of that sump!


Sent from my Moto G (5S) Plus using Tapatalk
 
Looks good.

I'm hoping you'll be topping off the water manually as this will be a nightmare to do it automatically.

The levels in both sides will vary hour to hour. Even with the same pump and exactly identical overflow dimensions your going to have differences with the plumbing and whatnot that will cause one side to pump more than the other.

If you were to put a balance pipe between the pump chambers of both sumps then all this won't be an issue.
You could use a dosing pump and figure out how much water you evap daily. Once you find that number you can replenish the same amount minus 5-10% daily with the pump. You would need a peristaltic pump to be precise enough for this but you would get semi auto ATO. And then just make up the 5-10% difference when you remember.


Sent from my SM-G955U using Tapatalk
Definitely manual top off lol. I've also been considering building my own stand so I can add RODI filter underneath with a tank for it to pull from. That way I know I have good water lol. I may also add a little qt tank under there.
I don't plan on any super complicated corals in this tank, mainly the nearly unkillables lol, so dosing won't be too huge an issue on this one.

Sent from my Moto G (5S) Plus using Tapatalk
 
I would definitely try to avoid having to manually top off. Its annoying as hell and in a small tank a little evaporation makes bigger changes. Here is a little breakdown of what I have going on in my back chamber. Also, a picture of how I did my lighting.


Back
Top