disc1
-RT * ln(k)
I promised over on the equipment forum to post this. This is a project still in development, so it looks ugly. But I think you can see how to utilize these pumps to build something cheap for yourself. I'll try to come back and post updates as I finish it.
I bought these cheap peristaltic pumps off e-bay for about $30 each. I wanted to use them to dose 2-part. To my surprise I found that they were quite precise. So I built a little Arduino sketch to run it.
These are the pumps that I got.

These pumps run from about 6V to 12V dc. The flow rate of the two pumps did not match, one pumps 26ml/min at 12V and the other pumps 40ml/min. I think the slow one is defective, but there's really no sending it back and even though it is slow it is consistent. I use it for alk since I like to drip that slower anyway.
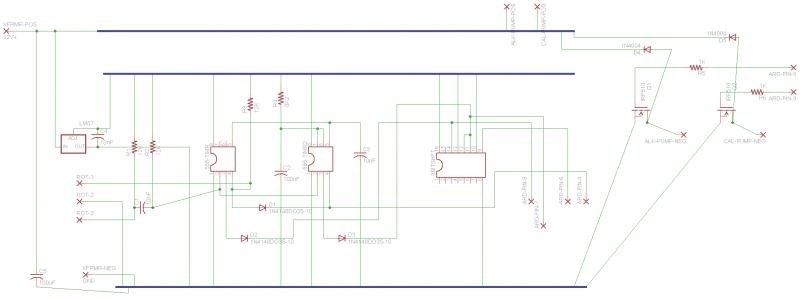
The flow rate is nice and linear with voltage, being about half at 6V. So I decided to use a MOSFET (RadioShack IRF510 was what I had on hand.) and PWM signal from the arduino. Power goes from positive to the pump, then from the pump to the drain pin, and then from the source pin to ground. The PWM signal goes to the gate pin. Since the pump doesn't run below 6V, use PWM values from 127 - 255 in the Arduino sketch.
Here is the full set-up...

And a close-up on the breadboard part.


The knob and the two ic chips are part of a rotary encoder that was put together for an entirely different project and ended up getting absorbed into this when I got tired of pushing buttons over and over. It's a horribly inefficient use of a rotary encoder using two 555 timers and an 8-bit shift register, but it worked well for what it was originally built. When I build a permanent version to put on a board I will trim this whole part down. Besides, it doesn't work very well.
Aside from that there are two pushbuttons, both of which are connected to arduino, but only one is used. It is used to select menu items or values. The knob allows you to scroll through the menus and adjust values. There are a couple of capacitors to keep the power smooth and two diodes running backwards towards positive from the drain on the MOSFET's to handle any kick-back from the pumps. Without these two diodes, you arduino will reset everytime the pump runs.
Once I had the program working, I wanted to make it pretty so I could put it in a box and use it on my tank. So I added the LCD screen I had laying around and added some functionality to the program. There are options to calibrate the pumps, prime the pumps, and build a dosing schedule. The schedule is stored in a seperate class that has arrays full of times and volumes. The flow rate is the same for all doses. There is currently room for two schedules, Alk and Cal, but I am going to trim the program down a bit once I am satisfied and probably add functionality for more pumps. It also saves the schedule and the calibration in the EEPROM so you don't lose it on a reset.
Right now the schedule is built by selecting a start time, end time, total volume, and max volume per dose. Right now I dose 60ml per day of the bicarbonate recipe so I do 5ml every two hours and I do the calcium doses on the odd hours. It runs the schedule every day and starts over at midnight. There is absolutely no error checking to see if the schedule will fit or to make sure that two additions don't coincide. I want to add that, but as of right now you have to calculate things before you put it in.
That pretty much does it. If I can find somewhere to host the code I will post it. It uses several of my home-made libraries. I'll package them up and post them too if anybody wants it. I'm sure a real programmer would have a field day with my code, but it works and that's good enough for me. I'm not claiming any real skill here. Just didn't want to pay big bucks for a dosing pump.
I bought these cheap peristaltic pumps off e-bay for about $30 each. I wanted to use them to dose 2-part. To my surprise I found that they were quite precise. So I built a little Arduino sketch to run it.
These are the pumps that I got.
These pumps run from about 6V to 12V dc. The flow rate of the two pumps did not match, one pumps 26ml/min at 12V and the other pumps 40ml/min. I think the slow one is defective, but there's really no sending it back and even though it is slow it is consistent. I use it for alk since I like to drip that slower anyway.
The flow rate is nice and linear with voltage, being about half at 6V. So I decided to use a MOSFET (RadioShack IRF510 was what I had on hand.) and PWM signal from the arduino. Power goes from positive to the pump, then from the pump to the drain pin, and then from the source pin to ground. The PWM signal goes to the gate pin. Since the pump doesn't run below 6V, use PWM values from 127 - 255 in the Arduino sketch.
Here is the full set-up...
And a close-up on the breadboard part.
The knob and the two ic chips are part of a rotary encoder that was put together for an entirely different project and ended up getting absorbed into this when I got tired of pushing buttons over and over. It's a horribly inefficient use of a rotary encoder using two 555 timers and an 8-bit shift register, but it worked well for what it was originally built. When I build a permanent version to put on a board I will trim this whole part down. Besides, it doesn't work very well.
Aside from that there are two pushbuttons, both of which are connected to arduino, but only one is used. It is used to select menu items or values. The knob allows you to scroll through the menus and adjust values. There are a couple of capacitors to keep the power smooth and two diodes running backwards towards positive from the drain on the MOSFET's to handle any kick-back from the pumps. Without these two diodes, you arduino will reset everytime the pump runs.
Once I had the program working, I wanted to make it pretty so I could put it in a box and use it on my tank. So I added the LCD screen I had laying around and added some functionality to the program. There are options to calibrate the pumps, prime the pumps, and build a dosing schedule. The schedule is stored in a seperate class that has arrays full of times and volumes. The flow rate is the same for all doses. There is currently room for two schedules, Alk and Cal, but I am going to trim the program down a bit once I am satisfied and probably add functionality for more pumps. It also saves the schedule and the calibration in the EEPROM so you don't lose it on a reset.
Right now the schedule is built by selecting a start time, end time, total volume, and max volume per dose. Right now I dose 60ml per day of the bicarbonate recipe so I do 5ml every two hours and I do the calcium doses on the odd hours. It runs the schedule every day and starts over at midnight. There is absolutely no error checking to see if the schedule will fit or to make sure that two additions don't coincide. I want to add that, but as of right now you have to calculate things before you put it in.
That pretty much does it. If I can find somewhere to host the code I will post it. It uses several of my home-made libraries. I'll package them up and post them too if anybody wants it. I'm sure a real programmer would have a field day with my code, but it works and that's good enough for me. I'm not claiming any real skill here. Just didn't want to pay big bucks for a dosing pump.

")