Well Here it is. The new Disco Doser Code.
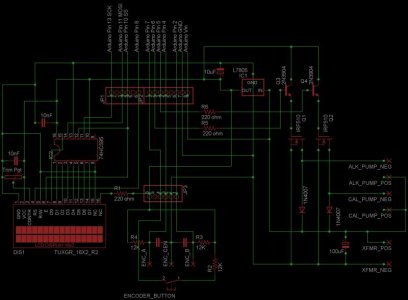
Give me a few days to get it installed and looking pretty and I'll put up schematics. They have major changes.
A big thanks to everyone that has had input on this thread
I am much much happier with what I have now. There are still a few minor tweaks I would like to make ( A warning when a container is running low) but I really want to get my tank back to an automated state so I'll finish up later.
There are two zip files. One contains the entire program with headers, and the other contains some libraries that are used by the program that are not included with the normal Arduino software.
YOU NEED BOTH zip files. DOSING_COMPUTER_6.zip goes in your sketch folder and extracts a folder containing the program and headers. DOSING_COMPUTER_LIBRARIES.zip goes into your libraries folder and extracts four folders.
DosingPump is just a small class that holds all the parameters for the pump and has the functions that convert volumes and rates into PWM rates and time.
LiquidCrystal_SPI_8Bit is a slightly re-written copy of the normal LiquidCrystal library included with Arduino. The only change in this version is the write function which uses SPI instead of seperate pins on the Arduino. If you have your LCD connected the old fashioned way, you can replace this include with the standard LiquidCrystal library and change the declaration of LCD (single line of code in DOSE_head.h) in the program and everything should work fine.
QuickPin is my own deal. That allows me to use operators to program with pins and also gives me the pin reading speed needed to handle things like rotary encoders. Regular old digitalRead just isn't fast enough to catch the pulse train. It has a big read me file and it has it's own thread
here on RC.
This time the code was written with other people reading it in mind. It should be much easier to follow. It also broken up a little better, in case one needs to borrow one part or another for use in a different project.
In order to make the thing Arduino 2.2 compatable, I had to move everything off into header files. These have to stay in the folder with the main program and if you open the main program in the Arduino software, you should see the headers on the other tabs. There are instructions in the read me file on how to copy and paste the whole thing into one long program so you can read through it in a linear fashion if you want to, but that will not compile with Arduino 2.2.
So far the only known bug is in the way the year is displayed while setting the time. It's just not worth fixing right now. I never set the date on it anyway.
Below is the text of the Read Me 2 file that explains how to use the doser. In the near future we can talk about how any particular features work. Please ask any questions you have about the code.
*******************************************************************************************************************
****************************************** FEATURES ****************************************************************
*******************************************************************************************************************
This application includes a few new features. The dosing is controlled by s very simple logic that ensures the entire volume will be dosed each day and also ensures that dosing intervals are respected. This is accomplished by allowing the schedule to be adaptive. With each dose, the computer will calculate the time left in the window and the volume left to dose and will break the volume up to fit the rest of the window. If a dose is missed, this results in a small increase in each subsequent dose in the window to make up for it. The last dose of the window will always complete the dosing target. It will also adapt for time. If a dose is late, each subsequent dose will also be late so that the interval is respected. When using 24 hour dosing (start time = end time) this offset will continue into the next day. If the dosing window is less than 24 hours, then the offset will not carry over and the computer will remove the last dose time of the current window if needed to maintain the interval. No volume will be lost by this process since the volume is also adaptive.
Another new feature is the container. A container is associated with each schedule. This represents the bottle youare dosing from. Set the size and the volume in it, and the computer will subtract from this any time it makes a dose. Future versions will allow for warnings when you are running out of suppliment. If you choose not to use the containers, it will not affect the performance in any way.
The last new feature is booster dosing. With conventional dosing, when a level gets low due to a water change or running out of suppliment for a week or whatever reason, we will usually add some amount of suppliment to boost the level back up to where it should be. This is in addition to the amount we normally dose just to maintain levels. But this has to be done by hand.
With booster dosing, you can set a volume and number of days and the program will add the additional amount neccessary each day until it is all dosed. For example, I dose 60mL per day into a tank. Let's say something happens to the tank and the alkalinity is low by 2dkH. I need to add 2dkH, and I don't want to raise by more than 0.5dkH per day to avoid shocking things. Assume that it takes 100ml of alkalinity suppliment to raise the level by 1dkH. So 200mL needs to be added over four days in addition to the 60mL per day that is normally dosed. Simply enter a booster dose of 200mL and 4 days and the computer will add an additional 50mL each day for four days for a daily total of 110ml per day during the boost.
*******************************************************************************************************************
****************************************** SCHEDULE RESETS ******************************************************
*******************************************************************************************************************
There are several conditions that will require the schedule to be reset. Due to the way the schedule keeps track of volume and time, setting the time or entering a new schedule could cause unexpected results for the first dose if things aren't reset.
When the schedule is reset, the program first looks to see if the current time is within the dosing window. If not, then it simply sets all everything to where it would be had the previous window been run using the new settings. The time of the last dose will be the end time of the new window. This causes few problems. Resetting the schedule while outside the dosing window is the safest option.
If the current time is inside the dosing window, then the computer will calculate how many doses would have been made so far if the current window had been run using the new settings. First it calculates how many intervals would have passed, and sets the time of the last dose to the time that the last dose would have occurred. It then sets the running voume tally for the day to reflect the doses that would have been made so far. This means that the volume total may not accurately reflect the actual volume dosed on the day that the schedule is reset. It also means that any booster doses that were included with the day's target will be lost, but subsequent days will not.
Setting a new schedule or getting a schedule from EEPROM will always cause a schedule reset.
When setting the time, you will be given the option to reset the schedules. It is recommended, but may not be necessary in all situations.
*******************************************************************************************************************
****************************************** MENUS ****************************************************************
*******************************************************************************************************************
When you first fire up the dosing computer, you see the word Starting for 2 seconds. It will then check a byte in EEPROM to see if flags are set indicating a schedule is saved in EEPROM. If so, it will download it.
Press the button and you get the top level menu. The choices are:
Set Time , Schedule , Single Dose , Booster , Pump , Container , Run
Set Time has the only known bug. It has to do with how the year gets displayed while you set the time. I haven't been setting the date and that one sneaked through and just wasn't worth going back in to fix.
Set each number by turning the knob and lock in your choice with a button press. Once you set the seconds, you will be asked whether or not to reset the schedules. If you don't reset, then the schedules will think that they have been turned off for the whole time missed between the old time and the new time you set. For small forward changes this can be handy, but since time only goes forward to the schedules, if you set the clock back the schedules will think they missed almost a whole day and dump in doses to catch up. This is handy if it's what you intend to do, but if not resetting the schedules will simulate the conditions that would be present at the new time if the pumps had been running all along. It will cause you to lose the days booster volume, so go easy on time resets if you are using boosters. I'm not using a RTC of any kind, and I allow the time to wander by a few seconds per day. It's not really a big deal, but I definitely don't look at the dosing computer to get the real world time. Every couple of months I think I will do a hard reset of the Arduino to avoid any millis() rollover issues that may crop up.
Booster allows you to set a booster dose. First is will ask you which schedule to boost. Then it asks for the total volume of the booster dose. Then it asks for the number of days over which to break up the booster. The program will look at the current time and determine if it is within the dosing window. If so, it will calculate an appropriate volume to add to the current days schedule and that will count as the first day of boost. If the current time is outside the dosing window, or is too close to the end of the dosing window, then the program will simply hold the volume and number of days and will add the appropriate amount to the target volume each day to finish the booster in the given number of days.
Schedule , Pump , and Container take you to other menus.
Run exits the menu and
Single Dose allows you to choose a pump and will ask you for a volume and rate. It will then run the pump for that volume and then exits the menu.
The Schedule menu has the following options:
Set Schedule , Adjust Volume , Show Schedule , List Schedule , Match Schedule , Save Schedule , Get Saved , Clear Saved , Exit
Set Schedule allows you to set the dosing window. If you set the start time = to the end time, then dosing will run continuously. You can use the start times to stagger the dosing of alkalinity and calcium. If you set the end time at least one interval short of the start time, then dosing will run and complete within the window every day. From here you also set the interval (in Hours : Minutes format) between consecutive doses of the same suppliment. It is recommended to set the intervals the same for alkalinity and calcium and set the start time one half interval apart. This will stagger the doses to avoid dosing them together and causing a precipitation. The
Match Schedule option will do this for you, setting the calcium schedule to match the alkalinity schedule with the appropriate stagger.
After the schedule is set by the user, it will immediately be reset. This means any booster volume that day will be lost, but subsequent days will still get their boosters. The reset will simulate conditions that would be present had the computer been running on the new schedule in the past. The running tally for the day will reflect that simulation and may not reflect the actual amounts dosed. The container volumes will not be affected by this discrepancy.
Finally you will set the volume and rate for the doses. Rate is never matched between schedules. You can always have two different rates if you want.
Adjust Volume does exactly what it says. It allows you to adjust the dose for a either schedule.
Show Schedule displays the parameters set for a schedule.
List Schedule will simulate dosing and print the times, volumes, and a daily running tally to the screen. It will ask for a number of days to run the schedule. The first day will start at the current time and will include any boosters present at the time. The rest of the days will run the entire window and will not include any booster volumes that may be set. At the end of each simulated day, the running tally will be shown with the target volume. They should match.
Match Schedule will set the calcium schedule off the alkalinity schedule. The alkalinity schedule is always the master. The intervals will be set to match and the start and end times will be staggered. You will be given the option of matching the volumes.
Save Schedule , Get Saved , Clear Saved all deal with schedules saved in EEPROM. Get saved will reset the schedule once the new schedule is loaded. If this happens during the dosing window, any booster dose for the day may be lost and the days volume dosed tally may not reflect the actual volume dosed.
Exit returns you to the main menu.
The Pump menu has the following options:
Prime Pump , Calibrate Pump , Save Calibration , Exit
Prime Pump allows you to use prime either of the dosing pumps. First you are asked which pump to prime. Then the word
PRIME or
QUIT is displayed. Pressing the button while PRIME is displayed will run the pump at full speed until you release the button. QUIT exits to the main menu.
Calibrate Pump will start the calibration sequence to set the minimum PWM rate, and the minumum and maximum flow rates. You will first set the minimum PWM rate. The pump will run at a low speed. Use the knob to adjust the rate until you find the slowest speed at which the pump will reliably run. If you do not want to use PWM, set this to full speed.
You will then set the minimum and maximum flow rates. The procedure is the same for both. The screen will promt you for a button press to start. Put the output tube from the pump into a graduated cylinder or other container and press the button. The pump will run for 30 seconds. When it stops, you will be asked to input the volume that was produced.
Exit returns you to the main menu.
The Container menu has the following options:
Reset Container , Add to Cont , Set Cont Vol , Set Cont Size , Exit
With any of these choices, you will be asked to choose a container to act on. The container choice will list both the name of the schedule it is associated with and the current volume and container size. There is also an exit option, so you can use any of these to check up on the current volume in your containers.
Reset Container will reset the volume to the size. Use this when you refil your container.
Add to Cont allows you to add to the current volume. Use this when you add suppliment, but don't fill the container completely.
Set Cont Vol and
Set Cont Size allow you to set the size of the container (the total volume you want to use it for) and the volume currently in the container.
Exit returns you to the main menu.
*****************************************************************************************************************************
Hope you find this code helpful. Please feel free to take it apart and do whatever you want with it. I only ask that you let me know about any improvements that you make that I might enjoy.
")