Drilling 40B for Eshopps Eclipse overflow- How would YOU do it?

gibbous

New member
I'm setting up a 40 breeder, and have an Eshopps Eclipse L overflow that I am planning to use. Planning to run it Herbie style with the third drain being emergency backup only.

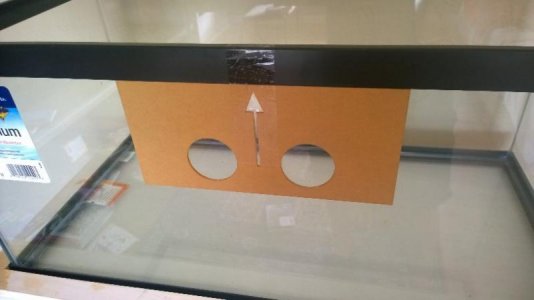
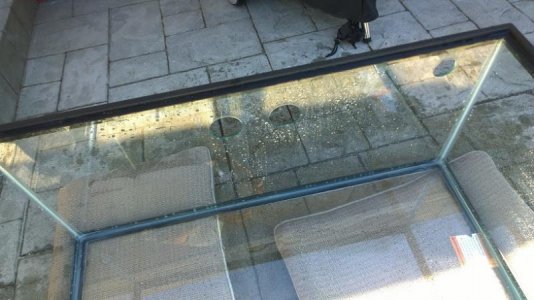
I'm almost ready to drill the tank and have looked around the web for how other people have installed this overflow, and particularly on a rimmed tank. In the examples that I've seen people have followed what the directions and oriented the drilling template with the arrow pointing up toward the rim on the outside of the tank. That looks like the first picture.

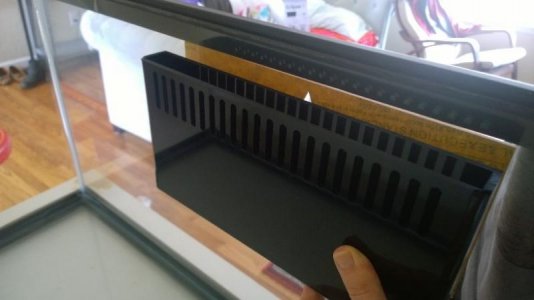
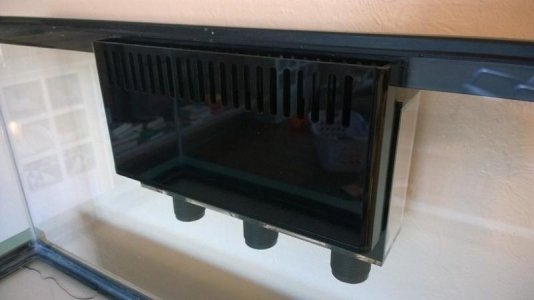
The result of that in the pictures I saw online was a very low water line due to the low positioning of the internal box. The 2nd picture shows where this would be, though it's a little bit hard to judge since the bulkheads push the box off the glass some. If installed at this point, the top of the internal box is just about even with the bottom of the rim, so it's pretty much impossible to get the water line all the way up to the rim.

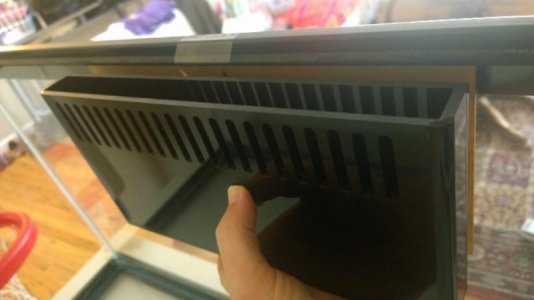
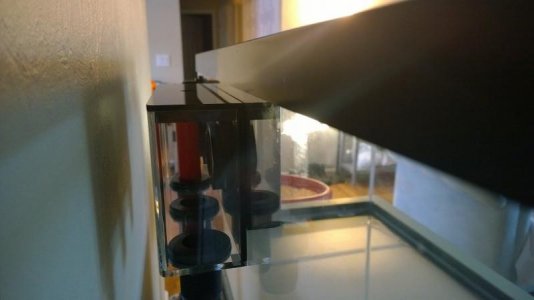
However, if I put the template on the inside of the tank where the rim is higher, both the internal and external boxes seem to fit perfectly around the rim as high up as they could possibly be in the tank. 3rd photo shows this position.

Eshopps has an instructional video that shows a tank being drilled for one of these, but the tank is rimless. In that video the template is aligned to the top of the glass, which seems like what would be happening if the template was aligned with the inside of the rim which is closer to the top. That's the way I'd like to do it to keep the water line as high as possible.

Which way would you do it if this tank was going to be in your living room?
 
Pictures showing?
 

Attachments

  • OF1.jpg
    OF1.jpg
    27 KB · Views: 3
  • OF2.jpg
    OF2.jpg
    32.4 KB · Views: 3
  • OF3.jpg
    OF3.jpg
    32 KB · Views: 3
Personally I would go with it measured from the inside of the glass to keep the higher water line. From what you describe about the video it sounds like that is basically what they did only on a rimless.
 
I have a modular marine overflow which is very similar to this. I can tell you that my internal part is much closer to the inner rim than how you have it in that picture on the middle. Like, the top of the internal portion of the box is maybe 1/4" below the top rim. Of course, if you're gonna install it that high, you need to make sure the external box will still sit below the exterior part of the rim, otherwise that's problematic too.

The picture on the right looks a bit better...i'd consider going even a tad higher.

you can only mount it so high until the external box hits the outside rim....unless you have the box custom made like I did, heh. i had given them the rim dimensions and it was customized so that it would all "just work"
 
I really hate the thin glass on a 40b. Have you ever had one before? When full, they deflect a full 1/4" in the middle - right where you will have your holes. Me? I would not trust a 40b to drilling. Others have done it but the tank scares me. I will only use them for sumps anymore.

Also those overflow boxes are not very well designed. They put the water level below the rim, which looks bad. The outside box is the same level as the inside, setting the stage for a flood.

I suggest you do an over the back overflow like an eshopps until (if) you get a larger tank.

Proceed with caution!
 
I have this overflow on a penisula 80g shallow rimless and I really like it.
I mounted the top of the template an inch below the top so I have about an inch and a half from the water line to the top of the tank. You're able to raise the water level in the tank with some fittings in the overflow box
 
I really hate the thin glass on a 40b. Have you ever had one before? When full, they deflect a full 1/4" in the middle - right where you will have your holes. Me? I would not trust a 40b to drilling. Others have done it but the tank scares me. I will only use them for sumps anymore.

Also those overflow boxes are not very well designed. They put the water level below the rim, which looks bad. The outside box is the same level as the inside, setting the stage for a flood.

I suggest you do an over the back overflow like an eshopps until (if) you get a larger tank.

Proceed with caution!

heh, my LFS still has a bunch of 40/50/65G tanks that were made a good 20-30+ years ago, all 36x18 footprint. 1/2 glass on all panels, and that wonderful 70s style wood veneer. they don't build em like they used to....though i could do with just black on the frame, lol. no thanks to the "vintage stereo" style wood grain, hahaha.

However, i can assure you, they don't put the water level below the rim if you install them correctly. On mine it's nearly at the rim with the pump off, and with pump running it's well above the rim and looks just fine. However, without being able to adjust the height of the holes on the exterior box (as you could do if you have one custom made for you), you are limited how high you can place the external box, which is where it hits the rim, and that in turn limits how high you can place the internal box, since the holes between the two boxes are fixed. Hopefully they offset it enough from the factory to handle most situations.

Also, the outside box is actually not the same level as the inside box, it's usually an inch or two below it. It is on mine, it looks to be the case on the eshopps as well.
 
I appreciate everyone's thoughts so far.

I am concerned about drilling holes of this size in a tank this small, and find it a bit alarming that the tank might already bow that much when full. Seen pictures of this overflow on this tank but now that all the pieces are in front of me it's not really confidence inspiring.

Regarding the fit of the boxes around trim though, when the template is placed on the inside both the inner and outer boxes are as close as I would want them to the top of the rim on both sides, including enough space for the lid to fit on the outer box. However the exact positioning of the teeth is also what looks like it could cause an issue.

The top of the outer box is about 1 1/4" lower than the top of the inner box. The lower edge of the weir teeth on the inner box is about 1 3/4" from the top. So that leaves about 1/2" of the length of the teeth that are going to be below the rim of the tank. With enough flow the water level may go up that much, and in fairness to the design of this overflow I think it was made to handle higher flow applications on bigger tanks than what I'm using it for.
 
Lol you shouldn't have any issues with drilling a 40b tank. I'm not too sure where other are speaking from but I've had my 40b drilled for years and it's still holding up strong. I also have a few 20b and 10gal tanks drilled with bulk heads and over flows and all is well. I just did a coast to coast on a 20b for a SPS tank in the works. If you're worried about bowing make a small brace though it's definitely not needed, but if it will help you sleep at night lol


Sent from my iPhone using Tapatalk
 
I've drilled 4 different 40B in the back or bottom of the glass and never had an issue with one of them. They certainly didn't deflect or bow anywhere. The frame is there for a reason.

The last one I drilled was roughly 3 years ago and I doubt they changed the construction on them but maybe they did
 
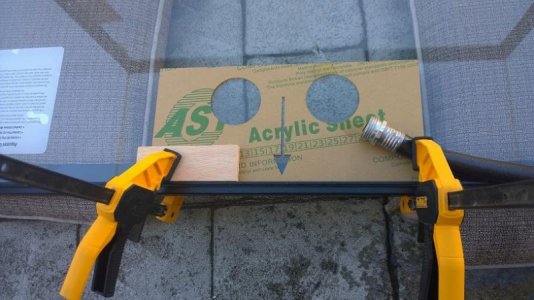
Just wanted to follow up on this in case it can help anyone in the future. I finally got around to drilling the tank for this overflow plus a GH 3/4" return kit. Results are shown in the attached pictures.

Drilling from the inside was a little awkward but got it done. I left a little room between the top of the template and the inside of the rim, and that was about the amount of clearance that the inside box had from the rim. Plenty of clearance on the oustide box.

One thing that's pretty clear from the picture of the inside box mounted is that there is a lot of tooth below the rim of the tank. I don't think I'll be able to make that up with water flow, so I expect to have to add a thin piece of acrylic to the inside of the weir to raise the water level that way.

I haven't water tested it all yet but so far so good. Hopefully I won't have to report back later saying it all exploded...
 

Attachments

  • WP_20160926_12_52_52_Pro.jpg
    WP_20160926_12_52_52_Pro.jpg
    60.2 KB · Views: 2
  • WP_20160926_13_38_55_Pro.jpg
    WP_20160926_13_38_55_Pro.jpg
    60.7 KB · Views: 3
  • WP_20160926_18_04_26_Pro2.jpg
    WP_20160926_18_04_26_Pro2.jpg
    30.1 KB · Views: 3
  • WP_20160926_18_04_50_Pro.jpg
    WP_20160926_18_04_50_Pro.jpg
    27.1 KB · Views: 2
Aqueon. Going to give it a good test outside before fill it indoors. I expect that it will be fine, but also expect that I'll always be a little bit worried about it on some level too.
 
I wouldn't worry about the tank itself as long as u drilled the holes the recommended distance apart & from the edges of the tank. I have the same tank & I have 5 holes drilled in the back glass & it's been perfectly fine now for the 3 years it's been setup. I'm not sure where the glass bowing idea came from but mine has not bowed at all.

As far as the overflow box. I would test it how it is, it may surprise u how far the water level will be up on the teeth. It will depend on how much flow through the system u have, the more flow the higher on the teeth it will be. I also wouldnt worry about the exterior box overflowing eighther. As long as u have your drains setup properly it is almost impossible for the box to overflow. It's more about the drains then the actual box.

U said u were running a herbie drain but with the 3 drains u should run a bean animal. I assume that's what u meant when u said a herbie with a dry emergency but there is a little more to it then that. Beans drain design is hands down the best drain setup. Make sure u set it up properly & u won't have anything to worry about.
 
hah, yeah, a herbie with an emergency almost IS a bean animal. just do it correctly. the only difference would be 2 straight stand pipes vs a durso + straight pipe. the durso just makes the trickle drain quieter. And given you almost always have a tiny trickle on a herbie (as it's nearly impossible to configure it to sit right below without gradually changing over time) you basically are just creating a slightly noisy bean animal.

In your case, you can just stick a strainer on the hole for the full siphon - don't even put any standpipes on that. One like this:
https://www.amazon.com/Lifegard-Aquatics-Profile-Strainer-R441012/dp/B00CRIDNV6

For the "open channel" you'll just need 2 90s connected together with one of the corners drilled as an airhole, and for the "Emergency" it's just a straight pipe.

Given it already came with that little red pipe, all you really need is a 90, a street 90, and a short piece of pvc, and a drill/drillbits. And optionally that siphon strainer, i suggest that regardless since it helps keep junk out of the siphon drain.
 
I also wouldnt worry about the exterior box overflowing eighther. As long as u have your drains setup properly it is almost impossible for the box to overflow. It's more about the drains then the actual box.

The only thing I was really worried about in with the outer box was clearance vs the outer rim of the tank, and there was plenty. The redundancy of drains and bulkheads was pretty much the reason why I went with this model as opposed to the smaller ones which might have been more appropriate for the flow level I'm expecting.

hah, yeah, a herbie with an emergency almost IS a bean animal. just do it correctly. the only difference would be 2 straight stand pipes vs a durso + straight pipe. the durso just makes the trickle drain quieter. And given you almost always have a tiny trickle on a herbie (as it's nearly impossible to configure it to sit right below without gradually changing over time) you basically are just creating a slightly noisy bean animal.

My thoughts exactly, if I can't keep the primary standpipe quiet just with elbows I'll explore other options. I don't mind the occasional tweaks to valves and such to keep things at appropriate levels so I'm just going to go as simple as I can to start.
 
I just did it with 75 gallon aqueon tank from Petco and used the template inside the tank not fully flush with the rim but give a few mm space because the eshopps also has a cover that you need to account for. used the medium size. Also try the drill on scrap glass. The drill bit that comes with the overflow is cheaply made and kinda wobbles. You do not want a wobbly drill bit to drill a hole.
 
Back
Top