Duke's 375 gallon reef tank build

dukecj

New member
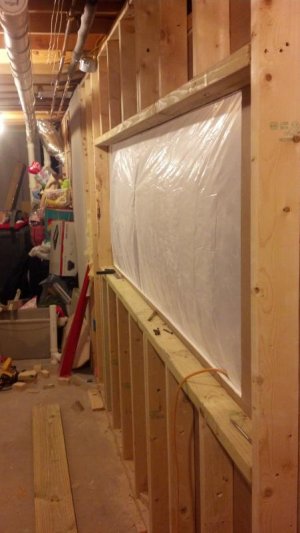
I am in the process of building my dream tank. I always wanted to install a 300 gallon tank as the background for my mini kitchen/ bar area. After I priced the tanks, and measured the area for the tank location, I decided to go with a 220 glass tank instead. It was going to be 72"x 30"x24" wide.

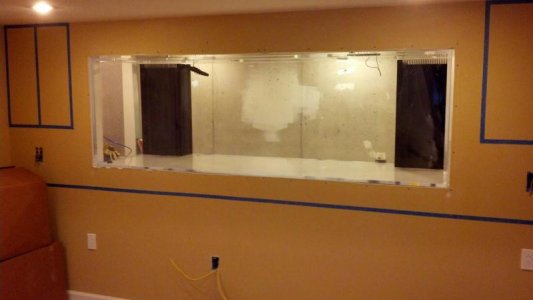
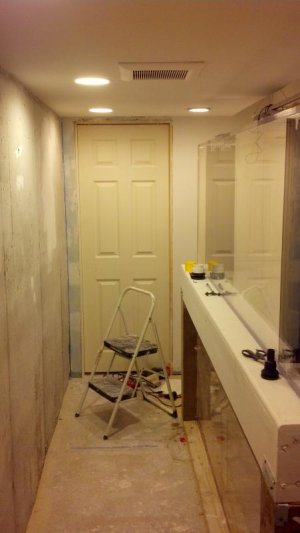
However, I really wanted a 300 gallon tank, so I measured the area again and changed the design to accommodate a tank that was 96"x30"x24" wide. I called a local live fish store (Salt Water Island in St Louis Mo) and priced an acrylic tank instead of glass due to the tanks weight and difficulty moving it to my basement and other factors such as cracking. The LFS told me they had a 180 gallon sump they would sale me for $500.00, which was 72"x24"x24". I went to look at it, and it was a lot larger than I thought it would be in person. I would have to build my stand to accommodate the sump which presented another challenge.
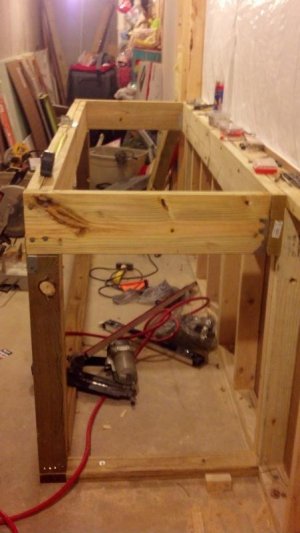
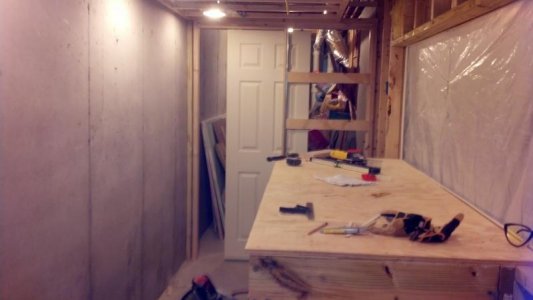
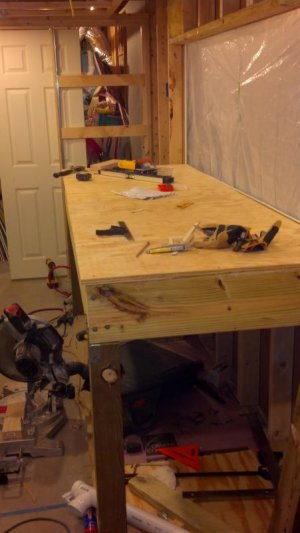
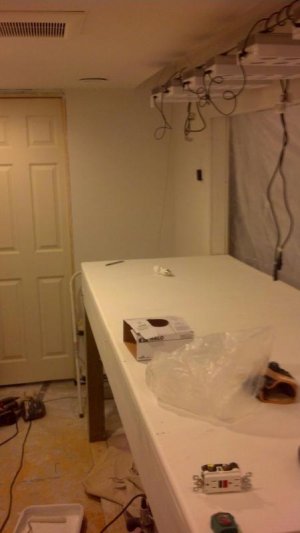
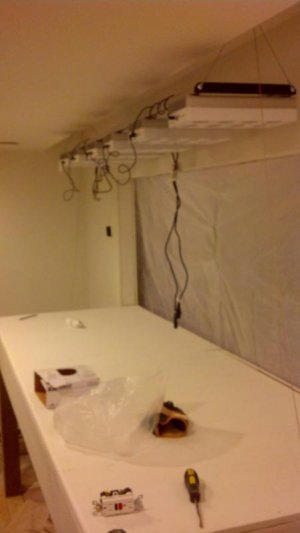
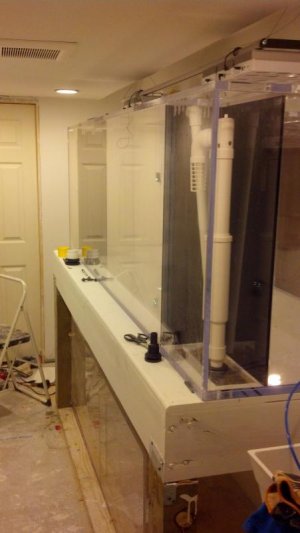
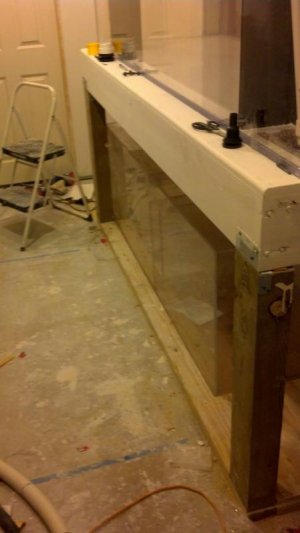
I built the stand 43" high 35" deep and 96" long, which will be the same height as the bar I'm going to build. I built the stand with 2x4s, 2x8 pressure treated wood and 3 4x6s for rear support. This allowed me to use less studs to support the rear of the tank so I would be able to fit the 180 gallon sump underneath.

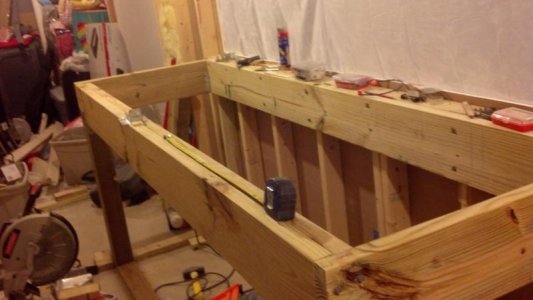
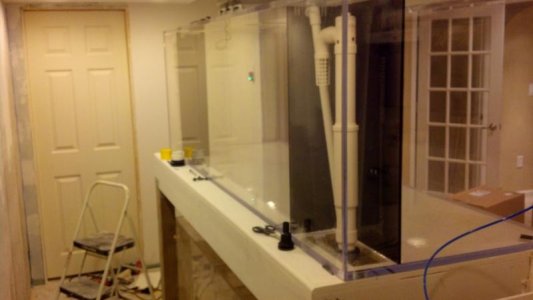
After I completed the stand, I measured it and realized that I could accommodate a 30" deep tank. I called the LFS and asked was it too late to increase the tank dimensions? They said it was not too late so my tank size went from the original 220 gallon to 375 gallons. My dream will soon be realized::dance:
 

Attachments

  • IMG_20130808_091124_750.jpg
    IMG_20130808_091124_750.jpg
    44.2 KB · Views: 8
  • IMG_20130809_073013_903.jpg
    IMG_20130809_073013_903.jpg
    43.2 KB · Views: 10
  • IMG_20130809_073040_558.jpg
    IMG_20130809_073040_558.jpg
    42.4 KB · Views: 10
Nice... I assume we are looking in the fish room area.

What other items are you going to have in there?

Power thoughts?

Humidity thoughts?

I do like the setup, and more the bar on the other side.

What other setups do you have? Just wondering.
 
Worm5406,

Yes, this is the fish room area. I added a 100 amp subpanel to handle the load to this room. The room is sealed from the rest of the basement. Mold tuff green board drywall was used and two pocket doors were installed for easy access. I decided against adding vents/ returns because I did not want humidity introduced into the HVAC system. I also decided against a dehumidifier due to tank water evaporation and energy consumption. Instead I went with a Panasonic FV-15VQ5 Whisper 150 CFM Ceiling Mounted exhaust Fan along with a Panasonic humidity sensor that comes on automatically when the humidity goes above a certain level. It’s really quite, and its energy star rated. My other setup is a 55 gallon reef tank my wife made me do before I was able to get the dream tank.
 
Ahh ok... so you are not a newbie... HAHAHHA.. I was just wondering... and a bit worried at first.

Welcome to Reef Central by the way!!

SO...

Tell us what else you have or have planned... Ask away with questions or ideas, we like to bounce ideas off each other and get opinions.

Quite a few of us like video's and of course pictures. I personally set up a camera and did time lapse of my build/tank placement/ and other views.
 
DUKE'S 375 Gallon Tank Build

DUKE'S 375 Gallon Tank Build

One of the biggest challenges was to integrate the tank into the bar area and I wanted the maintenance on this tank to be easy. This meant I would have to run new plumbing and electrical. The first challenge was to install a subpanel to accommodate all the new equipment. I did not want to bust my concrete to add new plumbing, so I went with a Zeller utility under sink drain.

In addition, I did not want any sound on the display side so the walls and ceiling were insulated. I did not want the waste and supply pipes running directly over the tank so I decided to frame the room. I had to build a soffit around the waste pipes in order to maximize ceiling height. This was necessary because the tank height is over 6 feet and I needed room for the lights and to get the rock into the tank.

Five recessed lights were installed along with a Panasonic FV-15VQ5 Whisper 150 CFM Ceiling Mounted exhaust Fan along with a Panasonic humidity sensor that comes on automatically when the humidity goes above a certain level.
 

Attachments

  • IMG_20130818_162116_697.jpg
    IMG_20130818_162116_697.jpg
    34.8 KB · Views: 8
  • IMG_20130818_162443_870.jpg
    IMG_20130818_162443_870.jpg
    34.3 KB · Views: 7
  • IMG_20130818_162515_303.jpg
    IMG_20130818_162515_303.jpg
    42.1 KB · Views: 8
  • IMG_20130902_225352_132.jpg
    IMG_20130902_225352_132.jpg
    36 KB · Views: 11
  • IMG_20130903_053910_708.jpg
    IMG_20130903_053910_708.jpg
    34.1 KB · Views: 9
I have purchased the following equipment…

SRO XP5000E protein skimmer

375 gallon acrylic Tank: 96x30x30, with one inch acrylic

180 gallon sump refugium: 72x24x24

HY 7000 Water Blaster return pump

2 VorTech MP60w ES

6 AI SOL Blue LEDs

Two Little Fishies GFO PhosBan Reactor 550

BRS GFO & Carbon Reactor – Jumbo

BRS 5 Stage Drinking & Reef PLUS
RO/DI System - 75GPD

410 LBS of CaribSea Arag-Alive Special Grade Reef Sand, Fiji Pink

275 LBS of BRS Pukani dry rock
 
Last edited:
The fish room has been taped, mudded, skim coated, and primed. The utility sink has been installed, and final GFCI electrical connections have been made. The tank stand has been routed, sanded and primed, and the AI Sol rail and lights have been installed and tested. At this point I was just waiting on the tank, which had been delayed. The delay gave me more time to do research on how to make this build as maintenance free and as energy efficient as possible.
 

Attachments

  • IMG_20130910_053849_204.jpg
    IMG_20130910_053849_204.jpg
    28.1 KB · Views: 8
  • IMG_20130910_053924_016.jpg
    IMG_20130910_053924_016.jpg
    22.3 KB · Views: 10
I would like to thank you all for welcoming me to Reef Central. Your comments and suggestions are greatly appreciated. I will really need help from you alls vast knowledge and experience when it is time to make fish and coral selections. I still consider myself new to the hobby.
 
The tank and sump finally arrived. The sides of the tank will be painted black. The back of the tank will be left clear so the tank will be viewable from both sides. This will also make easier to keep the back of the tank free of algae. The back wall of the fish room will be painted blue instead in order to give the illusion of a much deeper tank.
 

Attachments

  • IMG_20130914_124357_532.jpg
    IMG_20130914_124357_532.jpg
    30.1 KB · Views: 11
  • IMG_20130914_124443_245.jpg
    IMG_20130914_124443_245.jpg
    32.7 KB · Views: 9
  • IMG_20130914_124458_874.jpg
    IMG_20130914_124458_874.jpg
    34.8 KB · Views: 11
  • IMG_20130914_124503_664.jpg
    IMG_20130914_124503_664.jpg
    36.4 KB · Views: 9
  • IMG_20130914_124522_694.jpg
    IMG_20130914_124522_694.jpg
    33.9 KB · Views: 8
I ordered 250 pounds of Pukani dry rock from BRS after researching the pros and cons of the rock. The pros were the rocks' looks, and the main con was phosphate leaching problems. The possible solutions were bleach soaking, vinegar soaking, muriatic acid bath, lanthanum chloride, or GFO. I originally did not want to do the muriatic acid bath, however, when I placed the rock in the bleach solution there were roaches jumping off the rock. I assume they were feeding off the decaying matter on the rock.

I soaked the rock for 3 days in bleach. I removed them from the bleach, thoroughly power washed them, and allowed them to dry in the sun.
 

Attachments

  • IMG_20130929_103357_391.jpg
    IMG_20130929_103357_391.jpg
    64.8 KB · Views: 10
The next step was the muriatic acid bath. As you can see, a lot of nasty stuff came off the rock. I also removed many decaying creatures off the rock. After the acid bath the rocks were power washed again. I inspected each rock and allowed them the dry in the sun for a few hours.
 

Attachments

  • ResizedImage_1380903578581.jpg
    ResizedImage_1380903578581.jpg
    75.2 KB · Views: 9
  • ResizedImage_1380903485616.jpg
    ResizedImage_1380903485616.jpg
    57.3 KB · Views: 9
  • IMG_20130929_103313_142.jpg
    IMG_20130929_103313_142.jpg
    39.5 KB · Views: 10
  • IMG_20130929_103251_633.jpg
    IMG_20130929_103251_633.jpg
    45.5 KB · Views: 10
After the acid bath I soaked the rock in heated saltwater. Two days later I tested the phosphates with my API test kit, and it measured 0 PPM. I did not trust the results so I ordered a Hanna UL phosphorus checker. After soaking for a week I tested the water with the Hanna checker and it measured 200 PPB or 6.132 PPM, which is as high as the Hanna goes. I ordered a bottle of Kem-Tek 265-6 Pool and Spa Phosphate Remover (Lanthanum chloride) off Amazon for $16.99. I did a 100% water change and took the nuke'em approach. Three days later the Hanna checker read 48 PPB, or 0.14. At this point I felt it was good enough to remove them to start shaping the rock.
 
Back
Top