You are using an out of date browser. It may not display this or other websites correctly.
You should upgrade or use an alternative browser.
You should upgrade or use an alternative browser.
Foam/Rock Wall for my 265 gallon Tank!
- Thread starter Speckled Grouper
- Start date

lemkerailroad1
New member
any updates grouper????????
I have been through 100's of builds and your looks awesome and a lot of my questions were answered in you descriptions
I have started my own thread (don't want to hijack), dave 185, please check it out and see if im on the right track, comments always welcome
but great build and looking forward to update and pics
Speckled Grouper
Sticks Suck!
Well, after 5 years, I can tell you that the foam wall looks great, nothing has disintegrated, no ill effects whatsoever on livestock, it all looks very natural, encrusted with Coraline and lots of the other "pests" we all have to battle.....
Due to my work and an allergy I developed that seems to be aggrevated by Saltwater and/or coral, I have not spend much time on the tank. So my corals are not in the best of shape. Lots of the fish like the Powder Blue and the Yellow Tang are still with me.
The Solaris, of course, has long crapped out and I am running just the T5's that I had originally installed as supplements.
I hope, one day, soon, we'll get that canopy off, install some new lights, add some new corals and take some pictures.........")
Due to my work and an allergy I developed that seems to be aggrevated by Saltwater and/or coral, I have not spend much time on the tank. So my corals are not in the best of shape. Lots of the fish like the Powder Blue and the Yellow Tang are still with me.
The Solaris, of course, has long crapped out and I am running just the T5's that I had originally installed as supplements.
I hope, one day, soon, we'll get that canopy off, install some new lights, add some new corals and take some pictures.........
zeminabr
New member
Amazing thread. Just read through the whole thing (I need a life, apparently).
One question I have, though: I have a 150 gallon acrylic tank that is full of saltwater, and saltwater alone (no life or rock yet). I want to secure my epoxy-cured rock wall to the back of my acrylic tank with the water staying in there. I know silicon doesn't bond well with acrylic, but I have seen silicon used for bonding plastic to plastic. I cannot tell if it is reef-safe, though. There is nothing on there about mold-free, so I am assuming it is not harmful. Thoughts? Or thoughts on other ways to bond this wall underwater to an acrylic tank?
One question I have, though: I have a 150 gallon acrylic tank that is full of saltwater, and saltwater alone (no life or rock yet). I want to secure my epoxy-cured rock wall to the back of my acrylic tank with the water staying in there. I know silicon doesn't bond well with acrylic, but I have seen silicon used for bonding plastic to plastic. I cannot tell if it is reef-safe, though. There is nothing on there about mold-free, so I am assuming it is not harmful. Thoughts? Or thoughts on other ways to bond this wall underwater to an acrylic tank?
Zeminabar, dont worry I just read through all of this tread and these rock wall tanks are amazing.
I do have a question that I don't think was ever asked. How would you take one of these walls out to upgrade the tank. If you need to move how would that work without losing all of the rock and coral?
Grouper, I hope you get back into your tank and give your fishes and corals some love. Your tank was inspiring.
TropTrea
New member
The foam rock wall would remain in tact after you took the water and everything else out of the tank. It would only add minimium weight to it.
As far as the corals and other rocks you can move them in the buskets you saved every time you bought sea salt. Simply fill them up only 3/4 full with rocks then corals and finaly water then recover them for the move.
As far as the corals and other rocks you can move them in the buskets you saved every time you bought sea salt. Simply fill them up only 3/4 full with rocks then corals and finaly water then recover them for the move.
that is the one problem that I have found with my build. I have positioned the locklines to provide additional flow behind my scape as it is not silicone to the wall itself.
I believe that lots! of flow in my tank overcomes this design flaw. Time will tell.
Having this much has forced me to remove most of my euphila but my SPS love it!
I believe that lots! of flow in my tank overcomes this design flaw. Time will tell.
Having this much has forced me to remove most of my euphila but my SPS love it!
buffalo123
New member
Won't the sand stick to the foam when its still wet , rather than using epoxy?
I was wondering if i can build a portion of wall for my reef and add it without completely tearing my reef apart. Just a back wall with some shelves.
I was wondering if i can build a portion of wall for my reef and add it without completely tearing my reef apart. Just a back wall with some shelves.
miatawnt2b
New member
Yesterday I saw an interesting tank with foam walls. The individual simply used black foam and put it directly on the back of his aquarium when it was positioned on it's back. Then he sprinkled agrivate on the foam before it dried. The end results were beautiful.
How long has his tank been set up? I'm not confident in the longevity of the direct foam to glass bond.
-J
New Twist
New Twist
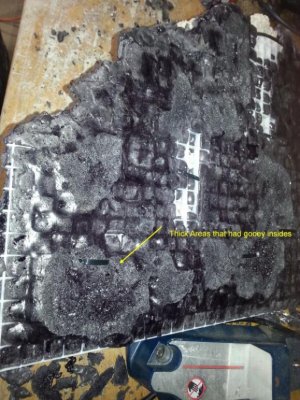
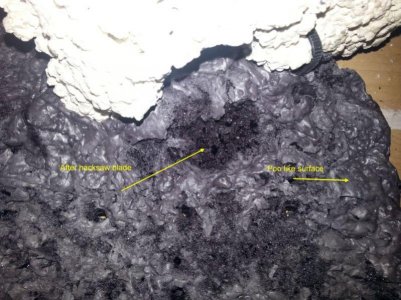
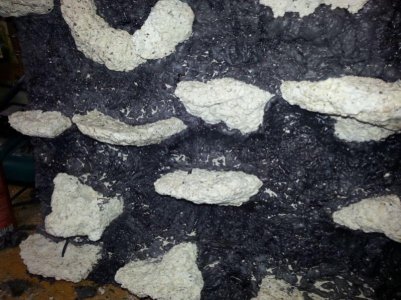
First Thanks Speckled One for OP! It inspired me to make my own foam wall. Some stuff I thought I'd share about my build. I pushed the foam flat after 30 min. cure time because I wanted to reduce the size and buoyancy of the foam. Found that after 24 hours cure the foam expanded through the backside and I had to hacksaw the thick areas down. Pic 1. I also found the thick areas had some gooey, sitcky, messy uncured foam inside them! Still on fingers 48 hours later! That foam is evil! The other thing I didn't like twas the "poo" like surface of the foam after it cured so I scored it with a Phillips head screwdriver. Pic 2 As I was scoring the surface I thought maybe I can push a hole through wall to help the curing in any thick areas of foam. While I was at it I thought again why not push holes through the entire wall to increase that surface area of the wall. I plan to have a 3/4" between wall and aquarium and to circulate water back there as well. Pic 3 shows main wall section pre-scoring hole poking!
New Twist
First Thanks Speckled One for OP! It inspired me to make my own foam wall. Some stuff I thought I'd share about my build. I pushed the foam flat after 30 min. cure time because I wanted to reduce the size and buoyancy of the foam. Found that after 24 hours cure the foam expanded through the backside and I had to hacksaw the thick areas down. Pic 1. I also found the thick areas had some gooey, sitcky, messy uncured foam inside them! Still on fingers 48 hours later! That foam is evil! The other thing I didn't like twas the "poo" like surface of the foam after it cured so I scored it with a Phillips head screwdriver. Pic 2 As I was scoring the surface I thought maybe I can push a hole through wall to help the curing in any thick areas of foam. While I was at it I thought again why not push holes through the entire wall to increase that surface area of the wall. I plan to have a 3/4" between wall and aquarium and to circulate water back there as well. Pic 3 shows main wall section pre-scoring hole poking!
Attachments
Speckled Grouper
Sticks Suck!
First Thanks Speckled One for OP! It inspired me to make my own foam wall. Some stuff I thought I'd share about my build. I pushed the foam flat after 30 min. cure time because I wanted to reduce the size and buoyancy of the foam. Found that after 24 hours cure the foam expanded through the backside and I had to hacksaw the thick areas down. Pic 1. I also found the thick areas had some gooey, sitcky, messy uncured foam inside them! Still on fingers 48 hours later! That foam is evil! The other thing I didn't like twas the "poo" like surface of the foam after it cured so I scored it with a Phillips head screwdriver. Pic 2 As I was scoring the surface I thought maybe I can push a hole through wall to help the curing in any thick areas of foam. While I was at it I thought again why not push holes through the entire wall to increase that surface area of the wall. I plan to have a 3/4" between wall and aquarium and to circulate water back there as well. Pic 3 shows main wall section pre-scoring hole poking!
Taz, I went through everything you stated above, well you saw my "permanent" finger "make up" ....lol...that stuff is evil.....
But you get the hang of it eventually, and even if it looks ugly for a while, once it's covered with coral or has coral in front of it, you won't even notice.
I will make a concentrated effort to take some pictures of the back wall just as soon as I can. You'll see what I mean
thereeftank
New member
Hey guys, quick question, what happens with the stagnant water in the back? what if it collects particles of food? or something starts rotting?
I didn't silicone mine to the back. somehow missed that part during my build. Of course it started to float and move. I have it anchored down with pvc pipes. (closed canopy), however there is a gap behind the wall and I think it's a source for my ever constant battle with nitrates/phosphates. During water changes, I sometimes direct a pump output behind the wall and get lots of grey water ... makes me want to tear it out and start over. I had mine for about 1.5 years
Space is the Place
Space is the Place
I plan on securing the bottom of wall to a 3/4" PVC and dilling holes in PVC every 2-3" to jet water out and over the fake wall. I'll send sketch-up later.
Space is the Place
Hey guys, quick question, what happens with the stagnant water in the back? what if it collects particles of food? or something starts rotting?
I plan on securing the bottom of wall to a 3/4" PVC and dilling holes in PVC every 2-3" to jet water out and over the fake wall. I'll send sketch-up later.
TropTrea
New member
How long has his tank been set up? I'm not confident in the longevity of the direct foam to glass bond.
-J
I believe it was up for several years like from pre 2003 because he used to be a regular customer of mine when I had my store. He explained his technique to me years ago which and used it on several Chichlid tanks before using it on hiis reef tank.
Apply a coat of Great Stuff in black on the back glass about 1/4 to 1/2 inch thick. Then sprinkle it with Hawian Black agrivate and crushed shells. Then lightly form and press everything together gently. Finally let everything dry at least 48 hours. After it is dried he would vacum the surface to remove any loose particles . (I think this step is a waste as the loose particles could be used as substrate) Then finally he fills the tank lets it sit for 24 hours and then drains and refills several times to make sure any remaining toxins are removed.
He has a Tanginiquin cichlid tank that is custom and looks fantastic with this. The tank is 6' long 13" deep and only 13" tall but everything is black tones except the fish that really stand out. I had seen that tank back around 2000 and it looks prety much the same now with the exception of algea issues on the top of the of his back wall.
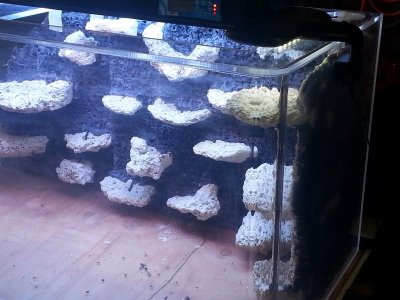
Dry fit update
Dry fit update
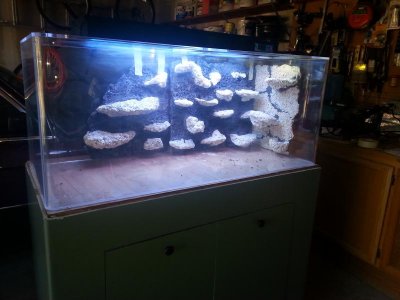
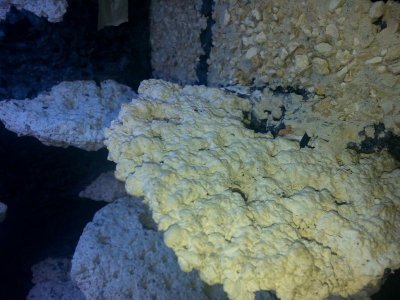
I'm posting update of build while I wait for the epoxy I ordered to arrive. I include one close up to show the epoxy coral/sand work on wall. Just want to take this time to say THANKS REEF CENTRAL folks for making this website happen. Sites like this do so much to help hobbyists do their thang!
:fish1:
")
Dry fit update
I'm posting update of build while I wait for the epoxy I ordered to arrive. I include one close up to show the epoxy coral/sand work on wall. Just want to take this time to say THANKS REEF CENTRAL folks for making this website happen. Sites like this do so much to help hobbyists do their thang!
:fish1:
Attachments
TropTrea
New member
On this general subject but a little different twist.
Back in the early 80's they were localy selling in several pet stores stone and convrete walls designed to cover the back of various sized tanks. They were basicly special concrete designed for under water footings with pieces of rock stuck in them while they were curing. I know several people that used them in show african chichlid tanks but no one that used them with fish that required soft water. I assume this was because lim is a main ingredient of concrete and it could bleach into the water causing high alkilinity.
However with salt water we are generaly increasing our alkilinity to keep th water balanced for our corals. So would the lime bleaching still be a problem in the salt water application? Could there be other issues using a concrete mix for salt water and especialy reef aplications?
the ones I saw also in use were all only several months old only. Which brings ip new questions as to what prompted people to not continue using this system? One thought might be the difficulty trying to remove any algea growth from the concrete. Then it moves the question if algea removal was an issue will it also be an issue on the long term with the foam rock walls?
lemkerailroad1
New member
I don't want to hijack but I would like to put a few words in if you don't mind
I have read a lot on this foam wall subject and like a lot of them, your tank is looking good
someone a few posts back was talking about moving, and after it was drained it really wouldn't add but a few pounds, I have over 200 lbs in my tank, the tank is a 185 acrylic which doesn't weigh anything, but it took 6 of us to put her on the stand......lol
just food for thought......
another guy mentioned about it being stuck to the wall and rotting food or stale water behind, I don't know how the guys with the glass tanks do it but I have a arylic and the foam is glued to the wall holding the rock work, nothing can get behind it......
heres a pic of mine

I have a build thread here if anyone wants to check it out, please do and let me know what you think http://www.reefcentral.com/forums/showthread.php?t=2303071
but other than that,
I have read a lot on this foam wall subject and like a lot of them, your tank is looking good
someone a few posts back was talking about moving, and after it was drained it really wouldn't add but a few pounds, I have over 200 lbs in my tank, the tank is a 185 acrylic which doesn't weigh anything, but it took 6 of us to put her on the stand......lol
just food for thought......
another guy mentioned about it being stuck to the wall and rotting food or stale water behind, I don't know how the guys with the glass tanks do it but I have a arylic and the foam is glued to the wall holding the rock work, nothing can get behind it......
heres a pic of mine
I have a build thread here if anyone wants to check it out, please do and let me know what you think http://www.reefcentral.com/forums/showthread.php?t=2303071
but other than that,
Similar threads
- Replies
- 5
- Views
- 107
- Replies
- 3
- Views
- 797
- Replies
- 6
- Views
- 3K