Fully Self Cleaning Skimmer Cup/Neck with Enhanced Dome Lid

CuzzA

New member
Ok, so as I looked at the design of nearly every skimmer, I see many flaws. Of course these probably are more "cost" associated than anything else.

The one major flaw I see is the design of the flat lid. Logic tells me that the reason why the skimmer lid is always loaded with gunk is because that's where the bubbles are popping. How many of these bubbles are actually popping and falling back into the neck? I don't know and I'm not going to watch a slow frame video and try to count bubble bursts.

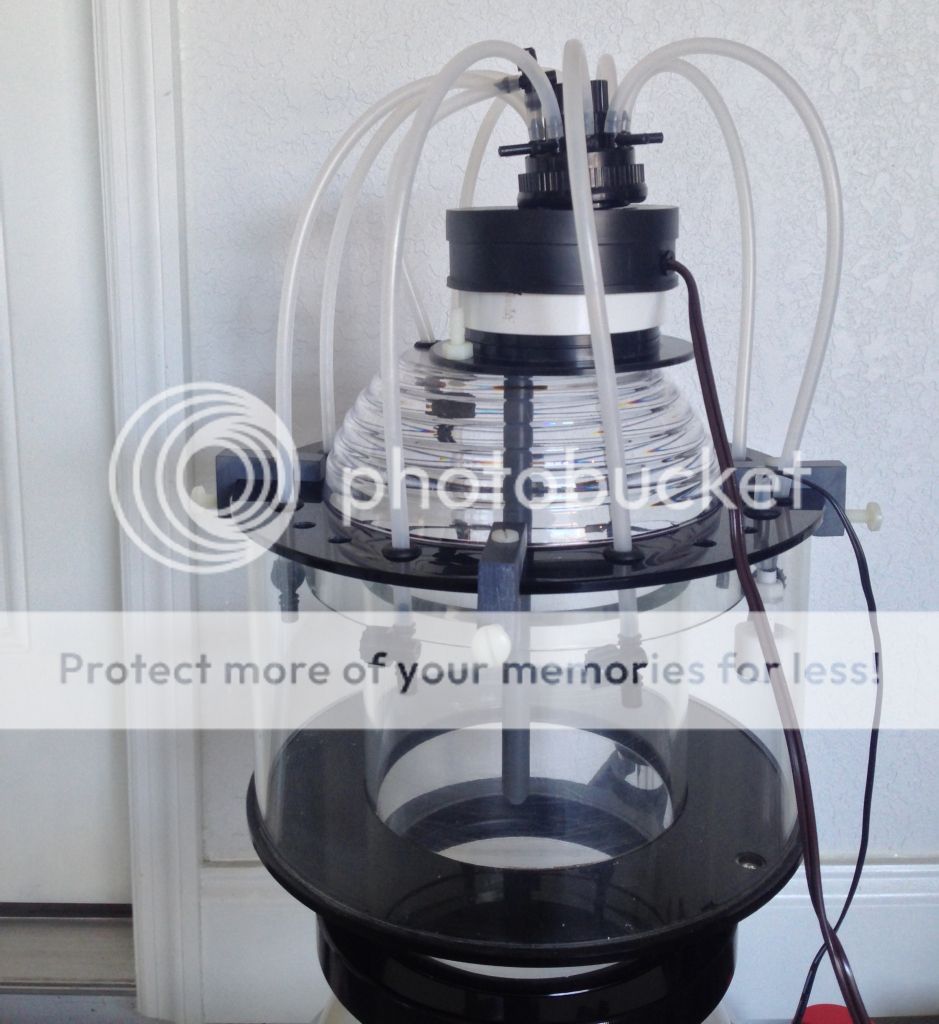
But I did decide to add a dome to my lid. My idea behind this is that you'll increase skimmate production and efficency because A) The foam height will be greater and more easily fall over the side and B) When the bubble does pop on the domed lid it will travel along the slope into the cup rather than into the neck. During my research on this I found that every single person who ran their skimmer without the lid saw an increase in skimmate production.

The next mod I executed was the standard neck cleaner with a squeegee. There's really nothing special here as other have done it and many companies sell neck cleaners for about triple what it would cost you to do it yourself. Of course the benefit to a neck cleaner is that there is a certain point when the neck is so dirty that skimmate production slows down and it must be cleaned. With the neck cleaner you will always have peak performance from a clean neck perspective.

Finally, the last mod I added was a complete wash down system. I thought about what I'd have to do to keep my skimmer running great and the bottom line is you have to clean the neck and wash the cup. So with this mod my skimmer cup and domed lid will get a blast wash down from the micro jet sprinklers I installed. This will be fed by an rodi container. I'll also add a solenoid to the drain to open in conjunction with the cleaning process.

Of course all of this will be automated daily with my Apex including the use of the float switch inside the skimmer cup.

There are still a few more adjustments I need to finish. I'll order the squeegee from Avast and I need to figure out a better way to secure the float switch. For some reason I'm having trouble locating hollow plastic threaded pipe.

06b773f3bf196c9d7e52b6a9a8615204_zps96c84814.jpg


8cda4b82ecd3ac4adc756a3b4628aab6_zpsecdc44cc.jpg
 
Last edited:
Next project is my DIY Sea Swirls at cost of around $40 each. They couldn't be any simpler to replicate.
 
Looking forward to the sea swirls man. Ive been wanting to make some sea sweeps too. Love the skimmer diy btw.
 
Great idea. Would like to see it in action. I 2 want to make sea sweeps and swirls. Looking forward to seeing them
 
This is actually very funny for me because when I first started my most recent tank I jumped into it without doing much research into recent technological advances. I had a nano in High School and thought I could replicate that success in a 90 gallon. So I walk into a tiny LFS that doesnt even really carry saltwater fish, however this guy had a huge box of used equipment in the back of his shop he let me look through. Sure enough there was a Marineland 100 skimmer in there, only downside, missing the lid. I dig around a little bit more and found a plastic bowl that just so happened to fit snug on the cup of the skimmer. The skimmer actually worked quite well and I do believe that the bowl on top helped it to collect extra skimmate.
 
Irish, it only makes sense. I think extra vent holes are advantageous as well. You don't want any head pressure on your foam head.
 
Video of it working?

I'll water test everything and post a video as soon as I get the squeegee in. The skimmer is a used SRO 5000 with a new never been wet bubble blaster pump for my 300 that I don't have yet. I'm having the steel stand raised from 30 inches to 36, so everything is on hold until I finish that. I'm trying to get everything in order prior to purchasing the tank as I don't want to risk any damage from it sitting in my garage.
 
I like the dome lid idea and your logic behind it seems sound.did you make the dome yourself?it looks like something you found and modified to make it meet your needs.if you did all the mods to the skimmer yourself then I really have to give you credit for doing an excellent job.I've been building stuff out of plastics for almost 20 years now and it really looks professional.the people on the forums who really know me can tell you I have made some really cool stuff for aquariums myself,everything from my own rimless acrylic tanks to cone skimmers.so kudos on the DIY work.I hope it performs as you hope it will.if it does in fact work better i might just steal the idea for when I get around to making another cone skimmer for my 40g breeder when I set it up.
 
I like the dome lid idea and your logic behind it seems sound.did you make the dome yourself?it looks like something you found and modified to make it meet your needs.if you did all the mods to the skimmer yourself then I really have to give you credit for doing an excellent job.I've been building stuff out of plastics for almost 20 years now and it really looks professional.the people on the forums who really know me can tell you I have made some really cool stuff for aquariums myself,everything from my own rimless acrylic tanks to cone skimmers.so kudos on the DIY work.I hope it performs as you hope it will.if it does in fact work better i might just steal the idea for when I get around to making another cone skimmer for my 40g breeder when I set it up.

Thank you. I machined some of the oarts, but I can't claim I made the domed lid. I looked online how to do it and was going to attempt it, until I thought to myself why don't I just buy an acrylic bowl. Party City had the exact size I was looking for and it cost me like $3. So that decision was easily made for me.
 
Parts List

Parts List

As I stated the dome is an acrylic bowl. I simply sanded the bottom to make it flat and smooth. I drilled 4 holes. 1 for the PVC rod shaft that holds a 1/2" rubber grommet as a seal and 2 1/4 inch holes to mount the motor housing and 1 for a sprinkler.

I machined the lid clamps out of PVC bar stock. The nylon nuts and bolts holding it to the lid are 10-32 and I tapped the sides for 1/4-20 nylon screws. This is to prevent the lid from spinning while the motor is pushing the squeegee around the neck.

From bottom to top the neck cleaner consists of:

A 1/2 inch PVC rod for the shaft which goes through a 1/2 inch rubber grommet coated with silicone o-ring grease and installed on the acrylic bowl. You could also use a lip seal.

The bottom plate motor housing is a 3 inch sewer cap mounted to the bowl with 1/4-20 nylon nuts and bolts. I sanded off any imperfections from the mold and the company logo/description.

Next I machined a 1/2 inch x 2.75 inch motor mount out of PVC bar stock. I tapped the motor mount from the bottom to install a 1/4-20 beveled flat head stainless steel screw to secure the mount to the sewer cap base plate. I also tapped the top of the mount with 8-32 stainless steel screws to hold the motor to the mount.

From there I cut down a 3" PVC coupling to reduce unnecessary height. This is simply installed onto the sewer cap with a little compression. It's a really tight fit and the sewer cap has ridges that hold it in place very snug.

On top of the coupling is a 3 inch rubber pipe cap that comes with a steel pipe clamp. The clamp is unnecessary. It simply fits very snug right over the top of the coupling. I didn't want anything to be permanently secured in the event I needed to replace the motor.

I drilled a hole through both the coupling and rubber cap and installed a nylon bushing to hold the lamp cord that is wired to the motor. I just plugged any gap inside the bushing with a little silicone.

Finally, I drilled a 1/4 inch hole in the top of the shaft and tapped the side with a 10-32 stainless steel set screw to mount the shaft onto the motor.

All of these parts were purchased at Ace except for the motor which was purchased from McMaster Carr. It's a 3rpm AC synchronous motor and cost around $23. This is the same motor I will use for the Sea Swirls as it has a pretty good torque rating at 6.9 lbs. I already had the PVC bar stock and 1/2 inch PVC rod, but you can source it online or from Alro Plastics in Clearwater.

Also, I'll note that any cuts I made were with a scroll saw including the original skimmer lid that had to be cut to allow the installation of the domed lid.

As for the wash down system, this was purchased at Home Depot. It's nothing more than threaded micro jet sprinklers that screw onto 1/4 inch ro tubing. The tubing is secured to the lid by nothing more than 1/4 inch rubber grommets. The grommets hold the tubing in place perfectly. The manifold was also purchased at Home Depot. This will allow equal distribution of water pressure to every sprinkler head. As I mentioned I will feed it with a pump in a seperate ro/di container.
 
Last edited:
Also, I should note that I may changed the orientation of the manifold. But until I have my stand back and the sump in place I'm not sure how I want to secure it. It will most definitely have a union for easy removal. I just installed it for the photographs.
 
Unfortunately I do not have it running yet. The skimmer is a SRO 5000 for my 300 gallon upgrade. Which should be here any day now.
 
I'm going to laugh when you plug that thing in and it either a) makes contact with an alien species or b) simply explodes.
 
I'm going to laugh when you plug that thing in and it either a) makes contact with an alien species or b) simply explodes.

You mean when it communicates with its cousin and I'm the first human to finally figure out what it's saying.

attachment.php
 

Attachments

  • image.jpg
    image.jpg
    47.8 KB · Views: 2
I like how you said first human because you knew I was going to say "C3P0 understands him!" But I said it anyway. One of these companies needs to license the star wars franchise and rake in the money. I would buy a skimmer that looked like R2D2.
 
Back
Top