Gofor's 60"L X 30"W X 24"T LeeMar Upgrade

gofor100

New member
Hey Guys,

Well, I've been planning an upgrade for quite a while now, and although (given my current living situation) it is slightly smaller than what I was originally planning for, the time has finally come! :dance:

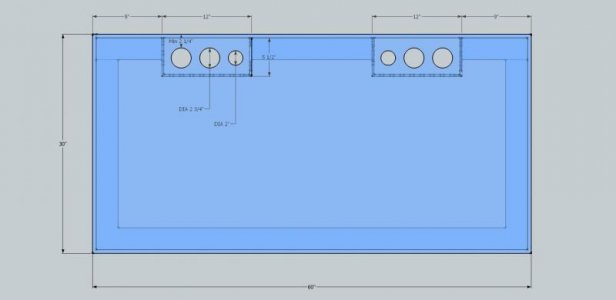
Just a side note... this upgrade almost never happened because it took A LOT of persuading on my part to get my wife on board... in fact, only a couple of weeks ago, I thought this idea was dead in the water. But... she started becoming a little more open to the idea, and I just placed an order for a 60"L X 30"W X 24"T LeeMar Eurobraced tank with Staphire on the viewing panels, set up for the Herbie Method in the overflows (two drains, and one return per overflow). The tank should be ready/delivered in the next month. :fun4:

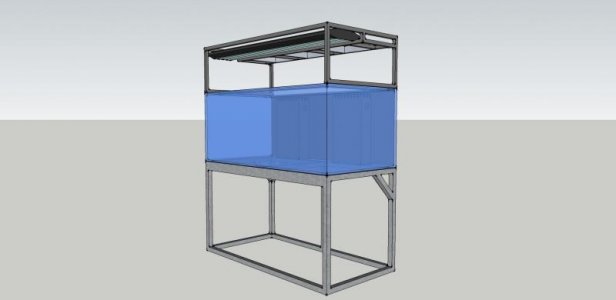
Along with that, I purchased a custom steel stand that measures 36"T so I don't have to bend down too much to see what I hope is an awesome tank. It'll be powdercoated black, and then skinned with probably a mahogany stained cover (still contemplating the final touches on this).

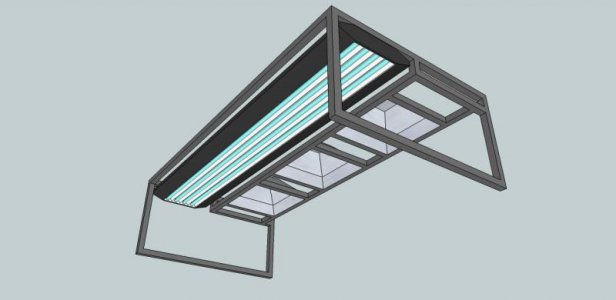
I also had an aluminum light rack created to attach my three 250W LumenMax Elite fixtures and one 48-inch 4-bulb light fixture (probably just a TEK light, but this still needs to be purchased), along with a few LED strips for morning/sunset affects. This will also be skinned with the same material as the stand, and the top will remain open to help with ventilation, also assisted with some computer fans placed in between the MH fixtures (two blowing down, two blowing up).

I'll follow up with some sketches of the above tank/stand/canopy.

Thanks for reading,

-Chad
 
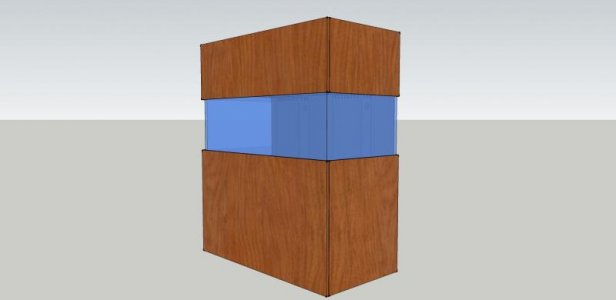
Here are some of the sketches of the tank to give you a better idea of what I'm working with...
 

Attachments

  • Chad's Tank - Overflow Layout.jpg
    Chad's Tank - Overflow Layout.jpg
    19.3 KB · Views: 25
Now the Stand and Canopy/Light Rack...
 

Attachments

  • Chad's Tank - No Skin.jpg
    Chad's Tank - No Skin.jpg
    18 KB · Views: 23
  • GoFor100 Light Rack-v1-side-lights (2).jpg
    GoFor100 Light Rack-v1-side-lights (2).jpg
    27.1 KB · Views: 20
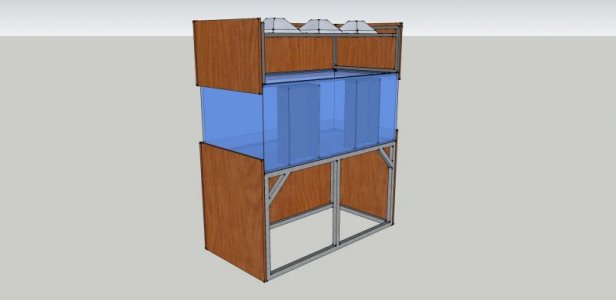
And the finished product... (although the actual stain will be a dark mahogany)
 

Attachments

  • Chad's Tank - Back.jpg
    Chad's Tank - Back.jpg
    18.5 KB · Views: 14
  • Chad's Tank - Finished.jpg
    Chad's Tank - Finished.jpg
    15.8 KB · Views: 20
And here's my equipment list:

(I'll note what I don't already have in case someone wants to cut me a deal )

Filtration
> Skimmer: Vertex Alpha Cone 200
> Media Reactors: TLF Media reactors- one using carbon, the other using GFO (although I'll be upgrading to the larger BRS reactors down the road)

Circulation
> Return Pump: Eheim Compact+ 5000 pump (1320 gph)
> Powerheads: 2XMP40WES placed on each side of the tank, 2XTunze Turbelle Stream 2 6085 (2113 gph each) continuously running in each corner of the tank pointed inward

Lighting
> 3 X 250-watt LumenMax Elite DE MH powered by Lumatek Digital Ballasts
> 1 X 48" 4-bulb T-5 TEK light fixture (don't have this yet, but just looking for a cheap fixture that'll do the job but looks decent)
> 2 X 12"-24" LED strips (have not gotten these yet or determined which brand-open to suggestions)

Temperature Control
> Canopy fans: I haven't determined the brand yet (open to suggestions), but will probably just go to Radio Shack or something, placing 2 pointed up, and 2 pointed down.
> Sump Fan: I've got two (probably only use one) Sunlight Supply Air King 6-inch Clip-on Fans that'll be in the sump area
> Chiller: JBJ Arctica 1/4HP Titanium Chiller
> Heaters: 2 X Won Brothers 350W Titanium Heaters (heard too many horror stories with the glass ones breaking)
(note: All of these will be controlled by an APEX controller- still need this- and each will turn on only when a certain temp is reached)

Supplements
> Dosing Pumps: I currently have a LiterMeter III system that takes care of all of the dosing (Ca/Alk/Mg)
> Ca Reactor: I will later purchase a GEO calcium reactor, and run this in conjunction with the dosing pumps as a safeguard- I travel for several days at a time sometimes and need a backup

Substrate/Rock
> Sand/Substrate: CaribSea Aragonite Special Grade Reef Sand (with a few bags of the Aragamax Sugar-Sized Sand that I already have)- still need several bags of the Special Grade Reef Sand in case anyone knows of good deals out there.
> Rock: Just got approximately 150 lbs of Marco Rock at a local show (Reef-a-palooza) for $2.00/lb. Not only was this cheaper than I could get online, the really cool part was that I was able to hand select every single piece... and got first dibs since I was their first customer of the show. I'll seed the dry rock with a carefully selected and quarantined live rock piece, but a majority of this will be dry rock since I don't want to inadvertently add any unwanted pests.

So there it is... any thoughts/suggestions are welcome (although a majority of the equipment has already been purchased, so I hope you agree with my purchases).

Thanks,

Chad
 
And finally, I just placed my order for an Advanced Acrylics custom sump this week (should have it by this Friday, which is plenty of time before the tank should arrive).

It's pretty much as big of a sump that I could fit while still leaving some room on the right side of the stand to place future equipment (i.e. Calcium Reactor and CO2 tank) and current equipment (such as my dosing pumps/containers).

The result... a 43"L X 24"W X 18"T sump.

Sorry for the lack of pictures with this post, but I'll try to describe the sump as best I can and will post pics when I actually get it.

I'm actually going sockless, so the Return section will be approx. 5"L X 24"W, and will have a pair of baffles (under-over) to keep any detritus in this section so I can vacuum it up when I do my weekly waterchange, and to keep the water level in the next section stable.

Next is the Skimmer/equipment section, which will be 14"L X 24"W... this will fit my Vertex Alpha Cone 200, my heaters, and 2 media reactors (one for carbon, the other for GFO). Immediately after this section there will be a triple-baffle (over-under-over).

Next is the Refugium, which will be 9 3/4"L X 24"W... I'm still contemplating just doing a "cryptic fuge", where I would put a good portion of rubble and LR (maybe with a DSB- need some feedback/help on deciding this) vs. the "typical fuge" where people keep chaeto and what-not. I'm leaning towards the cryptic fuge because it's simpler and will not need any equipment (i.e., light) or use any energy (which I think we all are conscious of- every little bit helps when CA Edison is charging you up the a$$). Immediately after this section is a pair of another baffles (over-under) with a set of teeth that will keep any snails and the like in the refugium.

Last is the Return Section... which will be 6"L X 24"W. This will have a probe holder and house my return pump to the main tank, my return pump to the frag tank (so I can have better control over the flow into and out of each tank and can independently work on each if needed), and the feeder pump into the future calcium reactor (as well as any other equipment I might purchase in the future that would need access to the sump).

Next step... make room for the tank!

Thanks again for reading,

Chad
 
sounds awesome. I see you decided to go with 3 DE across the tank. That should give you plenty of light evenly spread across the tank.

I have been having a very tough time deciding on my light set up for my 60" tank. I was set on 2 full size LumenArc's with 250w SE bulbs. however after purchasing them, I decided my canopy was just going to be too big. Now I am contemplating dropping it down to the mini's, but still just using 2 bulbs.

Thanks!

Yeah... I currently run 2 X 250w DE (same fixtures) on my 48"L tank and the acros love it... so I figure since I'm adding another foot in length and even more in depth (front to back) I should have plenty of coverage for the corals that I'll be keeping if I have three fixtures (along with some T-5 supplement).

I've been REALLY happy with the LumenMax Elite fixtures if you're still contemplating what to get... I could probably get away with just two of these on the upgrade but that would probably require me to be more careful in placement of SPS, which I honestly don't want to worry about. Good luck with your build!

Thanks for reading,

Chad
 
I am told that SE get a little better light spread, but I dont have any evidence, only hope.
Thats why I think I can get away with 2 SE on my 60"x26wX24T.

Plus, I already have ballast for 250w SE, and my VHO set up for actinics, so in theory all I need is a couple of good reflectors.

I have 2 large rock bommies, and thats where all my SPS will go, the hope is that I will have my LPS out in the sand beds.

Can wait to see your actual tank.

Yeah, not sure about the light spread on SE vs. DE, but I do know the fixture has A LOT to do with that. Also, LumenMax Elites come in the SE version as well if you're interested. (I promise I don't work for them, I just really like their fixtures :D).

It sounds like your set-up should work though given that you have two designated spots for your SPS.

I can't wait to see my actual tank too!!! :bounce2:

Thanks,

Chad
 
Alright,

Progress is being made (albeit, without pictures... YET).

So here's what's been happening the last couple of weeks and what's coming up...

> ROCK: Got 150+ lbs of Marco Rock at RAP, and was actually the first person to get to their booth that Saturday (got there when it opened up), so I was able to select from all of their show pieces and had first dibs on EVERYTHING. Needless to say, I got some pretty nice pieces for a great price and will take some pics when I unload everything and start laying out my aquascape.

> SUMP: As I'd mentioned before, I ordered my custom sump (43"L X 24"W X 18"T) from John at Advanced Acrylics a couple of weeks ago and John dropped it off at a LFS just this last weekend. When I went to pick it up, all of the dimensions were spot-on, and it looks great. Brought it home this last Saturday, it passed my leak-test, and now it is all set for the upgrade. Pics should come this weekend.

> PREPARING FOR THE TRANSFER: So my current set-up is a 60 gallon DT and a 35 gallon Frag Tank, both plumbed together. The problem is my DT/Frag Tank has several pests that I'd prefer to be without (i.e., planaria, apitasia, and some nuisance algae) and I don't want to introduce these little buggers into my new tank. So I've devised a plan that should minimize the chance of infesting my new tank.

1) Break down my Frag Tank and transfer all of the corals into my DT- this is so that I can scrub down the Frag Tank really good (then leave it dry for a couple of days) and dremel the overflow teeth (have had problems with the water-level and circulating the water). I actually just completed this step last night and am in the process of cleaning and re-filling the Frag Tank with a mixture of new saltwater and saltwater pulled from the DT.

2) Break down the DT, dip all corals/inverts, and transfer these with as little of the existing rock as possible- this is where the corals/inverts will live until the new tank is set up, cycled, and ready. This is also where I will closely observe the corals/inverts (mainly the rock some of them may be attached to) to make sure the pests didn't get transferred or are removed before spreading. Since my new tank won't be up and running (and ready to have corals) for another couple of months, this should be a sufficient quarantine process for all of my corals. Once the new tank is ready, I have it set up where I can easily plumb them back together and run them off of the same sump. I hope this step will be completed this weekend, since the tank should be arriving in the next couple of weeks.

3) Quarantine my fish- I'll actually just be using my current 60 gallon DT as a QT (even though I currently have only 3 fish- a Starry Blenny, Firefish, and Yellow Wrasse). They will be placed in the 60 gallon for at least one month (probably longer) and go through a treatment of Cupramine to ensure that no Ich parasites get into the new tank (even though I've never seen one spot on my fish, I want to be super careful with this because I will be keeping some sensitive fish in the new tank). All new specimens will go through the same treatment (with the possible addition of Prazipro treatment in the last week of quarantine).

Sounds like a lot of work for me, but hopefully in the end it will all be worth it.

Thanks,

Chad
 
Tagging along. I'm excited to see how your build goes. I am designing a system that mirrors yours. Im sure I will have questions for you as your build goes on.
 
Looks like you've got a good plan going for your upgrade. I'm jealous.

Where is your tank going to be located?

I see that you're in California. I understand the electrical prices are rather high. Have you looked into LED's for lighting? The upfront cost would be high to light your tank.
However you would be saving money pretty quickly and would recoup the cost in much shorter time than I would out here in StL.

LED's are powerful enough now to penetrate to the bottom of 24 inch deep tanks, and you are planning on a sand bed. So you actually have less depth to go.
LED's are lasting 50K hours, at 10 hour long photoperiods, that's going to be 13.698 years, (13.7 rounded), with 12 hours photoperiods that's going to be 11.415 years of run time.
That's 11-13.7 years without replacing a bulb.

So whatever you're paying for electrical useage, you need to figure out the cost to run three 250 w MH's monthly, plus the cost to replace whatever bulbs you wanted to run yearly.

48" 4x72W AquaIllumination Modular LED Light System

Thats for the Blue, personally I'd go white, but it doesnt appear to be on Premiums website at the moment. These are the AI Sol's, the Phoenix should be out sometime soon and is reported to be less expensive. These are not cheap, and its for 48 inches worth of lighting as opposed to 60. I figure you should get your foot in the door, and then add another one if you need/it want it then.
With this set up you'd be using 288 watts of main (as opposed to supplemental like T-5s etc) instead of 750 watts.

Another option right now is the EcoTech Raydion XR30W.
You would need a minimum of 3 of these, possibly 4, and they can consume as much as 118 watts per fixture, so 354 watts as opposed to 750. But that's only if you're running it on high with all LED's lit. This is designed to be easily programable to change colors to suit your tastes and every case I read where people have switched from MH's to LED's has had to drop the LED intensity down to 50% because they are bleaching their corals. The white, blue and royal blue LED's are all within the narrow band of light spectrum that corals use for photysnthesis. This means that ALL of the light produced by those LED's is useable to the corals. With MH's, the light produced is not just within those narrow useable wavelengths, so there is light produced that cannot be used by the corals, (wasted). The LED's arent doing that, hence the corals being bleached.

Things to Beware of when changing to LED's This explains it better than I can. Full disclosure, I'm a mod on that board, but this is the best way I've seen yet that explains why corals are bleaching when people switch over to LED's from MH's....

The Raydion has both red and green LED's that can be turned on and tailored to meet your aesthetic needs for your tank...

Another option if you cant afford the out of the box systems, (I cant, I'm currently running 250 W MH's on my system too) is to DIY them. I'm looking more at this route myself....Here is one place you can go to DIY them...

http://www.rapidled.com/servlet/StoreFront

I've never DIY'd lighting, but in poking around the site, it appears to be pretty simple...big savings that way.

Also regarding your QT plans....I would suggest not using cupramarine unless absolutely necessary. Even chelated copper is harder on fish than a hypo salinity treatment. Here is another link to that board. Lee Birch is phenominal with fish diet, nutrition, and health....Curing Fish of Marine Ich . I've used the hypo salinity method he outlines there several times with new fish. I havent lost one yet and its less stress on the fish.

I simply use a Kalk dripper and fill it with RO water that has had sodium bicarbonate added to it, get a pH monitor calibrated, and start the drip. A slow drip with sodium bicarb laced RO will keep pH up, (hypo saline water has unstable pH issues), and keep salinity at the desired level for the duration of the treatment. You should also know that if your fish have ever had ich, it will be eliminated from your system after awhile due to the fish developing stronger resistance to it. If its been a year or longer without ich showing in your tank, you dont have it anymore as long as you havent added any new fish, corals, or inverts. That's right, fish, corals or inverts...ich can hitch a ride in with these things. So plan on QT'ing everything you put in the tank for at least 6 weeks before moving it over to your display system.

Dont get me wrong, I'm a huge proponent of QT'ing your fish and inverts to avoid introducing new diseases and to acclimate your more delicate critters to a captive environment, but realize that its very difficult to be 100% effective at keeping ich out of your system. I've gotten to a point where I QT fish for a period of approximately 6-8 weeks to get them eating prepared foods in a safe environment, (no bullying etc) and then I move them over to my system. This reduces the chances of things going bad and gives the fish the best chance possible at acclimating to my system. But I also have a small ich bout going on in my system right this very now. When I say small, I mean one fish is showing one or two spots of ich and has been for about a week. My system is a 120 display, with a 58 satellite tank, a 75 gallon sump,(50 gallons in sump, extra space for errors or general unplanned events, like power outtages), and a 40 breeder frag tank. Total system volume is about 250 gallons. My system contains the following fish:

4 inch Indo Pacific Regal angel (in my care 4 years this month, housed in 120)
4 inch Tomini Tang, (also 4 years this month, housed in 120)
2.5 inch Purple Tang, (also 4 years this month, housed in 120)
3 inch Black Cap basslet, ( 2 years in my care, no idea which month, housed in 120)
Mated pair of Rod's Onyx Clowns, (7 years for female, 5 years for male, housed in 120)
Bonded pair of Picasso Percs, (3 years in my care, housed in 58)
Firefish (3 years, housed in 58)
1.75 inch Blueline Angel, (3 months, showing ich, still eating and behaving normally. Havent seen more than 2 spots of ich on him thus far, housed in 58)
3 inch Powder Blue Tang, (3 months in my care, housed in 40 frag tank no signs of ich, and will not be staying in the 40 breeder long).

Since all of my fish were QT'd before going into my system, I can only guess that I introduced ich into my system by adding some sort of invert. I dont currently QT them. But I will when I upgrade in a couple of years to a tank with similar dimensions to yours.

Sorry for the ridiculously long post. You asked for opinions and well....you asked for it...;)

Looks like you've got a good set up planned out. Congrats.

Nick
 
Tagging along. I'm excited to see how your build goes. I am designing a system that mirrors yours. Im sure I will have questions for you as your build goes on.

Thanks... my excitement is growing by the day... feel free to ask as many questions as you'd like!

-Chad
 
Looks like you've got a good plan going for your upgrade. I'm jealous.

Where is your tank going to be located?

I see that you're in California. I understand the electrical prices are rather high. Have you looked into LED's for lighting? The upfront cost would be high to light your tank.
However you would be saving money pretty quickly and would recoup the cost in much shorter time than I would out here in StL.

LED's are powerful enough now to penetrate to the bottom of 24 inch deep tanks, and you are planning on a sand bed. So you actually have less depth to go.
LED's are lasting 50K hours, at 10 hour long photoperiods, that's going to be 13.698 years, (13.7 rounded), with 12 hours photoperiods that's going to be 11.415 years of run time.
That's 11-13.7 years without replacing a bulb.

So whatever you're paying for electrical useage, you need to figure out the cost to run three 250 w MH's monthly, plus the cost to replace whatever bulbs you wanted to run yearly.

48" 4x72W AquaIllumination Modular LED Light System

Thats for the Blue, personally I'd go white, but it doesnt appear to be on Premiums website at the moment. These are the AI Sol's, the Phoenix should be out sometime soon and is reported to be less expensive. These are not cheap, and its for 48 inches worth of lighting as opposed to 60. I figure you should get your foot in the door, and then add another one if you need/it want it then.
With this set up you'd be using 288 watts of main (as opposed to supplemental like T-5s etc) instead of 750 watts.

Another option right now is the EcoTech Raydion XR30W.
You would need a minimum of 3 of these, possibly 4, and they can consume as much as 118 watts per fixture, so 354 watts as opposed to 750. But that's only if you're running it on high with all LED's lit. This is designed to be easily programable to change colors to suit your tastes and every case I read where people have switched from MH's to LED's has had to drop the LED intensity down to 50% because they are bleaching their corals. The white, blue and royal blue LED's are all within the narrow band of light spectrum that corals use for photysnthesis. This means that ALL of the light produced by those LED's is useable to the corals. With MH's, the light produced is not just within those narrow useable wavelengths, so there is light produced that cannot be used by the corals, (wasted). The LED's arent doing that, hence the corals being bleached.

Things to Beware of when changing to LED's This explains it better than I can. Full disclosure, I'm a mod on that board, but this is the best way I've seen yet that explains why corals are bleaching when people switch over to LED's from MH's....

The Raydion has both red and green LED's that can be turned on and tailored to meet your aesthetic needs for your tank...

Another option if you cant afford the out of the box systems, (I cant, I'm currently running 250 W MH's on my system too) is to DIY them. I'm looking more at this route myself....Here is one place you can go to DIY them...

http://www.rapidled.com/servlet/StoreFront

I've never DIY'd lighting, but in poking around the site, it appears to be pretty simple...big savings that way.

Wow... thanks for the wealth of information! I actually considered LEDs at one point, but since I already had all of the MH's for my prior tank (and had gotten a used one for pretty cheap after-the-fact), I'll at least be starting with MH's. Not to rule out LEDs in the future though.

Actually, once I move to my own place (renting for now), I'll be going with a mixture of solar tubes and T-5, with possibly either LEDs or MH supplementing during the winter months.

Great info though! Thanks!

-Chad
 
Where is your tank going to be located?

Also regarding your QT plans....I would suggest not using cupramarine unless absolutely necessary. Even chelated copper is harder on fish than a hypo salinity treatment. Here is another link to that board. Lee Birch is phenominal with fish diet, nutrition, and health....Curing Fish of Marine Ich . I've used the hypo salinity method he outlines there several times with new fish. I havent lost one yet and its less stress on the fish.

I simply use a Kalk dripper and fill it with RO water that has had sodium bicarbonate added to it, get a pH monitor calibrated, and start the drip. A slow drip with sodium bicarb laced RO will keep pH up, (hypo saline water has unstable pH issues), and keep salinity at the desired level for the duration of the treatment. You should also know that if your fish have ever had ich, it will be eliminated from your system after awhile due to the fish developing stronger resistance to it. If its been a year or longer without ich showing in your tank, you dont have it anymore as long as you havent added any new fish, corals, or inverts. That's right, fish, corals or inverts...ich can hitch a ride in with these things. So plan on QT'ing everything you put in the tank for at least 6 weeks before moving it over to your display system.

Dont get me wrong, I'm a huge proponent of QT'ing your fish and inverts to avoid introducing new diseases and to acclimate your more delicate critters to a captive environment, but realize that its very difficult to be 100% effective at keeping ich out of your system. I've gotten to a point where I QT fish for a period of approximately 6-8 weeks to get them eating prepared foods in a safe environment, (no bullying etc) and then I move them over to my system. This reduces the chances of things going bad and gives the fish the best chance possible at acclimating to my system. But I also have a small ich bout going on in my system right this very now. When I say small, I mean one fish is showing one or two spots of ich and has been for about a week.

Since all of my fish were QT'd before going into my system, I can only guess that I introduced ich into my system by adding some sort of invert. I dont currently QT them. But I will when I upgrade in a couple of years to a tank with similar dimensions to yours.

The location of the tank will be in my downstairs living room, right along side my 35 gallon frag tank.

As for the QT, thanks again for all of the info, but I'm still leaning towards treatment of all fish regardless since my goal is absolutely NO ICH :). I'll definitely look more into the hypo salinity outlined in the link you attached, and see what others have to say on the subject. So I'm definitely not ruling it out just yet.

Also, I thought that ich could only be ridden of by going completely fallow for 2 months (meaning, it can be present without showing signs as long as there is a host that can be had every now and then)... although I've never seen signs of ich in my current DT, I really don't want to take the chance (however minute it might be) to introduce this into the new tank. So, for now, the plan is to QT my current fish, and QT any new fish.

We'll see how it goes.

Thanks everyone for your comments and info!

-Chad
 
1) Break down my Frag Tank and transfer all of the corals into my DT- this is so that I can scrub down the Frag Tank really good (then leave it dry for a couple of days) and dremel the overflow teeth (have had problems with the water-level and circulating the water). I actually just completed this step last night and am in the process of cleaning and re-filling the Frag Tank with a mixture of new saltwater and saltwater pulled from the DT.

Break down the DT, dip all corals/inverts, and transfer these with as little of the existing rock as possible- this is where the corals/inverts will live until the new tank is set up, cycled, and ready. This is also where I will closely observe the corals/inverts (mainly the rock some of them may be attached to) to make sure the pests didn't get transferred or are removed before spreading. Since my new tank won't be up and running (and ready to have corals) for another couple of months, this should be a sufficient quarantine process for all of my corals. Once the new tank is ready, I have it set up where I can easily plumb them back together and run them off of the same sump. I hope this step will be completed this weekend, since the tank should be arriving in the next couple of weeks.

Alright, so although no pictures like I promised, I can say that the pain-in-the-arse 2-day event described above was completed as of the weekend before last and it was a success. All of the corals/clams are doing well in the Frag tank, and this last weekend, I zapped a few aiptasias found on some plugs and will continue to keep an eye out for any others that might pop up.

The new tank should be arriving either this upcoming weekend or next weekend (waiting to hear from the builder)... but either way, this week will consist of making RO/DI water ahead of time (because I'm impatient and don't want to wait a couple of days to fill this thing after I already have it), cleaning/rinsing sand (so I don't have to do this when there is more important stuff to do when the tank arrives), and rinsing/pre-arranging the rock (this is the fun part, and will be done last so I can spend as much time as I'd like on this to make it look SWEEEET!).

Add into this the fact that I have to travel to North Carolina for a business trip later this week, and it leaves me no time to give you guys what I know you want... PICTURES!!! Sorry for the disappointment, but I promise I'll get some posted soon (maybe next week?).

Thanks again for following,

Chad
 
Back
Top