Join me for a strange one...

BTW this is the first thing I've ever seen that garbanzo beans are good for.

So true. Its like eating wet, chalky, dirt balls.


Can't wait to see some of this in the water. I'm wondering if you shouldn't just make all the rock too. Or are you doing that as well? (not necessarily out of clay)
 
tagging along.. this is trully an amazing build..wish i had the patience and imagination u do...keep up the great work, people like you make the hobby a million times more interesting...
 
So true. Its like eating wet, chalky, dirt balls.

:lol: :thumbsup:


Can't wait to see some of this in the water. I'm wondering if you shouldn't just make all the rock too. Or are you doing that as well? (not necessarily out of clay)

Me too! I hope it looks great but the real test is in da-water!

Rock..? This is the rock - I hope. The walls are very three dimensional and these standpipes fill visual space so I shouldn't need much more "stuff" covering the 'sea floor'.
 
tagging along.. this is trully an amazing build..wish i had the patience and imagination u do...keep up the great work, people like you make the hobby a million times more interesting...

Speaking of patience..

I suspect my fish don't believe they'll ever make it over to the new tank at this rate. :hmm2:

Thanks a bucketfull maaz!
 
Ok just finished readin this thread, amazing work and I am sure it has been alot of work for you. Keep it up I am looking forward to your progress.
 
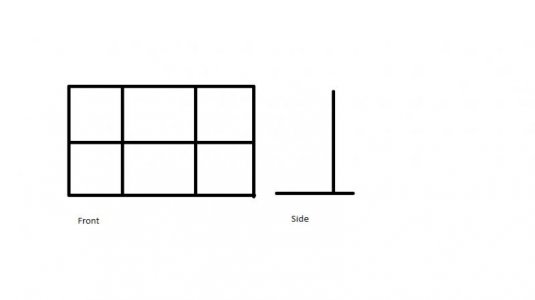
SO with 30 seconds and my sweet paint skills I drew something like I was thinking about. If you used like 1" on the bottom in to an upside down T and 3/4 uprights all schedule 40 or better it might hold. A test one would only cost a few bucks in PVC and if you had a plate laying around you don't need.
 

Attachments

  • Grid.jpg
    Grid.jpg
    11.9 KB · Views: 10
Speaking of patience..

I suspect my fish don't believe they'll ever make it over to the new tank at this rate. :hmm2:

!

I guess your fish knows you too well :thumbsup: I am sure they will enjoy their new home in couple of months time. You are doing a great job sir, keep it going and look forward to see the results from kilns.

Good luck.
 
Ok just finished readin this thread, amazing work and I am sure it has been alot of work for you. Keep it up I am looking forward to your progress.

Thanks!


very cool build

And a hearty thanks to South Africa!


SO with 30 seconds and my sweet paint skills I drew something like I was thinking about. If you used like 1" on the bottom in to an upside down T and 3/4 uprights all schedule 40 or better it might hold. A test one would only cost a few bucks in PVC and if you had a plate laying around you don't need.

Ah sum skilz bro! :lol2:

Seriously, thanks. My hopes are currently pinned on the magnets. I will cobble up a frame like you drew and see if it looks like it would be rigid enough. I kinda hate to give up any of the space behind the plates as my tank is only 24" deep which isn't all that much.


I guess your fish knows you too well :thumbsup: I am sure they will enjoy their new home in couple of months time. You are doing a great job sir, keep it going and look forward to see the results from kilns.

Good luck.

Thanks Tahir!

.
.
.


Today I completed the bottom of the right side discharge hide. If I do say so myself - it looks great! I took a picture of it then left the camera there.. :thumbdown I've also made the clay cylinder for the top half but haven't ordained it with sea-life yet. I plan to do that tomorrow. I'll snag a shot of it too and post them both then.
 
Here's the two ceramic shapes that make up the discharge hide.

The bottom (upside down)

e8vvojpvsa.jpg


and the top(right side up).

l46y5kq76j.jpg


Notice how I had to make these on a form? (7 gallon plastic pails) Otherwise they would slowly sag into heaps while I wasn't watching.

You may also be able to see that most of the tube worm things have a hole at the bottom thru the wall. This way the discharge nozzles will be able to jet water out of this structure. It should also be noted that the sides you can't see have many large holes carved out of them as the back wall is only for stability since it can't be seen from the front.

I will probably put a lid on this thing as sunlight barreling down on them is going to make all the plumbing visible inside - which sort of defeats the purpose of a.... h i d e.
 
Really looking forward to seeing this thing wet... I'm not good with imagining the end products of most builds but you have so many unique ideas here I'm just lost trying to envision the end state... Haha.
 
Thanks Hero.

Well then.. One of our fellow RCers sent me a stack of rare earth magnets to possibly use to hold on/up the ceramic plates.

They're scary strong. They are funny to work with because you just don't realize how strong they are. When you walk by and see one following you around because there's one in your hand it sort gives you chills.

The plan was to either glue them to the back of the ceramic or place them on the front of the ceramic. Either way to shoot thru to a mating magnet on the back of the tank.

I just got a hold of a piece of 3/4" acrylic to check on the hold-up force that would be available from a pair working thru it.

Drum roll....


.
.
.
.
.
.
.
.

2rcyb6e.gif


No joy.

The sliding force on dry acrylic is only measured as 2.8lbs.

Each plate is about 12lbs... That means I'd need about 5 or 6 pairs for each plate. That would be about 168 magnets. I think we can all agree that's not rational. I'd probably have visitors pinned to the front of the tank due to their pocket knives etc.

Instead I'll use the magnets for the cabinetry.

On to the tie wraps. I have various ones that are rated 50lbs each, so two per plate should be plenty.

I was also dreading drilling all those holes in the ceramic as they were taking a lot of pressure and 5-6 minutes each.

After expressing my concern to my ceramics buddy, he whipped out a drill and punched thru a pottery shard in about 5 seconds. He suggested I get a new bit. I did and !! about 10 seconds and little pressure. So today I started drilling them.

Hopefully later today I'll have the first set of three in.
 
I was curious to see if the magnets would work for your project. If the acrylic was 1/2" you probably would have been ok. I think everyones excited to see this tank with water.

Dave
 
Just curious- are the plates going to be resting on the bottom of the tank or not? If they're going to be resting on the bottom then you wouldn't need the magnets to hold them up- just hold them in place, right?
 
Thanks dz. Yes, I think that 3/4" is a problem. I let two of them touch... Gads - talk about force.

Everyones Hero; Nope, they are supposed to be a little off the bottom. That's how it's turned out. I got one column in. Whew, it was hard work. I had to climb in. Not sure how I'll get the last column in when I get to it.

I'll stick up a pic in a little while.
 
Here's the first part of the install.
I drilled the top deck and am hanging these.

I'm using releasable tiewraps which has already come in handy. Working with these plates gives me the feeling that they are fragile but I don't think so. However I don't want to find out so I have to continue being very careful..


Here's the first plate in.

dx941hhxvp.jpg


The first column:

de1ovv31nu.jpg


Close up.

mff3l4airh.jpg
 
Awesome progress. I've been following your build since july, and its been a very interesting journey. It's looking good now! Cant wait to see it wet
 
wow taking a long time but worth it. so how are you going to fix/cover the small 1/4" line between each plate? maybe foam or some epoxy putty for added strength? nice build.
 
Back
Top