You are using an out of date browser. It may not display this or other websites correctly.
You should upgrade or use an alternative browser.
You should upgrade or use an alternative browser.
Large peninsula mounted reefs - show me yours
- Thread starter karimwassef
- Start date
slief
RC Sponsor
slief- that is a stunning tank you have there. Amazing. Those are my dream dimensions.
Thank you very much!
karimwassef
Active member
I can't visualize what you mean by "on top of the tank"...
By the way, your tank dimensions are my ideal 4x8x2 and the peninsula build is exactly what I'm trying to get to.
I can't have access from the viewing side (spousal dissent), so I was thinking of actually putting a catwalk on top to access it from the fish room behind the wall.
By the way, your tank dimensions are my ideal 4x8x2 and the peninsula build is exactly what I'm trying to get to.
I can't have access from the viewing side (spousal dissent), so I was thinking of actually putting a catwalk on top to access it from the fish room behind the wall.
karimwassef
Active member
slief- that is a stunning tank you have there. Amazing. Those are my dream dimensions.
++1 it's big but so well maintained
JohnnyBoyPerth
New member
Painted, Two pack paint. Same stuff that was used on my kitchen cupboardspainted or laminated surface?
Yes, i have air conditioning duct that connects to a whirlybird on my roof. works a treat. Fan pushed the air into the duct, whirlybird sucks it outIs there a duct behind the fan?
")
karimwassef
Active member
Here's my built in that I want to convert into a peninsula
<iframe width="560" height="315" src="https://www.youtube.com/embed/vAqrv-yiuT8" frameborder="0" allowfullscreen></iframe>
<iframe width="560" height="315" src="https://www.youtube.com/embed/ae9YUvq68lg" frameborder="0" allowfullscreen></iframe>
<iframe width="560" height="315" src="https://www.youtube.com/embed/vAqrv-yiuT8" frameborder="0" allowfullscreen></iframe>
<iframe width="560" height="315" src="https://www.youtube.com/embed/ae9YUvq68lg" frameborder="0" allowfullscreen></iframe>
slief
RC Sponsor
I can't visualize what you mean by "on top of the tank"...
By the way, your tank dimensions are my ideal 4x8x2 and the peninsula build is exactly what I'm trying to get to.
I can't have access from the viewing side (spousal dissent), so I was thinking of actually putting a catwalk on top to access it from the fish room behind the wall.
This should help you visualize. :thumbsup:
Here is a picture of me sitting on top of the tank between the two openings.

A selfie.

This is a shot of the top of the tank showing one of the two 24"x24" openings. As you can see, one could get kind of comfortable up there.

karimwassef
Active member
WOW! ok. I get it now. ON TOP OF.
I guess I'm a big guy and that would be dangerous on top of my glass tank.
My lights are also bigger and consume more of the top of the tank so I can barely reach in there.
I guess I'm a big guy and that would be dangerous on top of my glass tank.
My lights are also bigger and consume more of the top of the tank so I can barely reach in there.
karimwassef
Active member
In contrast, I only have 7" of clearance 
<a href="http://s1062.photobucket.com/user/karimwassef/media/2CF7A78E-30D7-4C0C-B31F-53916517FFED_zpsz9loxyud.jpg.html" target="_blank"><img src="http://i1062.photobucket.com/albums/t496/karimwassef/2CF7A78E-30D7-4C0C-B31F-53916517FFED_zpsz9loxyud.jpg" border="0" alt=" photo 2CF7A78E-30D7-4C0C-B31F-53916517FFED_zpsz9loxyud.jpg"/></a>
What lights do you have?
Last edited:
slief
RC Sponsor
In contrast, I only have 7" of clearance
<a href="http://s1062.photobucket.com/user/karimwassef/media/2CF7A78E-30D7-4C0C-B31F-53916517FFED_zpsz9loxyud.jpg.html" target="_blank"><img src="http://i1062.photobucket.com/albums/t496/karimwassef/2CF7A78E-30D7-4C0C-B31F-53916517FFED_zpsz9loxyud.jpg" border="0" alt=" photo 2CF7A78E-30D7-4C0C-B31F-53916517FFED_zpsz9loxyud.jpg"/></a>
What lights do you have?
Yea, that would be a tight fit. I run 8 Kessil 360WE's and given the ability to raise snd lower the light rack, I have plenty of space to get up on top.
They look like kessils to me but I could be wrong.
Good eye! :beer:
karimwassef
Active member
This is why I take so long thinking through the design options... so much to learn.
Thanks,
Thanks,
slief
RC Sponsor
This is why I take so long thinking through the design options... so much to learn.
Thanks,
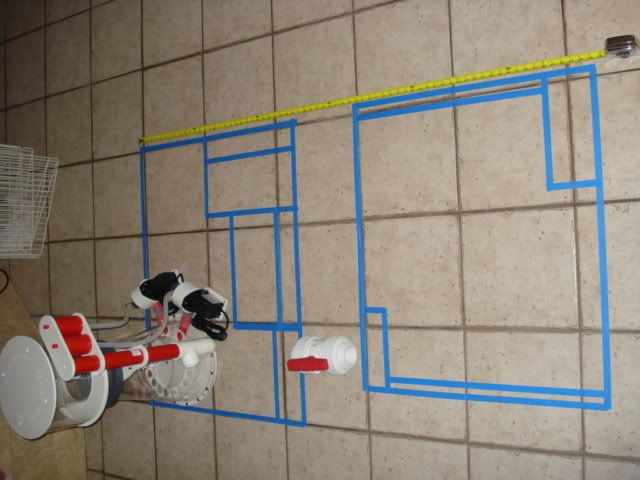
You definitely think things through. in almost 30 years in keeping salt water tanks, I've learned a lot from the many mistakes i've made. Back in the day, we didn't have the internet and forums like this to learn from others. The newbies don't realize how valuable it is to be able to learn from people like us that have many years invested in our aquaria educations.. 5 years ago when I swapped my sumps and made my new light rack, I put a lot of thought into how I was going to access things. Most particularly below the tank since there was much changing above it and also because that is where most of my maintenance occurs. It's funny the kinds of things you think about. I taped off my floor to simulate the space below the tank and then designed my new sumps footprints and chambers with tape on the floor so I could address and simulate the access. I used furniture to simulate door frames and pretended I was removing socks and things to make sure it was easy to service. Once I had a workable design that was easy to service though my door openings, I put that to paper and then CAD drawings.
Here are a couple shots of how I laid out my sump designs before having them made. This really helped in testing how I was going to be able to service them below the tank. I felt stupid pretending to change filter socks but in the end, it worked out well. The box on the right is the refugium. It has a pretty unique design that forces the water to flow across the entire width of the refugium in a laminar fashion.
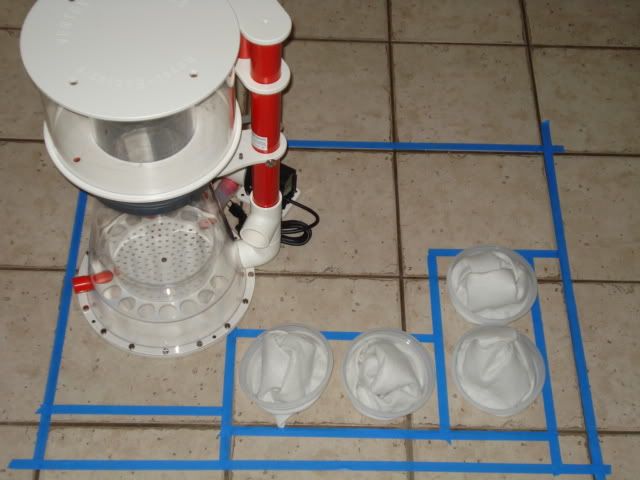
From tape to paper.

And from Paper to finished product. This was done as a retrofit and the sump swap was done while the tank was full and stocked. As such, I built deigned all the plumbing before I put the new setup under the tank. I built all my plumbing so that it modular that way I could build it, disassemble it and reassemble it under the tank without having to glue anything. Good planning made for a fast and uneventful sump swap..

Last edited:
karimwassef
Active member
Very nice! I like the mock-up idea too. I did the same - blue tape on the ground... wife and kids thought I was nuts.
Well - wife said nuts. Kids said cool and wanted to walk into the blue outline to get in the tank.. HA HA HA
I do most of my design on sketchup. I laid out my entire garage. Amazing what you miss when you don't put it all together. Each idea is ok, but the interference in the same space is often underestimated. And the difficulty in access too - sure it'll all fit, but you'll never get to it again.
I've literally had to lose weight to do some things!
karimwassef
Active member
Ok. Here's my idea
<a href="http://s1062.photobucket.com/user/karimwassef/media/0_zpshfdx1pc4.png.html" target="_blank"><img src="http://i1062.photobucket.com/albums/t496/karimwassef/0_zpshfdx1pc4.png" border="0" alt=" photo 0_zpshfdx1pc4.png"/></a>
It's an alternating bulk flow peninsula with forcing faces of water and a center overflow weir.
slief
RC Sponsor
Ok. Here's my idea
<a href="http://s1062.photobucket.com/user/karimwassef/media/0_zpshfdx1pc4.png.html" target="_blank"><img src="http://i1062.photobucket.com/albums/t496/karimwassef/0_zpshfdx1pc4.png" border="0" alt=" photo 0_zpshfdx1pc4.png"/></a>
It's an alternating bulk flow peninsula with forcing faces of water and a center overflow weir.
Without a doubt, you are one hell of an expert with Sketch Up!! That looks pretty slick!! I do however question the complexity of your proposed setup as I think sometimes we tend to overthink things when simplicity generally works quite well. Then again, you are KrazyKarim and you tend to take things to a while new level! I must say, I do love your ingenuity!
karimwassef
Active member
I want the simplest possible approach to get the desired effect. I'm not willing to compromise on the result though - well, not much anyway.
If there's an easier way to make an alternating bulk flow design, I'm up for it. That's another thread though...
http://www.reefcentral.com/forums/showthread.php?t=2519480&page=24
If there's an easier way to make an alternating bulk flow design, I'm up for it. That's another thread though...
http://www.reefcentral.com/forums/showthread.php?t=2519480&page=24
karimwassef
Active member
Oh. I think I missed to share one little detail...
The peak flow is 40K gph one way, then 40K gph the other way. It's distributed over nearly the entire cross-section of the tank, so the local flow isn't that high, but it's a lot of volume to move very quickly.
That drives the complexity and scale. I can do this with 2 pumps at 3K.. in the back overflow even.
slief
RC Sponsor
Oh. I think I missed to share one little detail...
The peak flow is 40K gph one way, then 40K gph the other way. It's distributed over nearly the entire cross-section of the tank, so the local flow isn't that high, but it's a lot of volume to move very quickly.
That drives the complexity and scale. I can do this with 2 pumps at 3K.. in the back overflow even.
Four Tunze's or Vortech's would accomplish a similar effect. Two on each side alternating on and off at opposite intervals. You could do the same with some Gyre's. Have them change direction so that one was flowing forward while the opposite side one was flowing backwards then change directions. Only gripe with the Gyers is their lack of dependability. Still much less complicated than those actuated valves you are considering and ultimately a lot cheaper. The Tunze's are bullet proof but I understand that's probably too simple of an approach and maybe not the desired effect you are after but they work well!
karimwassef
Active member
2 tunzes or vortechs can do 40,000 gph of uniform bulk flow?
That's the entire water column moving in the same direction at the same time.
That's the entire water column moving in the same direction at the same time.