You are using an out of date browser. It may not display this or other websites correctly.
You should upgrade or use an alternative browser.
You should upgrade or use an alternative browser.
Lightsluvr's 340G Upgrade
- Thread starter Lightsluvr
- Start date
- Status
- Not open for further replies.
<a href=showthread.php?s=&postid=15310964#post15310964 target=_blank>Originally posted</a> by Ed Reef
Just used a larger PVC pipe and insert your socks in and drill a dozen holes at the bottom for the water to flow out
Now there's a good idea!
Will the larger PVC float around in the sump chamber or does it stay put?
Thanks Ed.
LL
Ed Reef
New member
<a href=showthread.php?s=&postid=15311014#post15311014 target=_blank>Originally posted</a> by Lightsluvr
Now there's a good idea!
Will the larger PVC float around in the sump chamber or does it stay put?
Thanks Ed.
LL
It will stay put as the weight of the large PVC pipe will hold it down

Just make sure you drill enough holes (or teeth) at the bottom for the water to flow back out.
<a href=showthread.php?s=&postid=15311064#post15311064 target=_blank>Originally posted</a> by Ed Reef
It will stay put as the weight of the large PVC pipe will hold it down
Just make sure you drill enough holes (or teeth) at the bottom for the water to flow back out.
I guess the larger the hole the better?
By the way, I really enjoy your build thread!
LL
Before and after
Before and after
The Rubbermaid sump...
Before:

After:
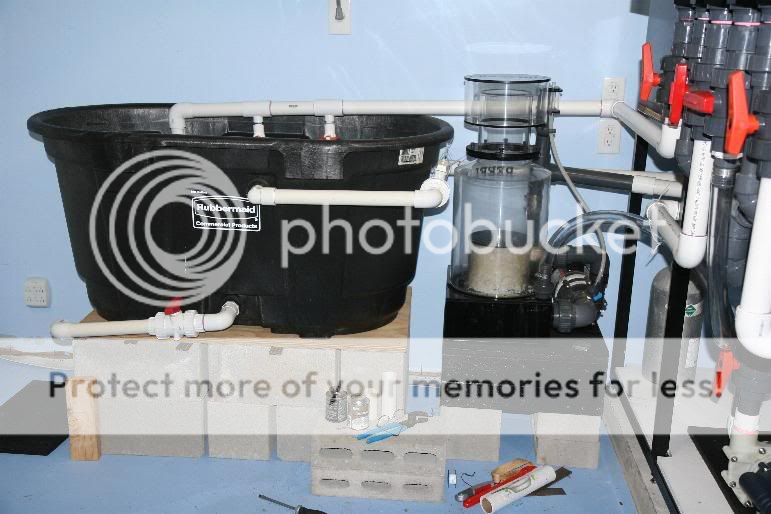
Detail - the overflow from the tank feeds through the rear pipe, which also has T's to feed phosban and carbon reactors:

The lower pipe in front is for water changes. I open the valve and 55 gallons will flow to waste. Then 55 gallons will be pumped into the sump from our water mixing system (awaiting construction). Return pump will be turned on after the water change and the fresh saltwater will mix in the acrylic sump with aged saltwater from the tank before being pumped into the returns...
After work today, we freshwater test the overflow and return systems...
LL
Before and after
The Rubbermaid sump...
Before:
After:
Detail - the overflow from the tank feeds through the rear pipe, which also has T's to feed phosban and carbon reactors:
The lower pipe in front is for water changes. I open the valve and 55 gallons will flow to waste. Then 55 gallons will be pumped into the sump from our water mixing system (awaiting construction). Return pump will be turned on after the water change and the fresh saltwater will mix in the acrylic sump with aged saltwater from the tank before being pumped into the returns...
After work today, we freshwater test the overflow and return systems...
LL
Ed Reef
New member
<a href=showthread.php?s=&postid=15311093#post15311093 target=_blank>Originally posted</a> by Lightsluvr
I guess the larger the hole the better?
By the way, I really enjoy your build thread!
LL
Glad I can help. Before you drill the holes, make sure you place a piece of tape over the pipe to avoid the drill bits from slipping on the smooth surface of the pipe.
Or simple cut a few teeth at the bottom should do the job as well as the sock will already remove most of the micro bubbles so you don't have to worry much
<a href=showthread.php?s=&postid=15311155#post15311155 target=_blank>Originally posted</a> by Ed Reef
Glad I can help. Before you drill the holes, make sure you place a piece of tape over the pipe to avoid the drill bits from slipping on the smooth surface of the pipe.
Or simple cut a few teeth at the bottom should do the job as well as the sock will already remove most of the micro bubbles so you don't have to worry much
All good information. Thanks again, Ed.
LL
More overflow plumbing...
More overflow plumbing...
The skimmer is plumbed into an overflow using 1-1/4" vinyl tubing. Outflow from the skimmer is plumbed back to the return chamber of the arylic sump using 1-1/2" PVC. I am hoping this won't create a backflow issue for the skimmer. If it does, I may have to dump the outflow into the first chamber, which is much closer to the skimmer.

The white tubing on the left (with the union) is the skimmer outflow...

The PVC has (2) 90 degree elbows - the skimmer outflow is the inner pipe in this photo. The PVC closest to the camera comes from the Rubbermaid sump:

We'll see if this will work when we break in the skimmer with saltwater...
LL
More overflow plumbing...
The skimmer is plumbed into an overflow using 1-1/4" vinyl tubing. Outflow from the skimmer is plumbed back to the return chamber of the arylic sump using 1-1/2" PVC. I am hoping this won't create a backflow issue for the skimmer. If it does, I may have to dump the outflow into the first chamber, which is much closer to the skimmer.
The white tubing on the left (with the union) is the skimmer outflow...
The PVC has (2) 90 degree elbows - the skimmer outflow is the inner pipe in this photo. The PVC closest to the camera comes from the Rubbermaid sump:
We'll see if this will work when we break in the skimmer with saltwater...
LL
Last edited:
Question of the day...
Question of the day...
Here's another answer to "holding your socks up"...


Patent applied for...
Available soon at LFS everywhere...
LL
Question of the day...
Here's another answer to "holding your socks up"...
Patent applied for...
Available soon at LFS everywhere...
LL
Last edited:
<a href=showthread.php?s=&postid=15312196#post15312196 target=_blank>Originally posted</a> by Lytehouse
All looks great.
Enjoyed getting purple cleaner on my hands again, but RC wouldn't let me post last night.
Is the next test the overflow test to see if the 2 sumps can handle a power outage?
Exactly. Filling up the DT, down the overflows, into the (2) sumps until the returns stabilize. Then I'll shut down the return pump just as in a power outage...
Fingers crossed.
LL
JRaquatics
New member
If your output of your skimmer is submersed you may want to vent it, especially the distance you are running the output line.
Bax
Premium Member
If you get back pressure, a good vent on a discharge line is a Y-Tee like one of these two picture here.

My skimmer and all solid return lines drop into the sump out of these to reduce bubbles and alow the drians to vent. Right now I am using 7" socks (as things are still kind of new), but when using 4" socks, I use 4" well screen to hold the socks upright as I have tons of it lying around. When I remember to, I also zip tie the sock to the crook in the Y-Tee so the 4" pipe & socks stay up. But I like your hook thingy too!
My skimmer and all solid return lines drop into the sump out of these to reduce bubbles and alow the drians to vent. Right now I am using 7" socks (as things are still kind of new), but when using 4" socks, I use 4" well screen to hold the socks upright as I have tons of it lying around. When I remember to, I also zip tie the sock to the crook in the Y-Tee so the 4" pipe & socks stay up. But I like your hook thingy too!
<a href=showthread.php?s=&postid=15312290#post15312290 target=_blank>Originally posted</a> by JRaquatics
If your output of your skimmer is submersed you may want to vent it, especially the distance you are running the output line.
I will put a Y-Tee at the final joint on the skimmer and the Rubbermaid sump , rather than the elbow...good idea -thanks!
Fortunately I don't glue those last fittings, as they are over the sump and need to be easily removed twice a week to change the filter socks...
LL
Last edited:
WE HAVE A WINNER!
WE HAVE A WINNER!
Full tank freshwater systems check has been completed, with no leaks and no adverse surprises!
At this moment, I am already draning freshwater from the tank and sumps...
Here we go...after the problem with the closed loop, I look a little "nervous":

About halfway there...

Getting near the overflows... watching closely...

More photos later!
LL
WE HAVE A WINNER!
Full tank freshwater systems check has been completed, with no leaks and no adverse surprises!
At this moment, I am already draning freshwater from the tank and sumps...
Here we go...after the problem with the closed loop, I look a little "nervous":
About halfway there...
Getting near the overflows... watching closely...
More photos later!
LL
Fill 'er up, Max
Fill 'er up, Max
There's something about the subtle chlorine smell of a freshwater test...aaaahhhh...
At last, the first water falls through the 36" oveflow:


I opened the valve to the Rubbermaid sump, so it would fill first:

Then opened the valve to the Acrylic sump to start filling the first chamber:

LL
Fill 'er up, Max
There's something about the subtle chlorine smell of a freshwater test...aaaahhhh...
At last, the first water falls through the 36" oveflow:
I opened the valve to the Rubbermaid sump, so it would fill first:
Then opened the valve to the Acrylic sump to start filling the first chamber:
LL
More wah wah
More wah wah
Starting to fill up the center chamber...

Checking for leaks in the critical return chamber...

Opening the valve to the return pump to continue water test...


Sumps filling up to anticipated operating levels... next step, power up the return pump...
LL
More wah wah
Starting to fill up the center chamber...
Checking for leaks in the critical return chamber...
Opening the valve to the return pump to continue water test...
Sumps filling up to anticipated operating levels... next step, power up the return pump...
LL
- Status
- Not open for further replies.
Similar threads
- Replies
- 0
- Views
- 94
- Replies
- 4
- Views
- 220
- Replies
- 11
- Views
- 139