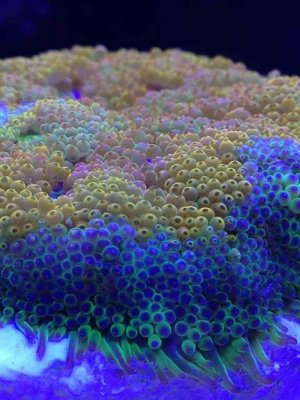
No photo editing for color enhancements at all. Although I do admit to being Adobe Certified, and use Photoshop to downsize the images down to 1024x768 for the web.
The image above posted through TapaTalk is actually grainy compared to the actual image on my phone.
I have an arsenal of filters for the GoPro Hero3, and my DSLR. Although those filters are not attached to the I5, I place them in front of the phone's camera lens to remove some of the blue hue, which then presents me with a much truer color.
You can use Photoshop to adjust the curves on the bottom end and remove brightness, which will enhance the entire image in a single action. Most DSLR's nowadays can have enough onboard adjustments that this is no longer necessary, and the only thing Photoshop needs to be used for is sizing.
I'd be happy to msg pic from my phone to anyone so you can see the actual image from the phone, just PM your number.
This is what I do, and your welcome to try it yourselves and see the difference, a little "how to":
1 - In order to get the proper color tone/balance/ISO with the I5 when the whites and blues are on, it's best to make sure the camera app is off/closed first (not running in the background). Then, with the phone pointed towards the tank, open the camera app and set it to HDR. The Sensor then picks up the correct color tone and sets the proper ISO. I believe the Samsung G4 and G5.
2 - Snap a picture if HD, then
WITHOUT SHUTTING THE CAMERA APP OFF, turn the iPhone down towards the floor. It picks up the light spill from the tank, and the dominant color is blue.
3 - Now, again without turning the camera app off, bring it back up to where you snapped the picture a minute ago. Much bluer isn't it? It's actually too blue, washing out color. This I because the sensor picked up the blue tone from the floor/room, and cannot compensate for it again.
It's always best to close the camera app when moving to a different spot to take a picture also, so that it can again compensate for the change in tone.
Below are 3 pictures I just took with my I5. Whites at 60%, Blue/RB at 100%.
First is as described step 1
Second as described in Step's 2 and 3.
Third - This is with an amber/red filter that I use when just the blues are on (Whites and Blues are on in the picture). I'll post the same picture later tonight with the same filter, once the whites have gone out. This image is to show you how much of an impact a filter can have.
Lastly, there is a video I took with my sony DSC-W350. Blue/RB at 100%. It starts with a white balance adjustment using the camera's option, then while the video is being recorded, I put a filter in front of the camera.
Make sure to take note of the colors in the video and set it to HD.
<iframe width="1024" height="720" src="//www.youtube.com/embed/c5Khrqvo2fA?rel=0" frameborder="0" allowfullscreen></iframe>


