My 500 + gallon system. Last 13 years to now. Build, Aquascaping & more. Lots of pics

I love this piece here....

3.jpg

I'm planning now and will be using foam, egg crate, etc... that "bridge" in the center is just excellent. from that angle it looks like a leg bone! well done
 
I love this piece here....


I'm planning now and will be using foam, egg crate, etc... that "bridge" in the center is just excellent. from that angle it looks like a leg bone! well done

That bridge was added weeks if not months after the scape was done. I searched high and low for that piece as its a 3' span between the back wall and the formation around the center overflow.. It not only had to be large but it also had to be the right shape.

There is an interesting story that comes with that bridge. That rock actually came from Catalina Water Company. They are one of the major real ocean water suppliers out here in California.

They had bought a barge full of live rock from Indonesia or something. During the ocean crossing, the generators failed and the rock went belly up before it made it to shore. Jim and I went down to the water company and sifted through dozens water filled bins that were no less than 20'x10' by 3' deep filled with not so happy almost dead rock. Needless to say that finding this piece was like finding the pot of gold at the end of the rainbow. I had searched stores, wholesalers including Walt Smith, landscaping rock suppliers. You name I tried it.
 
Wow man that is simply just a stunning rebuild!! I too am really liking the peninsula style, and the pics of when you had all of the corals in was AMAZING!
 
I thought I would add some pics of the new sump layout.

I have been working on the design for a couple weeks and have what I feel will be the final design. There are some factors that contribute to this design.
The underside of my tank is about 43" x 93" x 36" tall. Its a substantial size footprint but my under tank access is limited to about 31" wide after removing the door and casing. Based on that, I came to the conclusion that creating 2 sumps would be the best way of getting a large enough sump volume while still being able to get it under the tank.

The first of the 2 which will be the left side sump will be where the water from my overflow enters the sumps through 4 filter socks. The socks will be arranged in 2 trays which will be easily removable. The tray in the far back will have a piece added to it with a hole that my long tongs will be able to latch into making it easy to remove.

There will be an overflow behind each of the filter sock trays that will act as an air trap to help eliminate some of the air bubbles from the overlfow. There will be a pair of cutouts at the top of of these overflow boxes that will direct water to each of the socks.

The remaining space in this sump will provide space for the Alpha cone skimmer as well as the live rock from my previous sump.

At the forward right corner of this sump there will be another overflow box with an adjustable plate that will allow me to adjust the height of the skimmer sump. From that overflow, there will be a 2" bulkhead that will be plumbed directly to the refugium. There will also be another bulkhead in the skimmer sump that will be plumbed to the tank return pump which will also be plumbed into the fuge. There will be a ball valve between the skimmer sump and the return pump which will allow me to shut down the fuge without shutting down the return pump. This will be helpful during fuge maintenance as I can close the valve to the return pump at the fuge and open the valve at the skimmer sump thus allowing my return pump to draw from the first sump.

The fuge will house a deep sand bed as well as macros. It will be illuminated by a pair of 6500K 65W flourescent bulbs in seperate fixtures. The cover for the fuge will have cutouts so that these lights can sit on top of the cover with the clear lenses set into the cover.

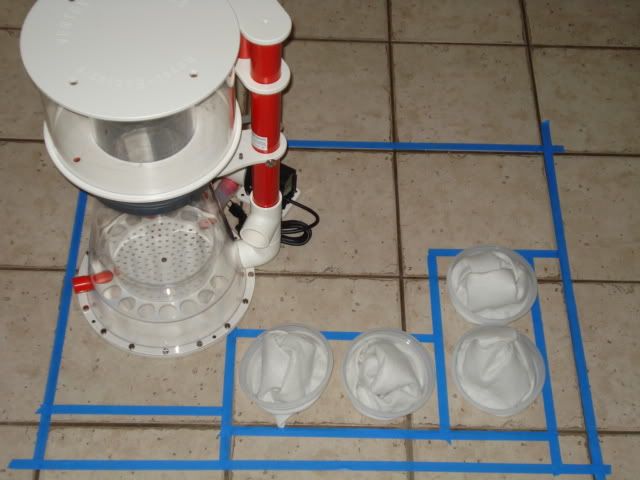
To determine the layout of the first sump, I started with painters tape on the floor and masked off the footprint of the sump. Then placed the skimmer into the taped off footprint and proceeded to tape off the ideas I had for the filter sock layout.

Below is what i came up with. This shows the masked off area with the sock trays masked off and the skimmer placed into position.

DSC00469.jpg


Another view
DSC00474.jpg


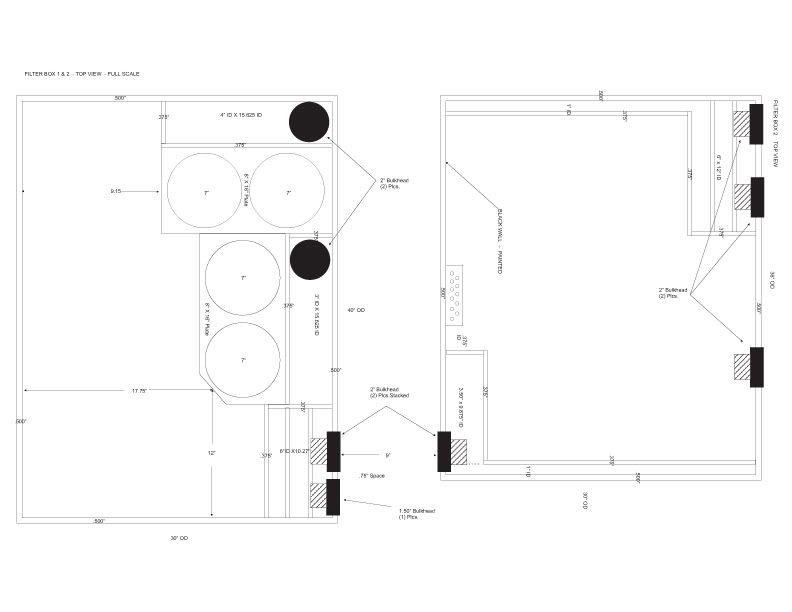
Here is a dimensional layout of the new sump that will house the skimmer and filter socks.
Filter-Box-1_WEB.jpg


Below is a dimensional layout of the refugium. The refugium will have adjustable plates that will also allow me to adjust water levels. The return overflow will have removable dividers that will act as air traps. By making them removable, I can have another plate made that is shorter or taller should I need to make adjustments.
Fuge-copy_web.jpg


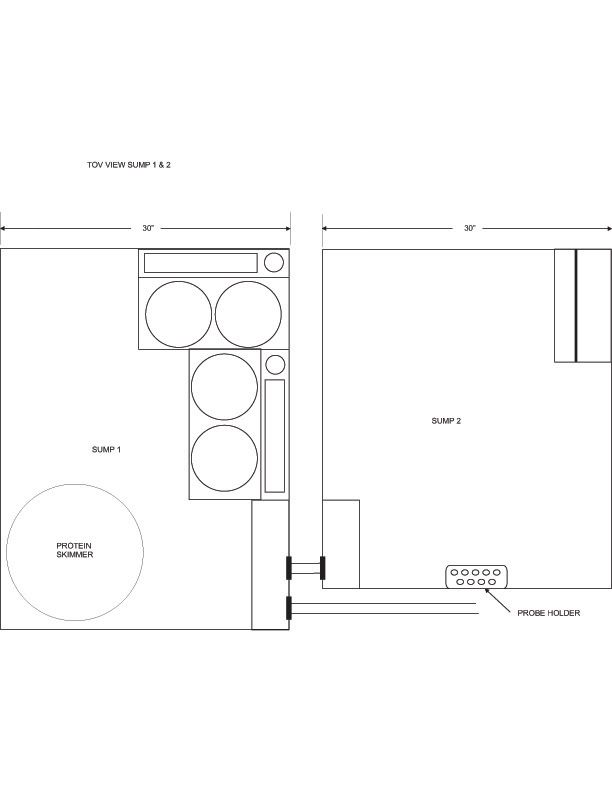
Here is a layout of the 2 sumps and how they will look plumbed together. The return pump will draw from the overflow at the far top right of this picture. That is also where my chiller pump will draw from. The chiller will return to a bulkhead on the far right lower end of the picture.
sump-and-fuge_WEB.jpg


I would love to hear your thoughts on the sump layout. I need to make my final decision/changes immediately as they are ready to start assembly. My goal is to get them done by mid next week.
 
Last edited:
Nicely done, my friend! Your aquascaping is awesome and so is the presentation. What a first class setup. I'm jealous as heck over here with my puny ones.

By the way, your skimmer looks looks like it's gonna kick some butt.
Excellent!!!

Tom
 
Thanks guys! As with any large tank, the work can be endless but the system as it sits right now requires minimal maintenance. Of course the build was a bit of an undertaking but it was well planned out and went like clockwork. The same can be said about the upgrades along the way. With the correct planning, a large job can be greatly minimized.

The next big project will be the sump removal and upgrade. Its looking like that will happen week after next. I will continue to update this thread as it gets closer as I should be able to get some pics of the new sumps being built. The sump removal and new sump(s) install will be videotaped so I expect we should have some really great stuff to show when that goes down.
 
Here are the final sump designs... The sumps are going together this week and should be ready by first of next week. I will try to get some pictures of them being assembled.
This is the layout of the main sump and refugium
Both-sumps_web.jpg


This is the refugium.
Fuge_web.jpg
 
Thank you for sharing. It is always interesting to see how things change over time.

Most people show changes over a year or two but you did it over a decade.
 
Ahhh! Two vlamingis! They'll use all 500 gallons!

In one pic I thought I saw two vlamingis in frame and the tail of another vlamingi U-Boat, searched the pics to see if it was really three, but the pair is awesome enough!

Great system and great upgrade plans. That skimmer is dead sexy! I am officially a fan! :fish1:
 
In one pic I thought I saw two vlamingis in frame and the tail of another vlamingi U-Boat, searched the pics to see if it was really three, but the pair is awesome enough!

Great system and great upgrade plans. That skimmer is dead sexy! I am officially a fan! :fish1:

Here you go. I just snapped some pics of them. Not great pics but good enough. Two of them are vlamingis. The third is a unicorn near as I can tell. I got all 3 together as part of a package buy out of tanks livestock.
Tang-6.jpg


Tang-8.jpg


Tangs-3.jpg


Tangs-5.jpg


Tangs.jpg


tang-10.jpg


tang-7.jpg


tang-9.jpg
 
Everything looks really nice so far, I always wondered what my tank would look like with some vho's added to the Mh'ds.
If I may make a suggestion on the sump, you might want to add some type of baffling between the socks and the skimmer, from experience once the socks become dirty they will tend to flow over the top of the socks causing microbubbles in the sump and cause the skimmer to become erratic possibly.
Then that might cause those bubbles to make it up to the tank.

BTW did you remove the eggcrate on the bottom from the first time, if so did you see a build up of detritus under the rockwork now?

Keep up the good work. oh one more thing the valimgi and unicorn tangs will probably gorw to over a foot in about a year.
 
Nice tank. I saw the LA Fishguys episode with this and was suitable impressed. I can't wait to see the sump installed. I love the Yorkie skimmer too.
 
Ha! I thought I saw the tail of a third sea monster in there. Good thing you have the foot print to enjoy them for a while. Just love big vlamingis they are like lap dogs of the reef personality wise. Too bad they need huge tanks like this to even be considered.
 
Everything looks really nice so far, I always wondered what my tank would look like with some vho's added to the Mh'ds.
If I may make a suggestion on the sump, you might want to add some type of baffling between the socks and the skimmer, from experience once the socks become dirty they will tend to flow over the top of the socks causing microbubbles in the sump and cause the skimmer to become erratic possibly.
Then that might cause those bubbles to make it up to the tank.

BTW did you remove the eggcrate on the bottom from the first time, if so did you see a build up of detritus under the rockwork now?

Keep up the good work. oh one more thing the valimgi and unicorn tangs will probably gorw to over a foot in about a year.

Thanks for the advice. There will be a fair amount of live rock between the socks and skimmer and I should have enough sock between the four 7" socks to last about 7-10 days between swaps. I picked up a case of 60 socks so I can swap as needed. I might also make some removable baffles if needed with acrylic if that becomes a problem. One other thing I did was to make all the air trap/baffles in the exit boxes of both sumps removable in case I need to make adjustments to their height. The baffles will slide into slots in the boxes.

As for the egg crate and detritus. There was none as I had a PVC manifold onder the rocks with holes drilled in it connected to my return pump which entered through the overflow. That kept constant flow under the rocks and pushed any sediment towards the glass. I still have the manifold under the rocks. Just no egg crate. If you look under the rocks (the pics dont show it) the flow has actually kept the sand out from under them.

Vlamingis over a foot in a year. I hope not!! That would be way to big. From my experience with other large fish such as sharks, the enviornment has a bit to do with the size potential of the fish.. I will admit that these are my first vlamingis so I dont really have any experience with them. My hope would be that the tank will help to keep them from growing too big to fast. Granted my tank is big by most standards but its not like they have a whole reef to them selves. The tank they came out of had them in it for a year or so and they didnt grow that much in that system but it was a much smaller footprint too.

Nice tank. I saw the LA Fishguys episode with this and was suitable impressed. I can't wait to see the sump installed. I love the Yorkie skimmer too.

Thanks.. Cant wait to get the new sumps in either!

Ha! I thought I saw the tail of a third sea monster in there. Good thing you have the foot print to enjoy them for a while. Just love big vlamingis they are like lap dogs of the reef personality wise. Too bad they need huge tanks like this to even be considered.

I got the Vlamingis about a month ago. They certainly do have personality. They are very sociable. They will follow you around the tank and love to be hand fed. Then again, most of my other fish will follow you around too. In the system they came out of, they would come to the surface and let you pet them!

I think the fish with the most personality in my tank thus far would have to be the long horn cow fish. He is funny. He will get into the current of the sea swirls and surf in it. Whats really funny is when he chases you around the tank. The little guy can pick up some speed when he wants to.
 
Last edited:
Back
Top