my bamboo half cube

blackwolf1778

New member
over the past 2 days ive been brainstorming and building on the go and so far i came up with a neat idea..

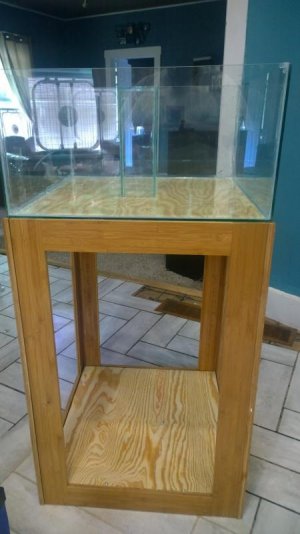
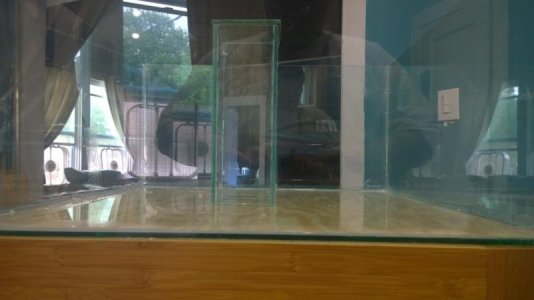
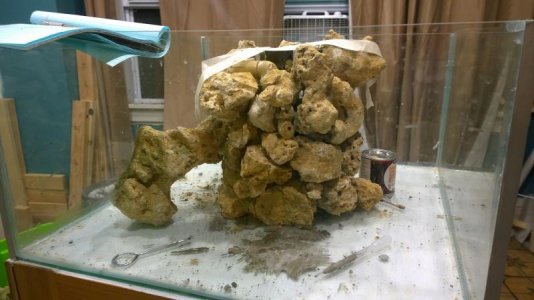
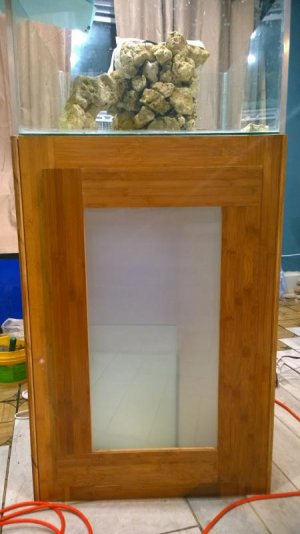
the tank size is 24w x 24d x 12h yielding 29 gallons, rimless our of 1/4" glass

the stand started as hardwood bamboo planks 3 3/4 x 5/8 x 37 3/4 bought at home depot for $1.88 / Sq ft case was $44.33 / box.. looks like its going to take me 2 boxes so not to bad for a one of a kind stand
attachment.php


all the pieces are screwed together with pocket hole joints

now onto internal bracing and support and 2 shelfs and built in sump

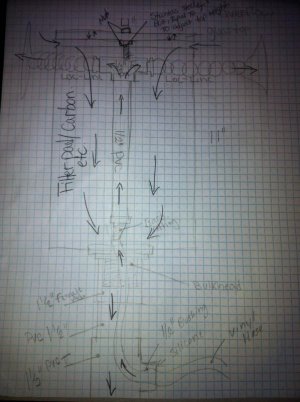
the overflow will be in the middle like this
attachment.php

its 4" x 4" with a 1 1/2' bulk head in the bottom there will be acrylic trays that stack inside the overflow box to work similar to a canister filter, here is a rough sketch i came up with
http://www.reefcentral.com/forums/attachment.php?attachmentid=285482&stc=1&d=1406301875
LARGER PICTURE THAT IS READABLE


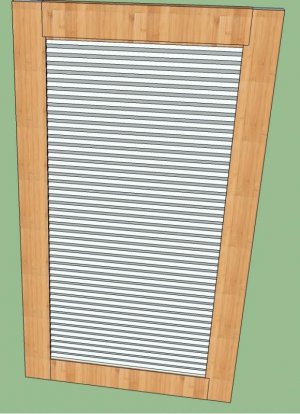
today ill get the doors built and get the wood to build the inner frame that will be majority of the support and get the glass overflow made! let me know your thoughts
 

Attachments

  • photo (3).jpg
    photo (3).jpg
    66.6 KB · Views: 7
updates

updates

well got the glass glued together and the stand almost done waiting for the silicone to cure for another day then i will start drilling the tank and trim the silicone then onto building the doors and silicone the new custom sump
attachment.php
attachment.php
attachment.php
 

Attachments

  • WP_20140726_16_49_27_Pro.jpg
    WP_20140726_16_49_27_Pro.jpg
    43.4 KB · Views: 3
  • WP_20140726_16_49_36_Pro.jpg
    WP_20140726_16_49_36_Pro.jpg
    34.4 KB · Views: 4
  • WP_20140726_16_49_54_Pro.jpg
    WP_20140726_16_49_54_Pro.jpg
    42.1 KB · Views: 4
good looking start…pretty much exactly how my tank is put together…i don't think i would put anything in the overflow though as it will plug up and you will eventually have a flood on your hands…plus every time you pulled the media out it would drip nasties into your display tank…my return is done almost the same…although i had a hard time getting it to fit through a "T" so i just ran it up through the bottom of the pipe…

i didn't silicone it in though as i wanted to be able to remove/ replace/ and or clean it from time to time.

as for your glass topper to the overflow…i would just crazy glue little clear pieces of acrylic to the top of the overflow box and sit the glass on top of it…will save a lot of fiddling with plumbing and such as you have it designed..

i dump all my top off water through the top of my overflow so it mixes in the sump before coming up to the display tank..

anyway great start…i love the bamboo…are you doing a japanese style door with a white screen inset in bamboo? that would be super cool…wish i had of done something like that…as it is now my sump gets warm being all sealed and i was having condensation troubles…so now i leave the door off…i might just knock the panel out of my door and replace it with screen..
 
well silicone is cured doing some trimming and cleaning up of the seams then water test then onto the drilling...

this is a rimless tank, and hopefully you used RTV103 or SCS product to hold it together"¦as consumer grade silicones sold in Homedepot etc will not do the trick for a tank build"¦

at any rate i would let it cure for one week before putting water in it..
 
yeah i used RTV didnt think about the overflow clogging thats a good point, the doors i was original plan was to do solid doors but i like your idea better! thanks for the advise!
 
update

update

ok ripping down the bamboo for the doors now, im on the fence if i want them to hinge, the other option that im leaning towards is using some earth magnets and recess them into the door and frame so them hold well but when off they are completely out of the way.. as for the door style im going with bamboo frame with paper shade in the middle ill use redi shades from home depot
this is what i came up with so far...
attachment.php
 

Attachments

  • door.jpg
    door.jpg
    85.1 KB · Views: 4
i also was extremely impatient and took a huge risk and took the tank out on the front porch and filled it up lmao... good news its holding, has a very very small leak in a corner looks like a place my clamp was and didnt get good silicone coverage so ill get that patched up..
 
i also was extremely impatient and took a huge risk and took the tank out on the front porch and filled it up lmao... good news its holding, has a very very small leak in a corner looks like a place my clamp was and didnt get good silicone coverage so ill get that patched up..

Can you patch silicone? I was always told silicone will not stick to cured silicone and any leaks needed to have the entire seam redone.
 
oops

oops

oops... well i sorta did it the right way i guess... lmao i used a razor blade and scraped off the old and put new but i didnt break down the entire seam.. i will water test again tommorrow and go from their. this is my first from scratch tank build so its a learning experience
 
well not to much progress was made... i made a door with the shade as planned just wasnt a fan so now im doing frosted glass instead.. ordered bulkheads and loc-line today for return and picking up the glass tommorow morning for the doors and sump..

Lighting is the new task at hand.. i really want pendant style since the tank is viewable from all sides and in the middle of my dinning room.. but still want to stick with bamboo so my idea to try is this..

412zx%2B7fGwL.jpg

taking this bamboo bowl... and combining with this
http://images10.newegg.com/NeweggImage/productimage/A32C_130415883566826171mBBH9eLVku.jpg
and a 20w full spec led and driver to make some one of a kind pendants.. 3 to be exact and at 3 different lengths so they look staggered.. top it off with a piece of acrylic and a few vents for intake and exhaust of air.. idk just a idea im kicking around..
 
Big update!

Big update!

LIGHTING!

well i went with the bamboo bowl idea.. used 1/8 stainless braided cable and a cable stop to hang it and then weaved my wire loosely to give a modern twist!? lol heres a pic of me mocking one of them up

in total there will be 4 pendants the closest one being 10" from rim and highest being 21" from rim all 4 slightly higher than the first in a stair like pattern
attachment.php

attachment.php


STAND!

well after 3 types of hinges and changing my mind over and over i figured out how to mount the doors.... so the bottom of the door sits on a piece of 3/4 x 3/4 x 12" aluminum L angle piece thats screwed to the frame of the stand so the door sits on the lip that is formed and at the top center is a cabinet roller lock thingy.. now the doors can be removed completely and out of the way!
attachment.php


LED LIGHTS!

so i ordered some GU10 12w led bulbs from amazon.. like 6$ each.. tore it apart re applied a good amount of heat compound and de soldered the leds and replaced with 2 royal blue and 2 cool white 6500k 3w diodes.. the lens is 35* and with the 4 i believe will give great coverage and keep the light only above the aquarium and not on my floor around it
attachment.php


ROCK WALL!

so a bucket of hydrolic cement and patients is producing a nice pillar of rock to surround the center glass overflow..
attachment.php
 

Attachments

  • WP_20140807_23_13_33_Pro.jpg
    WP_20140807_23_13_33_Pro.jpg
    19 KB · Views: 3
  • WP_20140807_23_13_48_Pro.jpg
    WP_20140807_23_13_48_Pro.jpg
    20.8 KB · Views: 3
  • WP_20140807_23_14_13_Pro.jpg
    WP_20140807_23_14_13_Pro.jpg
    20.1 KB · Views: 4
  • WP_20140807_23_15_14_Pro.jpg
    WP_20140807_23_15_14_Pro.jpg
    53.4 KB · Views: 3
  • WP_20140807_23_16_33_Pro.jpg
    WP_20140807_23_16_33_Pro.jpg
    42.1 KB · Views: 3
More

More

another pic of the rock wall...
WP_20140807_23_15_36_Pro.jpg

OVERFLOW BOX DESIGN AND PLANS..

so i changed my original plan to have the return line come up through the overflow box but i wasnt satisfied with 1 return line and with me not wanting anything on the outer glass i knew i needed to produce alot of water movement with my return to keep from adding a water circulator so i ran (2) 1/2" lines up with seperate bulk head and pumps and will dig out a extra arduino to program them to alternate in theory with the loc line i can aim them seperate directions and alternate and get water current to shift back and forth almost as if its waves.. ? who know its the plan to try though!

ISSUE.. loc line came in and its blue segments with cation orange male adapter and nozel so a can of fusion black paint should help out there lol
WP_20140807_23_17_40_Pro.jpg

SUMP..

sump in now assembled and planed ready to start cutting more glass and making the dividers
the sump is 1/4" glass and is 23" long 12" wide 12" tall and will have a fluidized filter in it along with several removable treys for media. if it all fits as planned i should not need any reactors for GFO and the fluidized filter with k1 will provide tons of place for my good bacteria (4 times bigger than recommended)
WP_20140807_23_17_18_Pro.jpg

STOCKING!..

well call me boring but i want to go simple.. and with such a small tank its hard to put the popular fish in it without worring about if they have enough room so i have recently became a fan of the blue/green cromies... and in my other tank i have like 7 and they school and look amazing so im thinking a BIG school of them and the rest will be corals
 
i didnt tank any for the first one but i will be tearing into the others as soon as more LED's come in and will make sure i tank plenty of pics then!
 
Back
Top