You are using an out of date browser. It may not display this or other websites correctly.
You should upgrade or use an alternative browser.
You should upgrade or use an alternative browser.
My Bean Animal Build
- Thread starter OnceTrueFalseBr
- Start date
OnceTrueFalseBr
New member


Mrramsey
NEO Reefer
I think you are going to have a real problem with that overflow the way you have it with those holes. You should have a flat weir like it was explained in your other thread. Your overflow box should have zero openings in it. Just use the top edge as the weir.
In fact you are going to have a possible flood in your sump because of all of the low holes that will allow water to continue to drain when the pumps are turned off or during a power outage.
In fact you are going to have a possible flood in your sump because of all of the low holes that will allow water to continue to drain when the pumps are turned off or during a power outage.
Last edited:
OnceTrueFalseBr
New member
I cut the top into 3 horizontals the plexi is 1/8 and wa afraid of breakage. I was going to plug the lower holes tonight and csp off the side with the c shape
OnceTrueFalseBr
New member
+1
Also, no need to glue your elbows inside the box.
My first build so im learning lol
Mrramsey
NEO Reefer
Here is what I'd do if you want to save what you have.
Cut along the red lines. Leave a bit of a center post, as well as the corners and a bit of the back edge at the full height you have. This will give you "legs" to support a lid to keep the jumpers out. I would then cut some 1" (guessing on the dimension here) strips of acrylic and bond that to the face and sides to cover the existing holes. Not sure what you are planning on plugging the holes with but silicone would be a bad choice.

Cut along the red lines. Leave a bit of a center post, as well as the corners and a bit of the back edge at the full height you have. This will give you "legs" to support a lid to keep the jumpers out. I would then cut some 1" (guessing on the dimension here) strips of acrylic and bond that to the face and sides to cover the existing holes. Not sure what you are planning on plugging the holes with but silicone would be a bad choice.
OnceTrueFalseBr
New member
Yes, that weir design is quite unique.
Lol i think i can still salvage it lol
OnceTrueFalseBr
New member
Here is what I'd do if you want to save what you have.
Cut along the red lines. Leave a bit of a center post, as well as the corners and a bit of the back edge at the full height you have. This will give you "legs" to support a lid to keep the jumpers out. I would then cut some 1" (guessing on the dimension here) strips of acrylic and bond that to the face and sides to cover the existing holes. Not sure what you are planning on plugging the holes with but silicone would be a bad choice.
Thanks! That looks great! I was going to use acrylic strips with solvent to cover fom the outside so no pressure would be pushing in
Thanks!
Is the plumbing setup right so far?
uncleof6
Active member
+1
Also, no need to glue your elbows inside the box.
Since the elbows will not be 100% covered in water, assuming the adjustment is right, the elbows must be glued into the bulkheads, unless you like air leaks. If wanting to remove the elbows, then threaded bulkheads need to be used, thread sealant, and an overflow box that is wide enough to allow the elbows to be removed. This is why threaded street ells are recommended.
uncleof6
Active member
Lol i think i can still salvage it lol
That overflow is pretty butchered up, I am not so sure salvaging it is the best plan. It looks to be short and should be full length of the tank. I don't know where the top edge of the weir will end up after further butchering, however, you want a flat, long weir, with the top edge of the weir even with the bottom of the trim on the outside of the tank.
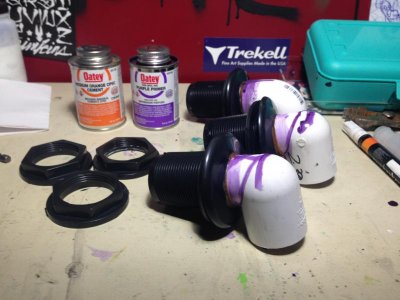
If you want things to look nicer, quit using the primer, it is totally unnecessary and a waste of time, and you are using the wrong type cement:
You need to use a transitional cement between the pvc and abs bulkheads, and either a thin bodied or medium bodied (if you prefer) solvent cement for PVC. The orange stuff you are using is for CPVC. There is a difference in the materials.
OnceTrueFalseBr
New member
That overflow is pretty butchered up, I am not so sure salvaging it is the best plan. It looks to be short and should be full length of the tank. I don't know where the top edge of the weir will end up after further butchering, however, you want a flat, long weir, with the top edge of the weir even with the bottom of the trim on the outside of the tank.
If you want things to look nicer, quit using the primer, it is totally unnecessary and a waste of time, and you are using the wrong type cement:
You need to use a transitional cement between the pvc and abs bulkheads, and either a thin bodied or medium bodied (if you prefer) solvent cement for PVC. The orange stuff you are using is for CPVC. There is a difference in the materials.
Thats what i get for trusting home depot. I even asked if orange was right! Ugh
Also i can cut it down to be flush with the bottom of the top trim
uncleof6
Active member
Thats what i get for trusting home depot. I even asked if orange was right! Ugh
Also i can cut it down to be flush with the bottom of the top trim
As long as the elbows are low enough in the "box" you can cut it down. Top of the elbows should end up ~ 13/16 below the top of the weir. (I have altered the dimensions a bit, using spears parts that I have part numbers for such as 410-010 for 1" threaded street ells; 1" down is still fine.) However, I would make the box much longer for the sake of the system overall.
Last edited:
OnceTrueFalseBr
New member
As long as the elbows are low enough in the "box" you can cut it down. Top of the elbows should end up ~ 13/16 below the top of the weir. (I have altered the dimensions a bit, using spears parts that I have part numbers for such as 410-010 for 1" threaded street ells; 1" down is still fine.) However, I would make the box much longer for the sake of the system overall.
Yea the elbow hole center point is about 4 inches from top of the tank
d2mini
Premium Member
Since the elbows will not be 100% covered in water, assuming the adjustment is right, the elbows must be glued into the bulkheads, unless you like air leaks. If wanting to remove the elbows, then threaded bulkheads need to be used, thread sealant, and an overflow box that is wide enough to allow the elbows to be removed. This is why threaded street ells are recommended.
Never glued mine.
They fit real snug and can be removed for maintenance.
uncleof6
Active member
Never glued mine.
They fit real snug and can be removed for maintenance.
Since the tops of the elbows are seldom underwater, socket ells need to be solvent welded in. Snug is not air tight (the siphon needs to be air tight all the time.) For the other two to start (to siphon) as they should, they also need to be air tight. An interference fit is not air tight, it is simply common sense. If you want to remove the elbows for maintenance, spend the time sourcing the proper parts, per the original design.
There are a thousand ways to "Burger King" this drain system. Only one way is guaranteed to work: as designed. This system is intended to work the first time out of the box, and the more "Burger King" methods suggested, the less likely it will work right the first time out of the box.
woodnaquanut
Active member
Must just be my good luck then. :wave:
Ah, luck. Me too!:wavehand:
OnceTrueFalseBr
New member
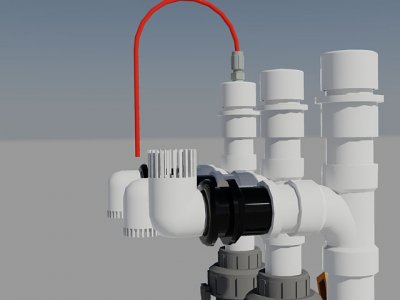
The plumbing start.
For thise following. I cut the overflow. Most probably want to kick me in the shins lol but im going to test out what i did. If it fails i will remake it lol
But heres the plumbing.
From left to right:
Emergency overflow
Primary emergency slow floe
Main siphon flow
Im sure soneone will tell me i effed up somehow(but i hope not!! Lol)
Similar threads
- Replies
- 7
- Views
- 302
- Replies
- 0
- Views
- 185