NEW 210 build!!

Progress on Sunday:

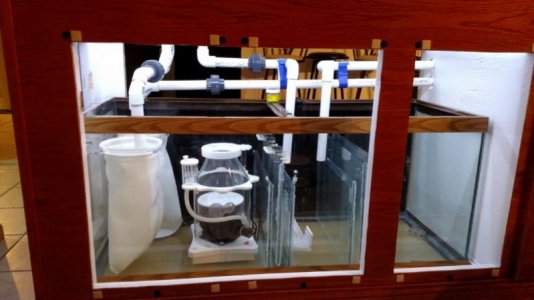
Plumbing 95% completed and started on the wiring :celeb3:

In the pictures below we got the drain lines all in place first for the herbie drain first. Only two holes in each overflow so no bean animal on this tank sadly, but will be in the plans for my future 500+ gallon custom build.

*WAIT did I just say that....lets get water in this one first*

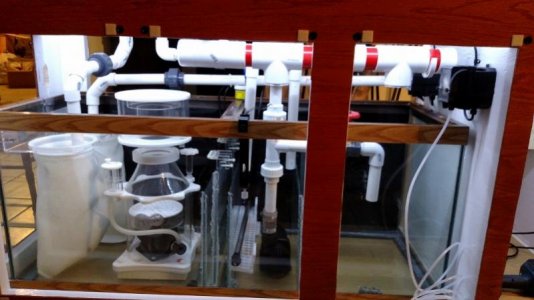
We then built the manifold for the returns, and to run a BRS dual reactor. Once we got the manifold mounted in the stand and hooked up to the Reef Octopus DC10500 return pump we proceeded to plumb the the return lines to the tank. This tank will have dual 3/4" return lines over the back of the tank running into split line-loc's. Just need to put in a few pipe hangers I need to go purchase yet to secure everything, and the plumbing will be 100% complete.

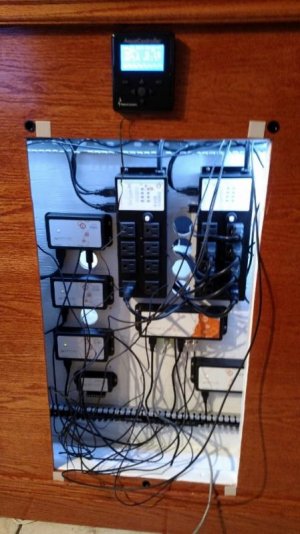
My helper through the whole project (Dad) left for the day and I spent the next few hours hanging the pumps for dosing, ATO, water change, and started running the wiring. It has been a long but very productive weekend and I am very close now to water and a leak test!
 

Attachments

  • PLUMBING1.jpg
    PLUMBING1.jpg
    40.1 KB · Views: 4
  • PLUMBING3.jpg
    PLUMBING3.jpg
    45.8 KB · Views: 4
  • PLUMBING2.jpg
    PLUMBING2.jpg
    50.2 KB · Views: 4
  • PLUMBING5.jpg
    PLUMBING5.jpg
    41 KB · Views: 4
  • return line plumbing.jpg
    return line plumbing.jpg
    44.6 KB · Views: 4
Monday was a slow progress day with having to work. I did get some wiring completed and as you can see by the picture it is unorganized chaos yet. That being said pumps, skimmer, and probes are all in place and plugged into the APEX. I got to spend some time on fusion labeling outlets for the components, but as far as APEX programming nothing started yet. I really hope the programming will be easy as that is not my strong suit!

I also figured out tonight that two EB8's will not be enough once I get my lights and will need to purchase another I had not planned for. That was not anticipated or part of the original budget. On a positive note adding another EB8 will leave me at least 5 additional outlets for any future expansion.

Chris
 

Attachments

  • wiring 1.jpg
    wiring 1.jpg
    59.3 KB · Views: 4
Looking really good.

Like the painted back of the sump.

The stand is looking really sharp, impressive.

Funny about needing a 3rd EB8 --- ran into the same issue.
 
Looking really good.

Like the painted back of the sump.

The stand is looking really sharp, impressive.

Funny about needing a 3rd EB8 --- ran into the same issue.

Thanks for the compliments!

The sump is my old 90 gallon DT so the painted back is a bonus from my old setup.

Stand came out better than I expected, less my poor measuring for the sump to slide into it. I hope the canopy turns out as good as the stand.

Yeah the 3rd EB8 was mostly because of my build plan growing from the day it was planned on paper by adding more stuff. I know I said I had a budget but I more so had a vision and plan to do this build right the first time so the additions are sticking more to that than the dollar amount. I would rather it stay dry another few months or longer than wish after the fact I did A-B-C instead.
 
Got the tank filled for a leak test today and my first disappointment or barrier on the build. The basement floor was not level when we started building the stand, so we new leveling before starting was needed. We got the tank and stand into position and put a level on it and it showed about 1/4" out of level. We shimmed the stand accordingly and proceeded to fill it with water and saw that when full and running that the right overflow was barely taking on water while the left was fully flooded. The left side was the side we put shims under. We measured the the difference per the level, drained the tank and the sump and added 3/8" to the left side to make up what the level said was what was needed. Refilled the tank and now the left side is doing what the right was.

Lesson learned is that the plastic rim glued onto the bottom and top of your tank may not mean level where the glass is sitting in regards to your stand and a 1/16" difference or less in how your overflows are glued in make a big difference in the water behavior with a herbie drain. This day is exhausted but tomorrow drain again and drop the shims 1/8" and refill and hope it all works out.

Frustrating!!
 
WOW. I bet it is.

Almost need a laser level to go off as a baseline, and measure down from there to see how much it is off.
 
Yeah, this sucks!

The stand we built is near perfect level (less than a 1/32") where it is being placed not so much. The **** me off part is that the tank is not level which makes trying to level the tank on the stand and make the overflows even is a guess. After filling it and draining it three times to make adjustments I didn't even feel like playing with it the next day.

I was deflated and needed a break, none of the plumbing leaks so that is awesome. Going to drain it and give the level another go today. I sure hope I can get it spot on or close this time.
 
Yeah I basically had to build mine in-place to get it level.

We did it all by eye, wish I had rented a laser level. lol
 
Heading to Florida this week for Corporate meetings so the project will be on hold for at least a week if not 2 weeks. Cold as hell here so some sun and warmth will be nice!
 
The good news is I finally got the tank level this weekend and the overflows are working like they should. Everything is dialed in and dead quiet.

The bad news is when I fired up the heaters, return pump, and skimmer it popped the breaker. The whole room is on the same line and I could see that as a possible problem going into this build. Apex showed just over 10 amps without any lights, power heads, dosers, AWC, or ATO going.

I guess I will be running a dedicated 20amp circuit after all. Another delay in a already long build.
 
Yep, I would run 2 too.

The price increase from 1 to 2 will be minor, so do it at the same time.

My total max amp draw (( according my my Apex )) has been 11.2. And still glad that I went with 2 20 amp circuits -- never know what I will add down the road.
 
Nice thing is I do not have to tear out any walls. The tank is in the finished part of the basement and the wall it is on is the utility side of the basement. The breaker box is only about 8ft directly behind it.

It is a rental house so I don't want to get too carried away cutting up the utilities. I already cut into a water line to hook up my RO/DI to start putting together my water making station.....If the landlord only knew....
 
Dave, Worm, and Todd you are all correct.

Two 20-amp circuits it is. After further review of the situation I have decided to run the circuits and outlets to the stand instead of cutting a hole in the wall of where I rent and may or may not live for a long time. With a 1/2" hole through the drywall we can run the wire from the breaker box to the tank stand and if I move I can disconnect the wire and take it with the stand. No 4"X4"+ hole and permanent outlet box required to do it this way and only a small hole to patch.

Going to purchase an outdoor dual outlet box with heavy duty 20 amp outlets, two 20 amp breakers this week and get the wiring project done this weekend.

In the mean time I will be working on getting my RO/DI and water station complete this week. I am also finishing up laying out my rock work and scape to get it placed into the tank for the cycle fill in the near future I hope!
 
Apex programming question.

I have two 800 watt heaters and do not want them both running every time the tank calls for heat. One is obviously enough to heat the tank, and the other is back-up and I would like to avoid major power spikes if possible.

So for my question:

What is the most common program used when running two heaters in Apex?

Can you program the heaters in Apex to cycle their use every other time heat is called for? Just to verify your back-up works instead of sitting dead and unused until needed?
 
It would be easier to state the programming something like to where:

if DOW M-W-Th-Sa

type statement. Then flip it for the other heater. This will let heaterA work on odd days and heaterB work on even days. This gives them equal amount of wear and usage.

To do it by DOW (day of week) is easier and less typing than making it every other hour.
 
Back
Top