New Build - 560g

Whats the plan for this tank? I'm assuming based on the lighting you shooting for a mixed reef? Have you started planning your livestock selection yet?

Yeah it will be a mixed reef. I've only just started making a livestock list, but I'm a big tang fan so there will be quite a few of them! One of the last fish added will probably be an Achilles tang.

Some of my fish from my 210g will also be moving over:

Male Blonde Naso
CopperBanded Butterfly
Tiger Goby
Paired Mocha Clowns
Paired Red Mandarins
 
Mandy's arent that tough if your willing to supplement the pod pop for a while.

That sump is beautiful, one of the biggest parts of my current systems I which was easier to upgrade. jealous
 
What light are you going to use for fuge? Nice project


I've been running a PAR30 LED bulb from Home Depot on my 210 "successfully" so I will continue using that, but I believe I'll be switching over to the Kessil Algae light in time.
 
I have a h80 ordered, have a small five and was using homedepot unit as well it worked but think new kessil will work better the 380 would work with big sump like yours
 
I haven't gotten as much as I wanted to do done, but here is an update.

I was originally going to plug my LED lightning into the ceiling, so I installed some outlets there. However, I ended up changing my mind, so I spent this weekend patching the holes I made into the ceiling that I had my wires routed through.

Also regarding the lighting, I've gotten a few PM's (think I answered them all) on how the Radions are hung. I put some boards connected to studs on the ceiling and used 3 Radion hanging kits connected to Bosch Rexroth. This railing allows me to slide the Radions left and right and the hanging kit allows me to raise the railing up and down. The railing wasn't my idea and more information can be found if you look at "Mr. Saltwater Tanks 375gallon build" video.

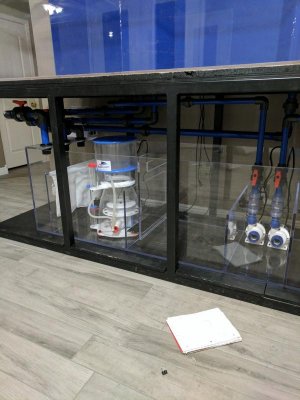
The wood the sump is on was painted black and there is a liner underneath the stand that is situated so if water does go under the tank, it will flow forward instead of towards electrical.

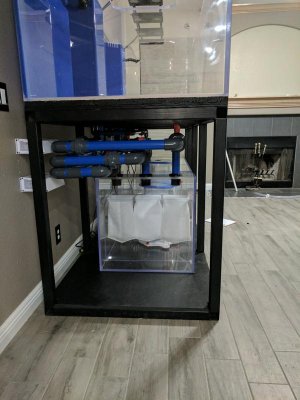
The styrofoam and wood the tank is on was painted black (needs some touch ups). The stand will be skinned, but I figured I'd paint it anyway.

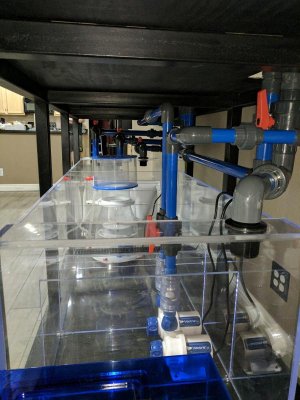
The overflows were completed. Bit of a complication there, the return drilled into the bottom of the overflow and side of the overflow (where the loc-line is) are not aligned. I could have either made a bunch of weird angles that would cost me a lot of real estate inside the overflow or use braided tubing. I ended up using braided tubing. I'm not thrilled with this, but its the only idea I could come up with without losing space and GPH; I will get a picture of this when I move the tank back out.

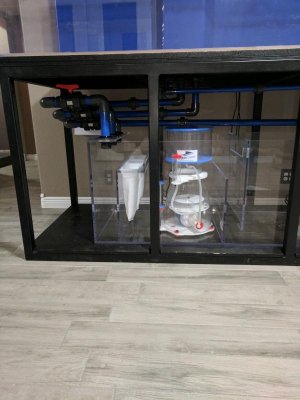
Another issue I was aware of, but didn't want to deal with right away, was the Maxspect Gyres. The way the top of the tank was made, the gyres would have wires going up then across the top and then back down. It would have looked very bad, IMO. I ended up getting two MP60's to replace them, so my 6month old Gyre 250 and new in the box one will be up for sale in a bit.

To stop using my WIFI adapter, I routed an ethernet cable through the wall and into the tank room where my Apex will be.

Lastly, my ATO will be mainly handled by my 275g resorvoir in the garage ~25 feet away. I have a booster put with an automatic shut off valve that will run tubing outside and through the wall into the tank room and connect to a float valve. If the float valve lifts then the booster pump in the garage will turn off. This will fill up my ATO container and then a Tunze will fill my tank and also tell me if the float valve fails. I'm using the Tunze because if the float valve does fail then I'd rather it on my floor then 200+ gallons flood my tank and then flood my floor. I may add the Apex water sensor to this area as well.

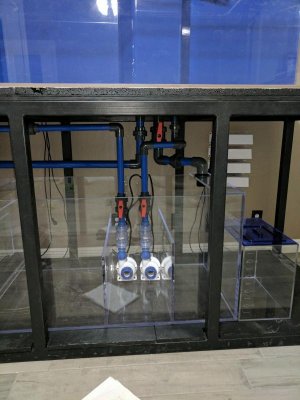
Here are a couple pictures:

IMG_20170508_231113.jpg


IMG_20170508_231156.jpg


I'm hoping by next Monday the plumbing will be done and I'll start working on aquascape ideas!:bounce3:
 
Just a thought, since you mentioned "if water does go under the tank". Rather than have water flow forward, have you consider adding a "lip" around the inside perimeter of the stands bottom. laying some 1x2 flat all around and waterproofing it; this can act as tray to keep water trapped within if there was spill or overflow. I estimate it can hold about 15gal (1"x34"x118"), which can buy you some time if something was to happen...Fairly easy and quick to do. Just an idea :) Hope that made sense.
 
Just a thought, since you mentioned "if water does go under the tank". Rather than have water flow forward, have you consider adding a "lip" around the inside perimeter of the stands bottom. laying some 1x2 flat all around and waterproofing it; this can act as tray to keep water trapped within if there was spill or overflow. I estimate it can hold about 15gal (1"x34"x118"), which can buy you some time if something was to happen...Fairly easy and quick to do. Just an idea :) Hope that made sense.

I was thinking about this and the reason I didn't do it was that I wanted to be able to see if there was a problem. However, I think your idea is still better as there are less destructive ways to tell if something is leaking!

I'll modify this, thank you Dream.
 
Apex (and a zillion other companies) make a flat conductive leak detector (I mention Apex because it can email you).

Even this cheap little battery powered thing https://www.amazon.com/Water-Alarm-Electronic-Detector-Detects/dp/B00OUD0QZC/ref=sr_1_19?ie=UTF8&qid=1494375267&sr=8-19&keywords=water+leak+detector

lets out a loud alarm if it detects water (in your little tray-lipped thing you are discussing)

I have similar, but the green frogs! They scream pretty loud and save a me a few times. no doubt the apex is more hi tech, but doesn't help if its leaking in the middle of the night :)
 
I put a battery operated leak detector in my stand for back up if the power go out in the middle of the night
 
Finished up the plumbing tonight. There will be minor changes, such as piping on the 4 bulkheads going down into the sump and I may adjust one of my return lines because its not 100% level, which is really bothering me!

My main goal with this plumbing setup was to allow complete access to the sump and not have 1.5inch piping going across it. I was going to go across the skimmer section, but the skimmer is simply too large (and I want as much access as I can get) and making 90's for a tighter fit didn't allow for balls valves. The bottom overflow, the one with the longest run, is being braced as it kept wanting to fall due to the weight.

I took everything I learned from my 210 and designed this one not to have those fall backs, so let me know what you guys think.

I'll be starting to remove my Apex from my 210 and get all the wiring setup for the 560 tomorrow.
 

Attachments

  • pic5.jpg
    pic5.jpg
    60.9 KB · Views: 1
  • pic4.jpg
    pic4.jpg
    55.1 KB · Views: 0
  • pic3.jpg
    pic3.jpg
    59.6 KB · Views: 1
  • pic2.jpg
    pic2.jpg
    58.7 KB · Views: 1
  • 6289660500236852483-account_id=0.jpg
    6289660500236852483-account_id=0.jpg
    70.7 KB · Views: 1
Any reason why the ball valves on the left side are facing up rather than forward ? All of your others are facing forward. Looks like youd be able to see and reach them easier if they were forward instead of up.

Very attractive and well thought out, rather than just basic infrastructure that needs to be hidden. Nice job!


Thank you, Robb! The original plan was to leave the stand completely open so I wanted it to look good, but going to end up skinning the steel stand in the end.

Are you referring to the three ball valves that are next to each other? I wanted them all near their respective bulkheads coming off the display tank, but they are very tall/wide, so I was not able to accomplish that without running the pipes completely across the tanks.

The ball valve that is vertical, the one controlling the fuge on the right side, was due to some poor measurements that I took and that ended up being the only way I could fit it there since I glued my returns already.
 
So I'm a little reluctant to post pictures of how all of the wiring went because I'm not too proud on the way it turned out. After re-doing the setup 3 times, I realized that with this many wires, I was never going to be completely satisfied on the looks.

I spent a lot of time routing wires, zip tying them, sticking velcro, etc. The Apex energy bars are mounted on the back of a piece of wood and all of the modules are on the other side. The wood is stuck to the stand by two strong magnets, so I can pick up the entire slab and access anything that I need to.

IMG_20170520_131003.jpg


IMG_20170520_131101.jpg


IMG_20170520_131136.jpg


IMG_20170520_131227.jpg


*The tanks to the right of the sump in the above picture will be for ATO water and the other is my QT system.*

The Vortech pumps are mounted now as well. There is 1 MP60 and 1 MP40 on each of the opposing sides. On the back wall there is (going left to right) 1 MP40 to the left of the first overflow and then another MP40 to the right of the second overflow. I wanted another MP40 to be in the middle of the two overflows, but being behind the tank with a ladder I could barely mount it, so I don't know how I'd ever reliable service this powerhead. I decided to scrap this idea and place the MP40's that are on sides so that they would hit that area.

Since the WXM module can only control 11 total vortech/radions, I will leave the back MP40's on during feeding to try to push the food forward and then control them with the reeflink.

IMG_20170520_132014.jpg


IMG_20170520_131957.jpg


I'll be spending the rest of today setting up the Apex and all of the EcoTech equipment on the WXM module. Tomorrow I will move the tank back and take PAR measurements for future coral placement and then hopefully start aquascaping outside of the tank. The goal is to have water in the tank on the 3rd of June. :bounce3:
 
Back
Top