You are using an out of date browser. It may not display this or other websites correctly.
You should upgrade or use an alternative browser.
You should upgrade or use an alternative browser.
Official Royal Exclusiv Dream Box Owners Thread.
- Thread starter slief
- Start date
slief
RC Sponsor
Slief,
Did that size nanodreambox get sold? I have been talking to Cristina about one that is in Florida.
My bad. Was thinking of the 60x49. I am pretty sure there is a 60x40 in stock.
Koestby86
New member
I have a issue with a object in the compartment where the pipes drain into.. Dont know if its a snail house or something else but it makes a annoying sound when it gets moved around because of the flow going in.. Any idea of how i could possibly get it out ? Both the bigger drains are piped and glued. I just wish I found out before i piped the tank :/
slief
RC Sponsor
I have a issue with a object in the compartment where the pipes drain into.. Dont know if its a snail house or something else but it makes a annoying sound when it gets moved around because of the flow going in.. Any idea of how i could possibly get it out ? Both the bigger drains are piped and glued. I just wish I found out before i piped the tank :/
Since it's full, it's kind of tough. If it's possible to pull the dreambox out and tip it on it's side, you can probably get out out where the water overflows into the socks. If you have access to one of the drain intakes either because one isn't used or if you are using unions, you can use a "flexible claw pick up tool" to fish it out from the drain intake pipe. Given the buoyancy of objects in the water, I am a bit surprised you can hear it in there though.
This is a claw pickup tool. Given the direction of the flow of water, you may even be able to get it by snaking one of these through the side of the box where the water flows into the socks. These are cheap and readily available online. This would likely be my first course of action.

ReefKeeper64
Wanna be a reefkeeper
Did you get the lids cut yet? Wanted to see how they turned out. I am thinking about ordering a Dreambox and will need to have my lids cut also.
Here are the finished lids. Total cost $67. I took Slief's advice and added an extra centimeter all around to insure no binding (there is none).
Attachments

Last edited:
slief
RC Sponsor
Here are the finished lids. Total cost $67. I took Slief's advice and added an extra centimeter all around to insure no binding (these is none).


Very nice! Those lids turned out absolutely perfect! :beer:
For those of you considering one of the empty dreamboxes, this is a perfect example of how it turns out. Make your template and take the lids to an acrylic shop or plastic fabricator to have the cut made using the template as a reference. Many cabinet shops can do to it too. It really insn't a big deal.
slief
RC Sponsor
Thanks for the help on the drain size.
Does anyone know the size of the union on the return pump side? Need to get my plumbing supplies together. I got my nanodreambox ordered.
Sorry for the late reply. Should be a 1" output on the busing for your new dreambox.
ReefKeeper64
Wanna be a reefkeeper
Thanks for the information. My new dreambox is in route from Florida.
Congrats and welcome to the club!
Thanks for the information. My new dreambox is in route from Florida.
Congrats!! You're going to love the dreambox.
docwells
Member
Congrats and welcome to the club!
Thanks. I can't wait to get it and get it installed. Trying to collect my plumbing supplies now.
Reefkeeper64, I need to get with you on your lids. I saw your templates. Do you have any more measurements that I can use to place my cut out in place like a measurement from edge to center point of the main cut out circle. And what skimmer are you using?
ReefKeeper64
Wanna be a reefkeeper
Thanks. I can't wait to get it and get it installed. Trying to collect my plumbing supplies now.
Reefkeeper64, I need to get with you on your lids. I saw your templates. Do you have any more measurements that I can use to place my cut out in place like a measurement from edge to center point of the main cut out circle. And what skimmer are you using?
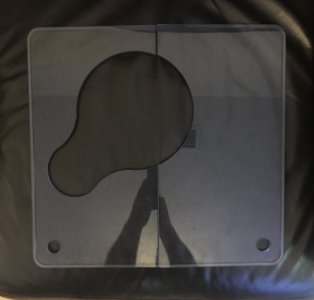
I'm using a Royal Exclusive Bubble King 180.
To start, I took the skimmer out of the dreambox, removed the skimmer cup, and then took a top down picture of the skimmer. Then I emailed the picture to my computer. I then used snagit to enlarge/reduce the photo to scale so that my printout would approximately match the actual length and width of the top down dimensions of the skimmer. I had to make a few printouts before I got this about right. Now I have a nice template to work with.
Next, I cut out the template and taped it to the cardboard cutout of the two lids. I would just make one cardboard cutout representing both the left and the right lids. Then I measured 2cm all around the skimmer cutout to provide clearance for lid removal.
You can tell from the pictures that I wanted my skimmer positioned over to the left so that I can see and access the DC skimmer controller easily. It also made some extra room in that compartment. You can center it just as well but this is what I did.
Hope that helps. Let me know if you have any other questions.
docwells
Member
I'm using a Royal Exclusive Bubble King 180.
To start, I took the skimmer out of the dreambox, removed the skimmer cup, and then took a top down picture of the skimmer. Then I emailed the picture to my computer. I then used snagit to enlarge/reduce the photo to scale so that my printout would approximately match the actual length and width of the top down dimensions of the skimmer. I had to make a few printouts before I got this about right. Now I have a nice template to work with.
Next, I cut out the template and taped it to the cardboard cutout of the two lids. I would just make one cardboard cutout representing both the left and the right lids. Then I measured 2cm all around the skimmer cutout to provide clearance for lid removal.
You can tell from the pictures that I wanted my skimmer positioned over to the left so that I can see and access the DC skimmer controller easily. It also made some extra room in that compartment. You can center it just as well but this is what I did.
Hope that helps. Let me know if you have any other questions.
Thanks for the help. That information was very helpful. I hope to work on it next week. I hope to install dreambox this weekend
docwells
Member
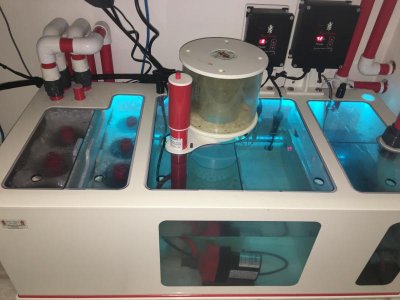
Just got my dreambox yesterday. It is awesome. Very well built.
I do have one issue. The LED lights will not come on. I've tried it in multiple outlets in my house, checked the connections, pressed the on/off switch on the remote multiple times and made sure the battery in the remote was installed correctly. Any other suggestions that I can try?
I do have one issue. The LED lights will not come on. I've tried it in multiple outlets in my house, checked the connections, pressed the on/off switch on the remote multiple times and made sure the battery in the remote was installed correctly. Any other suggestions that I can try?
slief
RC Sponsor
Just got my dreambox yesterday. It is awesome. Very well built.
I do have one issue. The LED lights will not come on. I've tried it in multiple outlets in my house, checked the connections, pressed the on/off switch on the remote multiple times and made sure the battery in the remote was installed correctly. Any other suggestions that I can try?
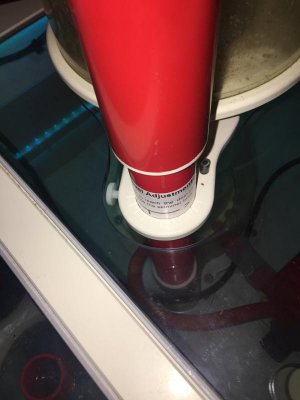
Do you have the connection between the led strip and the driver connected properly? There is an arrow or mark on the strip that indicates pin 1 which needs to match the pin 1 on the cable. If that cable is reversed, the strip won't light up.
slief
RC Sponsor
This shows the polarity arrow on the connectors. It's not teh same connector but similar. I'd also double check the remove batteries to make sure they are in the correct orientation (you mentioned doing that already) and make sure there isn't some remaining plastic under the cover from the piece you pull out of the battery. Lastly, make sure there is a good connection between the US power plug adapter on the AC Power supply. If you have a volt meter, check to make sure the power supply is outputting voltage. The center pin is + and the outer part is the negative.

Last edited:
docwells
Member
I checked the above issues again. All connections are correct. No plastic around the battery.
I have a bad or incorrect power supply. The power supply connection to to controller is not snug. The male pin is too long to fit all the way into the female connection. Whether that matters I do not know. If it doesn't matter then the adapter itself is bad. I tried another power supply from my cable box and the lights came on. The male section of that power supply is shorter and fits snug into the female controller socket. I did use my volt meter and got no power from the power supply There was power when I checked the US power supply adapter when I had it plugged into the wall socket by itself.
I have a bad or incorrect power supply. The power supply connection to to controller is not snug. The male pin is too long to fit all the way into the female connection. Whether that matters I do not know. If it doesn't matter then the adapter itself is bad. I tried another power supply from my cable box and the lights came on. The male section of that power supply is shorter and fits snug into the female controller socket. I did use my volt meter and got no power from the power supply There was power when I checked the US power supply adapter when I had it plugged into the wall socket by itself.
slief
RC Sponsor
I checked the above issues again. All connections are correct. No plastic around the battery.
I have a bad or incorrect power supply. The power supply connection to to controller is not snug. The male pin is too long to fit all the way into the female connection. Whether that matters I do not know. If it doesn't matter then the adapter itself is bad. I tried another power supply from my cable box and the lights came on. The male section of that power supply is shorter and fits snug into the female controller socket. I did use my volt meter and got no power from the power supply There was power when I checked the US power supply adapter when I had it plugged into the wall socket by itself.
OK.. That helps. Strange that the AC Adapter is dead but stranger things have happened. We are checking stock for a new AC Adapter for you and you were CC'd on the email.
Similar threads
- Replies
- 0
- Views
- 165
- Replies
- 0
- Views
- 311