Official Royal Exclusiv Dream Box Owners Thread.

Is the Dream box 3.0 being imported into the states now?

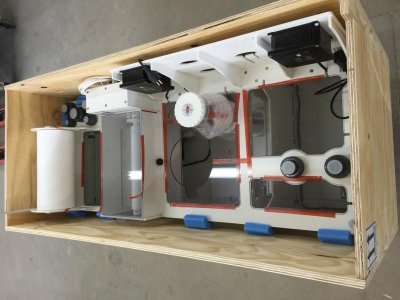
At some point they will be. We believe there is one coming in with the next shipment that will be shown at MACNA and will likely be offered for sale at the show. We don't have the final specs or pricing on it as of yet. I believe it will be a fully loaded version of this one with a big skimmer, lighting, reactors etc.
https://royalexclusiv.net/dreamboxe...000-liter/vlies-dreambox-beispiel-set-5c.html

Very nice unit I hope they decide to bring them in sooner rather than later.
 
Very nice unit I hope they decide to bring them in sooner rather than later.

Me too but the issue is that they are so busy building for customer orders that building them for inventory stock is kind of tough for them as the production line is always busy. Plus, people who are spending that kind of money on one of these oftenl want their intake line connection a certain size or a specific skimmer or specific return pump or pumps. Some want LED's, others don't. Some want red seams while others want the gray ones. It's easy to order one and have it built to meet your desired specs and have it shipped to the closest international airport instead of door to door to save some money. When we import them, the shipping to the US is added into the price then there is the domestic shipping to you so you aren't saving much if any money when it comes to shipping. Us having them instock solves the "I want it now" desire that many of us have but sometimes it's nice to have it built with specific options to suit your needs.
 
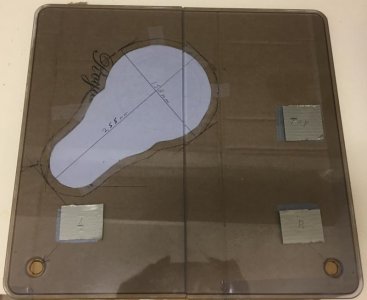
Dreambox Lid Template

Dreambox Lid Template

attachment.php


Hello all,

Would anyone mind taking a picture of their lids removed from your dreambox and set on the floor or a table? A straight down shot will make for a good reference template.

Also, would you mind also posting a picture of your lids back in place on your dreambox? That will give me a good idea how much clearance I should have between the opening and the skimmer. Mine is a BK180.

Thanks!
 

Attachments

  • sumpcutout.jpg
    sumpcutout.jpg
    37.3 KB · Views: 2
attachment.php


Hello all,

Would anyone mind taking a picture of their lids removed from your dreambox and set on the floor or a table? A straight down shot will make for a good reference template.

Also, would you mind also posting a picture of your lids back in place on your dreambox? That will give me a good idea how much clearance I should have between the opening and the skimmer. Mine is a BK180.

Thanks!

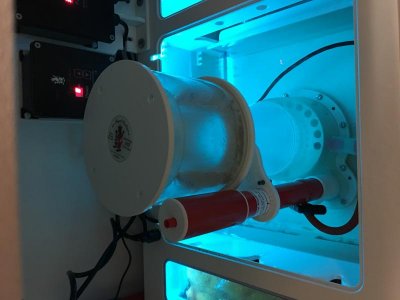
I think you can make the skimmer cutout a bit tighter. It's ultimately up to you though. If it were me, I would position the skimmer so the pump was easy to access for routine maintenance and keep the cutout as tight as possible to minimize evaporation. Also, if you use a small pot lid and an exacto knife, that will help you get that cutout in the template nice and clean.


Here are a few picture from the European website.

IMG_3425_zpsvhhwvpfb.jpg


IMG_3426_zpsrvbn0lkv.jpg


IMG_3428_zpspvye16ph.jpg


IMG_3429_zpsxsoebgpo.jpg


IMG_3430_zpsrklnjvr1.jpg
 
IMG_3430_zpsrklnjvr1.jpg
[/URL][/IMG]

Scott, You helped me yet again and this picture is a home run. Thanks!

I positioned my skimmer and pump the way the picture above shows and I like that better. I'll also make myself a tighter fitting template per your suggestion.

Thanks again!
 
IMG_3430_zpsrklnjvr1.jpg


Scott, You helped me yet again and this picture is a home run. Thanks!

I positioned my skimmer and pump the way the picture above shows and I like that better. I'll also make myself a tighter fitting template per your suggestion.

Thanks again!

Glad to help! :beer:
 
attachment.php


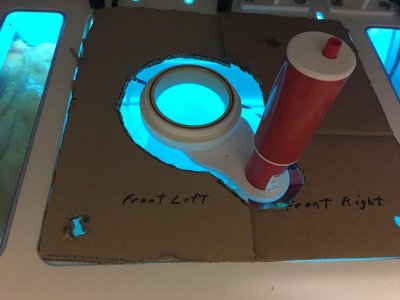
Scott, The template is finished now and I'll be taking it, along with the lids, down the my local plastics shop today. Thanks again for all your help.
 

Attachments

  • templatefile-1.jpg
    templatefile-1.jpg
    38.2 KB · Views: 4
attachment.php


Scott, The template is finished now and I'll be taking it, along with the lids, down the my local plastics shop today. Thanks again for all your help.

VERY VERY nice!! I would just make sure the lids with the cutout are easily removed from the skimmer. Particularly the left side.
 
Is the Dream box 3.0 being imported into the states now?


3 x Completesystems Dreambox 3.0 are on the way to USA.. 2 x 130x60x40 cm and 1 x 150x60x40 cm.

One of this Boxes, we want show them by Macna ....

All FleeceDreamboxes include Bubble King Deluxe 200, stackable Mediareaktor, Cockpit, LED, 3 x RD3 50 Watt Speedys, Red Seams, 12 Volt Panasonic-Timer....

best regards .. Klaus
 

Attachments

  • IMG_7104.jpg
    IMG_7104.jpg
    58.1 KB · Views: 6
3 x Completesystems Dreambox 3.0 are on the way to USA.. 2 x 130x60x40 cm and 1 x 150x60x40 cm.

One of this Boxes, we want show them by Macna ....

All FleeceDreamboxes include Bubble King Deluxe 200, stackable Mediareaktor, Cockpit, LED, 3 x RD3 50 Watt Speedys, Red Seams, 12 Volt Panasonic-Timer....

best regards .. Klaus

Sweet! That is great news!
 
Yesterday, July 4, I disassembled all of the plumbing, lubed all of the O-rings, checked all of the fittings and reassembled. I started the hose for the first test fill at 2:00 pm CST. As first fills go, I had minimal issues. I only had one leak and that was one of those stupid anti siphon valves. one of the O-rings did not seat properly. luckily, a tiled floor and drain handled that drip easily. So, simply removed that piece, re-seated the o-ring and we were good to go. I still have issues with them and I am not sure how to resolve them. Basically, they don't work, sometimes. if the pumps shut down, one or the other will sometimes "hammer:" the flapper just sits and bounces on the seat and will eventually drain the pipe and if the ends are underwater, siphon down to that level in the tank. I will drill a couple of anti siphon holes in the fittings at the top which will resolve that but if the pipes still drain, they serve no purpose. Waste of space and money. So, some investigation needed there. So everyone... 1 month shy of 2 years to the day that this project started, we have water. Here is a short video (phone ran out of memory, have to delete some of the porn off my phone! lol). System still needs dialed in. The pumps are only running at 36% and the main siphons are the only ones pulling water but I think my proof of concept fill went well. OH, the Owens Corning Foamular installed under the tank is PERFECT. It absolutely supports the entire rim of the tank and only crushed (imperceptible except no gaps) where needed and the bubble is spot on, on all four sides. Very pleasantly surprised.

https://youtu.be/P2L3ShVXUPI
 
You should position your return lines to a height where the sump can handle the back flow, check valve or no check valve. Any and all check valves will fail over time or slowly drain water as crud builds up on the flap. I went with the more expensive WYE check valve which I can remove the stopper and clean but it still leaked (brand new). However, I planned my sump to handle the back flow. The first time I started up my tank, I ran it without a check valve so I know where to position my return lines to prevent an overflow of the sump during a power outage. If your sump is not big enough then drilling siphon breaks as you mentioned will do the trick.

Sump and plumbing looks great!
 
attachment.php


Scott, The template is finished now and I'll be taking it, along with the lids, down the my local plastics shop today. Thanks again for all your help.


Did you get the lids cut yet? Wanted to see how they turned out. I am thinking about ordering a Dreambox and will need to have my lids cut also.
 
Did you get the lids cut yet? Wanted to see how they turned out. I am thinking about ordering a Dreambox and will need to have my lids cut also.

The shop said it would be about a week and a half to turn them around. I'll post pictures and exact measurements after they are back.

This hobby is more fun having a dreambox. It makes life easier and you find that you want all of your work (wiring for example) to be as organized as the dreambox. You won't regret your investment one bit. I know I dont.
 
Thanks for the reply. I am leaning toward ordering. Just looking at what add ons I might want like the board to mount my RD pump controller.

Would love to see your lids after being cut along with measurements.

Is you system installed and running or are you waiting on the lids?
 
Thanks for the reply. I am leaning toward ordering. Just looking at what add ons I might want like the board to mount my RD pump controller.

Would love to see your lids after being cut along with measurements.

Is you system installed and running or are you waiting on the lids?

Not sure if RE does this but might want to ask them for a longer outlet cord from the control box to the outlet if you get the board to hold the control boxes. I have three rd3 pumps and the cord from the pump to control box is very long which wasn't needed in my case since they were mounted to the dream box. I had to get some extension cords to be able to plug my pumps into the apex eb8 which was about 7ft away.
 
Thanks for the reply. I am leaning toward ordering. Just looking at what add ons I might want like the board to mount my RD pump controller.

Would love to see your lids after being cut along with measurements.

Is you system installed and running or are you waiting on the lids?

its running now but still without the lids. I'll post some more pictures this evening.
 

Attachments

  • IMG_3858.jpg
    IMG_3858.jpg
    39.9 KB · Views: 5
Back
Top