owenspackmans 180 Reef upgrade build.

Just my thoughts on the stand- All you really need to do is to transfer the weight from the 2x4 joists to the front and back 2x8 beam. Standard screws or even heavy framing nails are not intended to hold in shear. Metal joist hangars with rated joist hangar nails would transfer the load but lets face it... metal and salt just don't mix well. What i would do is run a 2x4 against the 2x8 so that the joists sit on it. Then secure the new 2x4 and the 2x8 together with some method meant to hold shear. Timberlock makes a fastener that would be ideal for this. They are all weather lags meant for attaching exterior deck ledger boards. Just my thoughts but looks like an easy fix.

-Matt

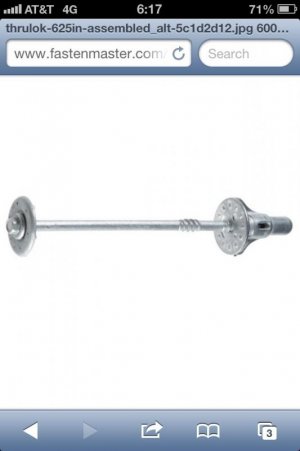
That's an idea. Is this the Timberlok fastener you were referring to?

http://www.fastenmaster.com/details/product/thrulok-screw-bolt-fastening-system.html

ImageUploadedByTapatalk1361877555.155348.jpg
 
I stand slightly corrected

I stand slightly corrected

It is not timberlock but ledgerlock. Same company but two different products. Ledger lock has the shear strength needed. You should be able to find some at any local boxstore. If you cannot find them use carriage bolts and slightly countersink them so they do not interfere with your plywood facia. Either way the idea is to transfer the load to the front and rear 2x8. Although I will probably get knocked for promoting this you could bypass the load bearing fasteners and just glue and screw the 2x4 against the 2x8. essentially a lamination. Glue can be effective here because the grain will be the same.

-Matt
 
Wow a lot work but its all paying off! Keep it up
Thanks Steve, i'll get there in the end, i wasn't expecting to have the stand issues, but i'm glad it was pointed out so I save myself from disaster.

It is not timberlock but ledgerlock. Same company but two different products. Ledger lock has the shear strength needed. You should be able to find some at any local boxstore. If you cannot find them use carriage bolts and slightly countersink them so they do not interfere with your plywood facia. Either way the idea is to transfer the load to the front and rear 2x8. Although I will probably get knocked for promoting this you could bypass the load bearing fasteners and just glue and screw the 2x4 against the 2x8. essentially a lamination. Glue can be effective here because the grain will be the same.

-Matt

Yes, I believe either the 2x8s, or the solution from tundra1000 would work.

So cdrewferd and tundra1000 I worked on a fix tonight and here is what I did. If you think its an adequate fix BUT would benefit from being screwed AND glued then its no big deal for me to remove and glue/screw.

I attempted to run the 2x4 48" across the front 2x8, under the joists, but my 2x4 wasn't completely straight and one end would not have been supporting, so i went with 2 20" pieces.

Here is what i did - In both front corners I placed a 2x4 directly under the outer joist (supporting the tanks sides) and the center joists. These were screwed into the 2x8 frame with both decking screws on each end and a 3" lag bolt in the center.
<a href="http://www.flickr.com/photos/29441159@N03/8512094772/" title="IMG_7466 by owenspackman, on Flickr"><img src="http://farm9.staticflickr.com/8390/8512094772_c58a42b599.jpg" width="500" height="375" alt="IMG_7466"></a>
<a href="http://www.flickr.com/photos/29441159@N03/8512094592/" title="IMG_7462 by owenspackman, on Flickr"><img src="http://farm9.staticflickr.com/8369/8512094592_106fb889ec.jpg" width="500" height="375" alt="IMG_7462"></a>

To help the 2x4 supports I placed a horizontal 2x4 directly under the 2x4 support and under the outer 2x4 joist supporting the tank edge. This was screwed into the 2x8 frame.
<a href="http://www.flickr.com/photos/29441159@N03/8512095136/" title="IMG_7468 by owenspackman, on Flickr"><img src="http://farm9.staticflickr.com/8379/8512095136_a7f7d472fa.jpg" width="375" height="500" alt="IMG_7468"></a>

Legs were then created with a 2x4 and 2x8 screwed together at a 90 degree. These were placed in the corners, directly under the 2x4 outer joist. The 2x8 finishes about 4" after the front of the tank.
<a href="http://www.flickr.com/photos/29441159@N03/8512094374/" title="IMG_7470 by owenspackman, on Flickr"><img src="http://farm9.staticflickr.com/8508/8512094374_1dda276e66.jpg" width="375" height="500" alt="IMG_7470"></a>

In the front center i screwed two 2x8's together and placed them horizontally from the cabinet bottom to under the plywood. The end of the 2x8's finish about 1.5" after the front of the tank.
<a href="http://www.flickr.com/photos/29441159@N03/8510982497/" title="IMG_7474 by owenspackman, on Flickr"><img src="http://farm9.staticflickr.com/8384/8510982497_007604bf6f.jpg" width="375" height="500" alt="IMG_7474"></a>

So now the 2 outer joists are support but the 2x4 support and the 2x8 legs. The two center joists are supported by the 2x4 support. The center of the tank is supported with the 2x8 column under the plywood. That is 5 front supports.

Let me know what you think of this fix.
 
I re-did some of the work on the internal supports to ensure my stand gives the supports it should. I still wasn't happy with the center supports using the 2x8's. I feel now the tank is well support from within the stand.

2x4 screwed against the front 2x8, pressed up against the plywood and screwed into the 2x4 joists supporting the center of the tank.
<a href="http://www.flickr.com/photos/29441159@N03/8513618317/" title="IMG_7477 by owenspackman, on Flickr"><img src="http://farm9.staticflickr.com/8245/8513618317_1bb771e6a0.jpg" width="500" height="375" alt="IMG_7477"></a>
<a href="http://www.flickr.com/photos/29441159@N03/8513618081/" title="IMG_7479 by owenspackman, on Flickr"><img src="http://farm9.staticflickr.com/8225/8513618081_071c0f87e3.jpg" width="500" height="375" alt="IMG_7479"></a>

Another 2x4 was placed against the front 2x8 under the new 2x4. This spans underneath both of the center supports. This is screwed in with exterior screws, deck fasteners and a lug bolt.
<a href="http://www.flickr.com/photos/29441159@N03/8513617797/" title="IMG_7481 by owenspackman, on Flickr"><img src="http://farm9.staticflickr.com/8507/8513617797_07f7a91065.jpg" width="500" height="375" alt="IMG_7481"></a>

A 2x4 was placed vertically under the new supports and screwed into the front frame.
<a href="http://www.flickr.com/photos/29441159@N03/8514728758/" title="IMG_7482 by owenspackman, on Flickr"><img src="http://farm9.staticflickr.com/8517/8514728758_dab92c0808.jpg" width="375" height="500" alt="IMG_7482"></a>

In the corners a short 2x4 is placed under the 2x4 joist supporting the tanks sides, screwed into the front frame. Another 2x4 is placed vertically under the 2x4 support and is screwed into the front frame.
<a href="http://www.flickr.com/photos/29441159@N03/8514728168/" title="IMG_7485 by owenspackman, on Flickr"><img src="http://farm9.staticflickr.com/8237/8514728168_9b67926593.jpg" width="375" height="500" alt="IMG_7485"></a>

2x8 and 2x4 legs were placed in the corners supporting the outer 2x4 joists.
<a href="http://www.flickr.com/photos/29441159@N03/8514727882/" title="IMG_7487 by owenspackman, on Flickr"><img src="http://farm9.staticflickr.com/8514/8514727882_65932ac725.jpg" width="375" height="500" alt="IMG_7487"></a>
<a href="http://www.flickr.com/photos/29441159@N03/8513616551/" title="IMG_7489 by owenspackman, on Flickr"><img src="http://farm9.staticflickr.com/8101/8513616551_dc5f984046.jpg" width="500" height="375" alt="IMG_7489"></a>

I feel the tank will have all the support it needs now. Opinions?
 
I had some time today to work on cleaning up edges and filling holes. Tomorrow will be some final sanding and trimming. If i'm lucky i'll be able to grout the tile.


cabinet dimensions are 61x43x48. its huge!

Disclaimer: this is my first real experience doing anything like this with wood....

<a href="http://www.flickr.com/photos/29441159@N03/8519301923/" title="DSC_0001 by owenspackman, on Flickr"><img src="http://farm9.staticflickr.com/8092/8519301923_d556e11f17.jpg" width="334" height="500" alt="DSC_0001"></a>

<a href="http://www.flickr.com/photos/29441159@N03/8519301527/" title="DSC_0018 by owenspackman, on Flickr"><img src="http://farm9.staticflickr.com/8231/8519301527_c457999888.jpg" width="500" height="334" alt="DSC_0018"></a>

<a href="http://www.flickr.com/photos/29441159@N03/8520414598/" title="DSC_0003 by owenspackman, on Flickr"><img src="http://farm9.staticflickr.com/8232/8520414598_f52dd6613d.jpg" width="500" height="334" alt="DSC_0003"></a>

<a href="http://www.flickr.com/photos/29441159@N03/8519300771/" title="DSC_0006 by owenspackman, on Flickr"><img src="http://farm9.staticflickr.com/8096/8519300771_2a06458409.jpg" width="500" height="334" alt="DSC_0006"></a>

<a href="http://www.flickr.com/photos/29441159@N03/8519300299/" title="DSC_0007 by owenspackman, on Flickr"><img src="http://farm9.staticflickr.com/8241/8519300299_a27bf43457.jpg" width="500" height="334" alt="DSC_0007"></a>

<a href="http://www.flickr.com/photos/29441159@N03/8520413572/" title="DSC_0014 by owenspackman, on Flickr"><img src="http://farm9.staticflickr.com/8386/8520413572_62d2072317.jpg" width="500" height="334" alt="DSC_0014"></a>

<a href="http://www.flickr.com/photos/29441159@N03/8520413282/" title="DSC_0015 by owenspackman, on Flickr"><img src="http://farm9.staticflickr.com/8389/8520413282_5748f71896.jpg" width="334" height="500" alt="DSC_0015"></a>
 
Trimmed the cabinet today. Just need to sand the filler in the nail holes, make the doors and its ready for stain.

<a href="http://www.flickr.com/photos/29441159@N03/8522050809/" title="DSC_0011 by owenspackman, on Flickr"><img src="http://farm9.staticflickr.com/8091/8522050809_2ac50c0455.jpg" width="334" height="500" alt="DSC_0011"></a>

<a href="http://www.flickr.com/photos/29441159@N03/8523164588/" title="DSC_0012 by owenspackman, on Flickr"><img src="http://farm9.staticflickr.com/8514/8523164588_fb624aa1ac.jpg" width="500" height="334" alt="DSC_0012"></a>

<a href="http://www.flickr.com/photos/29441159@N03/8523165112/" title="DSC_0010 by owenspackman, on Flickr"><img src="http://farm9.staticflickr.com/8520/8523165112_3a99a40823.jpg" width="500" height="334" alt="DSC_0010"></a>

<a href="http://www.flickr.com/photos/29441159@N03/8523165516/" title="DSC_0007 by owenspackman, on Flickr"><img src="http://farm9.staticflickr.com/8523/8523165516_e91985dbab.jpg" width="334" height="500" alt="DSC_0007"></a>

<a href="http://www.flickr.com/photos/29441159@N03/8522053149/" title="DSC_0013 by owenspackman, on Flickr"><img src="http://farm9.staticflickr.com/8091/8522053149_90a5a675fd.jpg" width="334" height="500" alt="DSC_0013"></a>

<a href="http://www.flickr.com/photos/29441159@N03/8522052635/" title="DSC_0003 by owenspackman, on Flickr"><img src="http://farm9.staticflickr.com/8507/8522052635_7e3e3a19ba.jpg" width="334" height="500" alt="DSC_0003"></a>

<a href="http://www.flickr.com/photos/29441159@N03/8523167300/" title="DSC_0022 by owenspackman, on Flickr"><img src="http://farm9.staticflickr.com/8092/8523167300_1184b8a261.jpg" width="334" height="500" alt="DSC_0022"></a>
 
Today the trim was completed and the doors made. I still need to put the doors on hinges.

I'm pleased with how everything turned out, considering I've never done anything like this before. I've certainly learned some lessons and would change a few things if I were to start again, but overall i'm really happy.

I realize that the front doors sit way too low. Oh well, can't change that now!

<a href="http://www.flickr.com/photos/29441159@N03/8525570321/" title="DSC_0012 by owenspackman, on Flickr"><img src="http://farm9.staticflickr.com/8107/8525570321_cbb0e9b97d.jpg" width="334" height="500" alt="DSC_0012"></a>

<a href="http://www.flickr.com/photos/29441159@N03/8526682760/" title="DSC_0043 by owenspackman, on Flickr"><img src="http://farm9.staticflickr.com/8506/8526682760_d7b9af04e9.jpg" width="500" height="334" alt="DSC_0043"></a>

<a href="http://www.flickr.com/photos/29441159@N03/8526682082/" title="DSC_0044 by owenspackman, on Flickr"><img src="http://farm9.staticflickr.com/8249/8526682082_42b542a4c8.jpg" width="334" height="500" alt="DSC_0044"></a>

<a href="http://www.flickr.com/photos/29441159@N03/8526681676/" title="DSC_0062 by owenspackman, on Flickr"><img src="http://farm9.staticflickr.com/8237/8526681676_336c7319d4.jpg" width="500" height="334" alt="DSC_0062"></a>

<a href="http://www.flickr.com/photos/29441159@N03/8525568319/" title="DSC_0066 by owenspackman, on Flickr"><img src="http://farm9.staticflickr.com/8092/8525568319_6ac778618e.jpg" width="500" height="334" alt="DSC_0066"></a>
 
Very nice and creative stand! Lovely dogs as well; I have owned 2 dalmatians in the past.

I assume you are going to water proof the wood under the stones to avoid water dripping?
 
Very nice and creative stand! Lovely dogs as well; I have owned 2 dalmatians in the past.

I assume you are going to water proof the wood under the stones to avoid water dripping?

Why thank you! Dalmatians are just the most wonderful companions. The larger one is deaf and just the most well behaved dog I've ever known.

I do plan to stain and waterproof the stand but have yet to decide what to go with. I do not want to stand to look too dark as I love the lighter look of the wood. Do you have any recommendations on stains and waterproofing products?
 
today I painted the inside of cabinet, used Kills Primer. Tomorrow I will use Plasti-Dip to paint the bottom of the cabinet.

<a href="http://www.flickr.com/photos/29441159@N03/8540026783/" title="IMG_7552 by owenspackman, on Flickr"><img src="http://farm9.staticflickr.com/8507/8540026783_bfce43e071.jpg" width="500" height="375" alt="IMG_7552"></a>
 
Plasti-Dip was used on the lower 2" of the tank, ended up using almost 3 cans, more than i had expected. I've had experience using this product on rims before and its always worked well, pretty durable and waterproof. We'll see how it holds up in an aquarium cabinet, so far i tested with freshwater, holds the water and wipes off easily.

I siliconed all of the seams twice. Once this dried Kills Primer was used to paint the inside of the cabinet, 3 coats. Then the 3 coats of Plasti-Dip.

<a href="http://www.flickr.com/photos/29441159@N03/8543726524/" title="IMG_7576 by owenspackman, on Flickr"><img src="http://farm9.staticflickr.com/8380/8543726524_e2e52e9761.jpg" width="500" height="375" alt="IMG_7576"></a>

<a href="http://www.flickr.com/photos/29441159@N03/8543726818/" title="IMG_7554 by owenspackman, on Flickr"><img src="http://farm9.staticflickr.com/8507/8543726818_a5ce83ef06.jpg" width="500" height="375" alt="IMG_7554"></a>

<a href="http://www.flickr.com/photos/29441159@N03/8542627145/" title="IMG_7562 by owenspackman, on Flickr"><img src="http://farm9.staticflickr.com/8094/8542627145_3497543af9.jpg" width="500" height="375" alt="IMG_7562"></a>

<a href="http://www.flickr.com/photos/29441159@N03/8543727372/" title="IMG_7565 by owenspackman, on Flickr"><img src="http://farm9.staticflickr.com/8098/8543727372_3912fd2e22.jpg" width="500" height="375" alt="IMG_7565"></a>

<a href="http://www.flickr.com/photos/29441159@N03/8542627591/" title="IMG_7579 by owenspackman, on Flickr"><img src="http://farm9.staticflickr.com/8100/8542627591_741c0485e6.jpg" width="500" height="375" alt="IMG_7579"></a>

<a href="http://www.flickr.com/photos/29441159@N03/8543740782/" title="IMG_7581 by owenspackman, on Flickr"><img src="http://farm9.staticflickr.com/8245/8543740782_302b58490d.jpg" width="375" height="500" alt="IMG_7581"></a>

That's looks great, I think u are really gonna appreciate that in the future
 
installed the DJ strip today, needs a little neatening up.

The plasti-dip isn't going to hold up. I need a plan B.

Placed the refugium and 10g top off tank inside the cabinet today to get some spacing ideas.

<a href="http://www.flickr.com/photos/29441159@N03/8545946737/" title="IMG_7595 by owenspackman, on Flickr"><img src="http://farm9.staticflickr.com/8374/8545946737_5ca64e767d.jpg" width="500" height="375" alt="IMG_7595"></a>

<a href="http://www.flickr.com/photos/29441159@N03/8545946509/" title="IMG_7589 by owenspackman, on Flickr"><img src="http://farm9.staticflickr.com/8367/8545946509_1861af44ab.jpg" width="500" height="375" alt="IMG_7589"></a>

<a href="http://www.flickr.com/photos/29441159@N03/8547042660/" title="IMG_7587 by owenspackman, on Flickr"><img src="http://farm9.staticflickr.com/8522/8547042660_fa4b967051.jpg" width="500" height="375" alt="IMG_7587"></a>
 
Back
Top