ReefPharmer
Active member
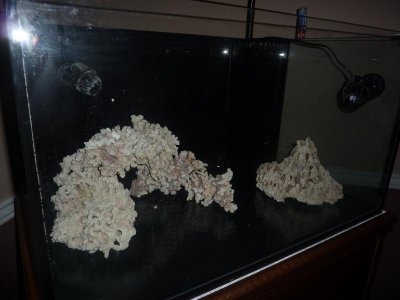
Here is a brief summary of my re-build of a rimless system that is 36x24 deep x 20 high. As of right now, I decided to go barebottom due to issues with sand i have in my bigger tank.
As a side note, I purchased this tank second hand, so some of the equipment is used.
Tank came on a premade stand (MDF wood) which had water damage spots all over it. If you never used MDF, dont use it to build a stand, water gets in and raises the "wood". Very bad look, especially on a white stand.
<a href="http://www.flickr.com/photos/60123349@N06/7015294059/" title="rimlessstart by playaslk, on Flickr"><img src="http://farm7.staticflickr.com/6238/7015294059_d9bca9783b.jpg" width="240" height="320" alt="rimlessstart"></a>
I started by cleaning the tank and rebuilding the stand. I wont go deeply into the stand build as there are so many already on the site but here is the basic pic of it:
<a href="http://www.flickr.com/photos/60123349@N06/7015294099/" title="standbuild by playaslk, on Flickr"><img src="http://farm7.staticflickr.com/6232/7015294099_049d5bf0cc.jpg" width="320" height="240" alt="standbuild"></a>
A tip for the stand builders out there: use a large 90 deg angle. Just because you cut your 2x4s at a 90, doesnt mean they will come together at a 90 degree perfectly. As a result, my stand was "off" a bit. Not enough to rebuild it but enough to irritate me and not fit a perfectly cut 36x24 top. i had to "alter" the top skin slightly.
I used Kilz primer/paint outdoor all in one, and coated it several times.
The other tip is consider where your overflow is ahead of time. Below is a pic of my plumbing and i totally did not consider where the overflow is and how it is plumbed. I had to cut the brace 2x4 down to size AFTER i glued/primed it because the elbow pvc would not fit obviously. TOTAL PIA! Dont make my mistakes.
I used 3/4 maple plywood to make the skin and walnut stain. The trim was all bought from HD. It was also stained / clear-coated.
<a href="http://s278.photobucket.com/albums/kk113/dlkley/?action=view¤t=P1040807.jpg" target="_blank"><img src="http://i278.photobucket.com/albums/kk113/dlkley/P1040807.jpg" border="0" alt="Photobucket"></a>
Not many people do this but I had a bad experience with a skimmer tipping over when i was away and filling the stand with water. Since then, i prefer to make a sort of a false bottom to collect water in case of an accidental overflow. Call me crazy.
<a href="http://www.flickr.com/photos/60123349@N06/7015239543/" title="false botom by playaslk, on Flickr"><img src="http://farm8.staticflickr.com/7054/7015239543_dc979fdbe5.jpg" width="375" height="500" alt="false botom"></a>
For the door, I have had issues lining up the hinges properly in the past, so i decided to just have a removable "door". To get it to properly sit in place, i used magnets on top o the "door" and inside the stand, and made sure it fits snugly.
<a href="http://www.flickr.com/photos/60123349@N06/6869128416/" title="magnet on door by playaslk, on Flickr"><img src="http://farm8.staticflickr.com/7098/6869128416_f10771e4b6.jpg" width="375" height="500" alt="magnet on door"></a>
The sump is glass w/ acrylic baffles that i put in with quite a bit of silicone. Another tip... figure out what skimmer you want to use, put it into the sump, THEN put in the first baffle for it. Dont make the mistake of putting in baffles that dont fit your skimmer. Here is a pic of the plumbing.
<a href="http://www.flickr.com/photos/60123349@N06/6869129026/" title="hitchhikerwtf by playaslk, on Flickr"><img src="http://farm7.staticflickr.com/6216/6869129026_753b6dda15.jpg" width="375" height="500" alt="hitchhikerwtf"></a>
OOPS, I am not sure how he got in there. Ok here we go one more time, notice the circled area, i had to use a jigsaw and cut out the brace some, after it was sealed/primed, very irritating.
<a href="http://www.flickr.com/photos/60123349@N06/6869287806/" title="plumbing by playaslk, on Flickr"><img src="http://farm7.staticflickr.com/6091/6869287806_4942a10ccd.jpg" width="375" height="500" alt="plumbing"></a>
For the skimmer, if you dont like the noise of the air humming, you can use a home made muffler")
<a href="http://www.flickr.com/photos/60123349@N06/7015239641/" title="muffler by playaslk, on Flickr"><img src="http://farm7.staticflickr.com/6048/7015239641_297dfe8b8f.jpg" width="375" height="500" alt="muffler"></a>.
As a side note, I purchased this tank second hand, so some of the equipment is used.
Tank came on a premade stand (MDF wood) which had water damage spots all over it. If you never used MDF, dont use it to build a stand, water gets in and raises the "wood". Very bad look, especially on a white stand.
<a href="http://www.flickr.com/photos/60123349@N06/7015294059/" title="rimlessstart by playaslk, on Flickr"><img src="http://farm7.staticflickr.com/6238/7015294059_d9bca9783b.jpg" width="240" height="320" alt="rimlessstart"></a>
I started by cleaning the tank and rebuilding the stand. I wont go deeply into the stand build as there are so many already on the site but here is the basic pic of it:
<a href="http://www.flickr.com/photos/60123349@N06/7015294099/" title="standbuild by playaslk, on Flickr"><img src="http://farm7.staticflickr.com/6232/7015294099_049d5bf0cc.jpg" width="320" height="240" alt="standbuild"></a>
A tip for the stand builders out there: use a large 90 deg angle. Just because you cut your 2x4s at a 90, doesnt mean they will come together at a 90 degree perfectly. As a result, my stand was "off" a bit. Not enough to rebuild it but enough to irritate me and not fit a perfectly cut 36x24 top. i had to "alter" the top skin slightly.
I used Kilz primer/paint outdoor all in one, and coated it several times.
The other tip is consider where your overflow is ahead of time. Below is a pic of my plumbing and i totally did not consider where the overflow is and how it is plumbed. I had to cut the brace 2x4 down to size AFTER i glued/primed it because the elbow pvc would not fit obviously. TOTAL PIA! Dont make my mistakes.
I used 3/4 maple plywood to make the skin and walnut stain. The trim was all bought from HD. It was also stained / clear-coated.
<a href="http://s278.photobucket.com/albums/kk113/dlkley/?action=view¤t=P1040807.jpg" target="_blank"><img src="http://i278.photobucket.com/albums/kk113/dlkley/P1040807.jpg" border="0" alt="Photobucket"></a>
Not many people do this but I had a bad experience with a skimmer tipping over when i was away and filling the stand with water. Since then, i prefer to make a sort of a false bottom to collect water in case of an accidental overflow. Call me crazy.
<a href="http://www.flickr.com/photos/60123349@N06/7015239543/" title="false botom by playaslk, on Flickr"><img src="http://farm8.staticflickr.com/7054/7015239543_dc979fdbe5.jpg" width="375" height="500" alt="false botom"></a>
For the door, I have had issues lining up the hinges properly in the past, so i decided to just have a removable "door". To get it to properly sit in place, i used magnets on top o the "door" and inside the stand, and made sure it fits snugly.
<a href="http://www.flickr.com/photos/60123349@N06/6869128416/" title="magnet on door by playaslk, on Flickr"><img src="http://farm8.staticflickr.com/7098/6869128416_f10771e4b6.jpg" width="375" height="500" alt="magnet on door"></a>
The sump is glass w/ acrylic baffles that i put in with quite a bit of silicone. Another tip... figure out what skimmer you want to use, put it into the sump, THEN put in the first baffle for it. Dont make the mistake of putting in baffles that dont fit your skimmer. Here is a pic of the plumbing.
<a href="http://www.flickr.com/photos/60123349@N06/6869129026/" title="hitchhikerwtf by playaslk, on Flickr"><img src="http://farm7.staticflickr.com/6216/6869129026_753b6dda15.jpg" width="375" height="500" alt="hitchhikerwtf"></a>
OOPS, I am not sure how he got in there. Ok here we go one more time, notice the circled area, i had to use a jigsaw and cut out the brace some, after it was sealed/primed, very irritating.
<a href="http://www.flickr.com/photos/60123349@N06/6869287806/" title="plumbing by playaslk, on Flickr"><img src="http://farm7.staticflickr.com/6091/6869287806_4942a10ccd.jpg" width="375" height="500" alt="plumbing"></a>
For the skimmer, if you dont like the noise of the air humming, you can use a home made muffler
<a href="http://www.flickr.com/photos/60123349@N06/7015239641/" title="muffler by playaslk, on Flickr"><img src="http://farm7.staticflickr.com/6048/7015239641_297dfe8b8f.jpg" width="375" height="500" alt="muffler"></a>.