RapidLED Aurora Build

AZRippster

Diver & Reef Aquarium Nut
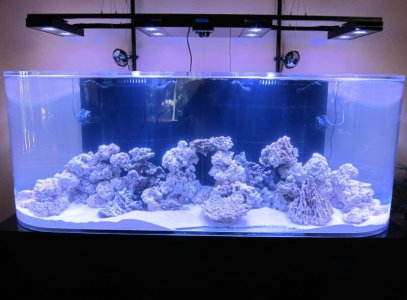
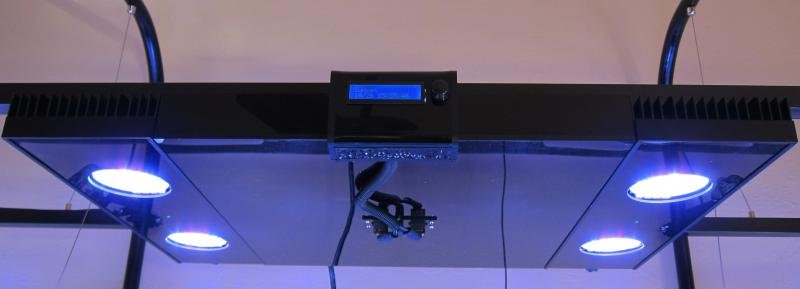
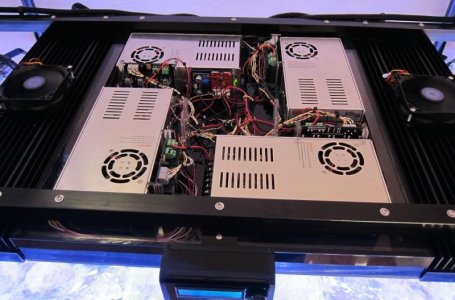
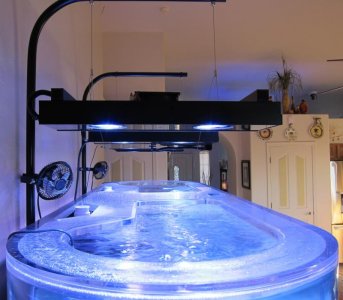
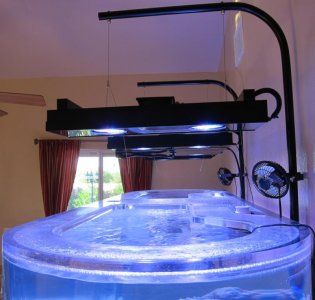
Thought I would share with any of you Tucson/Sierra Vista DIY'ers my RapidLED Aurora build I finally finished this weekend. These are truly awesome and basically the Ecotech Radion Pro 30. I decided on using the Coralux Storm X controller because Neptune Systems do not have a PWM module "yet" for us DIY'ers. It would have been nice to tie in the fixture into my Apex but I do have to say the Storm X is a very nice unit and Ben is amazing in his prompt responses to any questions you may have. So, if you don't want to put out "allota dough" for Radions, you'll love these.
 

Attachments

  • Aurora Front.jpg
    Aurora Front.jpg
    27.3 KB · Views: 7
  • Aurora Storm X.jpg
    Aurora Storm X.jpg
    21.7 KB · Views: 7
  • Aurora Wiring.jpg
    Aurora Wiring.jpg
    66.4 KB · Views: 7
  • Aurora Side L.jpg
    Aurora Side L.jpg
    68.4 KB · Views: 7
  • Aurora Side R.jpg
    Aurora Side R.jpg
    70.9 KB · Views: 9
Thank you for the nice words. Kudos also go out to Mike and Vince from Rapid LED. They are exceedingly helpful in providing technical advice and answering all sorts of questions regarding the products they sell. This is my second build using them and I couldn't be happier.
 
Looks so clean. Nice job! Did you us an Arduino or was it preprogramed? Some people have made some awesome code for them.
 
I used the Coralux Storm X. I built the housing for it and made it removable in the event I wanted to change anything. That's why it's mounted to the front versus internally. Ben, the developer, has really put allot of thought into it. There are still a few features that would be nice, but he's covered most of them and he's amazing at getting back to you if you have any questions. It's based on an Arduino UNO. You can check it out at:

www.coralux.net
 
Thats so bad @$$! Great job, your hard work shows. Specially for people that know how much goes into diys but the payout is superb.
 
Ariyan,

I apologize I missed your question the first time around. I made the housing out of 1/4" Black Acrylic and 3/8" Clear. The main body that houses the electronics I made the same height as the heat sinks so they would line up nicely. The heat sinks come with a clear acrylic splash shields, but that exposes all of the LEDs, electronics, and wiring. Quite ugly if you ask me. So, I made my own out of 1/8" Black Acrylic routed on the edges down to 1/10" so they would slide into the original grooves. Obviously I routed the holes for the LED pucks and if you look closely you'll see the moonlight LEDs centered between them. I used cool white 5mm LEDs. You normally see Royal Blue LEDs (also in my previous DIY fixture), but personally I don't like them. I'm a diver and I've never seen "any" blue during a night dive. Running 5mm low voltage cool white LEDs look far more like the moon's light at night over and in the ocean. The Coralux Storm X can easily drive 5mm LEDs from any of its PWM channels at 10V, you only need to put a 220 Ohm 1/4 watt resistor inline on the positive side. The Storm X provides a lunar cycle, so that's almost automagic.
 
no worries, I have a single puck and storm x…

Where'd you get the acrylic from?

I was planning on doing almost exactly what you did but I was thinking about using a little less pucks and doing some white SMD's in-between them…

Very nicely done….
 
We had an appointment in Phoenix so while we were up there we stopped in at Curbell Plastics. Yeah, Tucson is limited on acrylic sheet availability and in Sierra Vista it is non-existent. Curbell has it all.
 
Wow I wish I knew how to build these bad a$$ lights but sadly im horrible at these types of diy ,so who tought you how to make all this
 
Hello azdiver,

All you have to do is research into whatever you want to build and how to work with the materials necessary for the project. I started building acrylic tanks and sumps/wet drys in the late '80s due to being young and short on cash at the time. I talked to people in the acrylic shops (Tucson used to have some good ones) and read some info at the library. I was also in the Air Force and fortunate to have a slammin' woodshop on Davis-Monthan (cutbacks closed those in the '90s). As far as electronics, pretty much the same thing. I used to reverse engineer friend's electronic guitar effects when I was a kid and build my own. My folks weren't very supportive of rock music and that's what I wanted to play :wildone: .

We are getting ready to migrate our main tank to this one with the new lights. The new tank sits against a wall that behind it has a closet for our central bathroom. My wife had the idea we should convert that closet into a filtration room and keep the bulk of the hardware and devices out from under the new tank, so, that is becoming a reality. Without DIY'ing it, it would have been a hodgepodge collection of store bought equipment stuck in places we hoped it would fit and function. Now everything fits and is designed for optimum function and maintainability. Some things we still bought due to practicality and the manufacturers proven track record with a certain product. I'm also fortunate to have a wife with a very creative mind that loves the hobby. Many times she'll suggest something I jump on and say will not be possible but later figure out how to make happen.

Thanks for the kind words. If you ever have a question about fabrication and I have some experience with it, I'm more than happy to share what I know. Just drop me a line.
 
I must say that I have spent time with AZRippster and some of his family and they are amazing people with a plethora of knowledge! Their (old) system is (was) amazing and I know that the new 450g race track tank will be stunning because of their attention to detail. They know a lot of diy tricks and sent me home with a list of things I must try out for myself.

Russ, good luck on the build and I hope to see it soon!
 
Hey Carlos,

You're just saying that cause you want the rastas! ;)

Seriously, thank you for the compliment. BTW - I should have those rastas for ya soon. I'm hoping the new tank will be cycled within the next couple of weeks so we can make the migration. Not really looking forward to that.
 
Thank you Carlos. We keep watching it from day-to-day to see when the cycle completes. We'll be moving all our live rock from the 180 over so things should remain very stable. Thankfully we're only moving a few feet. I'm hoping by next weekend, if not it will likely be over Veteran's Day weekend so we'll have lots of time.
 

Attachments

  • Dual Bullnose 450.jpg
    Dual Bullnose 450.jpg
    59.9 KB · Views: 9
Awesome information, I'm in the process of planning out a new 150 tall and this definitely fits the bill and cuts the cost of the EcoTech products, granted they have tons of bells and whistles; but who really gets in and changes their lights regularly?
 
How are the lights working out for you now?
I'm looking at this kit too. What spread do you get from each fixture

Corey
 
So far we really like them. The tank is 36" deep and we're still not running them past about 50%. Initially we didn't try tweaking too much, basically ramping all 4 channels equally up and down. Since then we've been making adjustments. A big one was to bring down the whites. I'm sure there was some shock caused during the migration from our 180 to the 450, but even after things stabilized, the corals just didn't seem to be opening like they should. After we brought down the whites and did some adjustments to water flow, things have started getting back on track. We still haven't really seen any new coralline algae starting to develop on the new rocks, but I'm sure it's just a matter of time. Here is an updated photo as of yesterday. Taken with my cell phone so it's not the greatest, but gives an idea.
 

Attachments

  • 450-7 Dec 14-Sized.jpg
    450-7 Dec 14-Sized.jpg
    57.4 KB · Views: 8
Back
Top