You are using an out of date browser. It may not display this or other websites correctly.
You should upgrade or use an alternative browser.
You should upgrade or use an alternative browser.
SC Aquariums Owners Thread
- Thread starter OceanWolf
- Start date
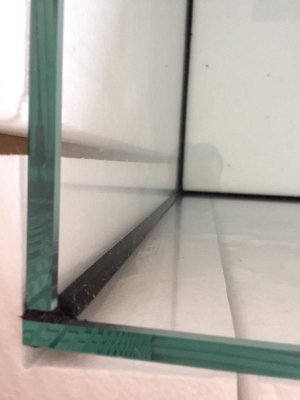
those 2 seams wouldnt bother me. That lip is nothing to do with the integrity of the seals. That wont be noticed once the tank is set up. If they bother you a small dap of black aquarium silicone is a quick fix but these are purely cosmetic.
These are not seems, these are cracks in the silicone looks like is was cut with a razor and the other pic is the silicone seal coming off the glass which is more in middle of the tank on that same corner, once the tank is filled and it will put pressure on the walls these cracks and seems can open up a lot bigger and might even give out over time a flood my house. Please note this is only on one corner all other corner are 100% perfect so I have what to compare it to.
Here is a pic of the other corner and what is should look like.
Attachments
soulpatch
New member
That silicone in the corner is not really holding the tank together though. The silicone between the glass panes does that job. The silicone in the corner is more of a protective barrier for the silicone between glass panes so you dont pound on that with a scrapper or such.
So it is an easy fix as it is cosmetic to just dap some more on that spot or to drag a razor yourself to remove the corner bead and redo it. Not saying you should have to fix it since it is a new tank but this is a minimal concern.
So it is an easy fix as it is cosmetic to just dap some more on that spot or to drag a razor yourself to remove the corner bead and redo it. Not saying you should have to fix it since it is a new tank but this is a minimal concern.
I hear you, i bought this tank originally to be a PNP system. Anyway lets see what im going to do.That silicone in the corner is not really holding the tank together though. The silicone between the glass panes does that job. The silicone in the corner is more of a protective barrier for the silicone between glass panes so you dont pound on that with a scrapper or such.
So it is an easy fix as it is cosmetic to just dap some more on that spot or to drag a razor yourself to remove the corner bead and redo it. Not saying you should have to fix it since it is a new tank but this is a minimal concern.
soulpatch
New member
black silicone is super easy to get and would take all of perhaps 10 minutes to repair and a couple days to completly cure which would be used when you are plumbing and setting up rocks and such.
http://www.bulkreefsupply.com/aquar...ck-10oz.html?gclid=CJrtsPv0ktMCFReHswodeqcHGA
This is so minor though that I would just ping Steve with pics and ask for a few bucks back to pay for silicone and your time to repair. Literally will be 10 minutes of your time to cut out existing with a blade, throw this silicone in a caulk gun, set bead, use corner tool bought at home depot to wipe seam and provide clean look.
those 2 seams wouldnt bother me. That lip is nothing to do with the integrity of the seals. That wont be noticed once the tank is set up. If they bother you a small dap of black aquarium silicone is a quick fix but these are purely cosmetic.
Just wondering what could have made this happen? Did the tank shift or something?
soulpatch
New member
That is easy to do if they did not press well when laying the seam or cleaning it with a seam tool. Anything to the silicone to cause concerns would show tears in between the glass panes, excess bubbling, ect.
This was just a worker who was likely speeding through. Unfortunately it only shows up after the silicone starts to cure and was likely already packed by then as this isnt structural.
If the tank shifted or such where the glass panes moved or would have integrity concerns you would see that in the silicone between the panes of glass. Take a flashlight if you need to and put some pressure ont he glass panes and you will see if anything is there. While filling the tank do the same but when making a tank one typically does the glass pane silicone before they go back and seal the corners to give added protection for the seam. Some manufactorers like Reef Savvy put an acrylic type of shield in there instead of silicone that they call amored seams or somethign like that.
Again I wouldnt have any concerns running the tank as is form your pics. I might dap some silicone on it just to ensure I dont slam my scapper into it but thats it.
those 2 seams wouldnt bother me. That lip is nothing to do with the integrity of the seals. That wont be noticed once the tank is set up. If they bother you a small dap of black aquarium silicone is a quick fix but these are purely cosmetic.
I'm not handy when it comes to these things. So if I were to redo the silicone can I just do a bead on top of this one or is it mandatory to take off the old one before?
RogueGrown
New member
I'm not handy when it comes to these things. So if I were to redo the silicone can I just do a bead on top of this one or is it mandatory to take off the old one before?
Make sure to use masking tape where you dont want the silicone to be, mask it off lay the bead down and then pull the tape straight up and away from the bead. It'll make a nice clean line.
soulpatch
New member
silicone doesn't attach to itself well so it would be best to take a blade and trim this back so fresh silicone can seat to the glass. Literally take a razor blade and hold it flat against the surface and slowly cut the one side of silicone free from glass. Re[peat on other side. When done use some vinegar to clean glass and put new stuff on.
There is nothing handy needed to lay this bead of silicone. If we were talking the structural between the glass panes I would tell you to seek help as bubbling and such there could cause failure.
Once you clean glass apply painters tape about 1/2" from the inner corner (whatever distance matches other corners), cut tube top, put in caulk gun, pull trigger and lay bead. With the silicone/caulk tool like the one linked below you should be able to match the curve of the existing corners. Use the tool from bottom to top stopping a few times to wipe excess off the tool with paper towel if needed. When you have it all done do a final pass from bottom to top to ensure uniform look. Finally remove the tape slowly (tape ensures a perfect edge).
http://www.target.com/p/dap-procaul...gclid=CN7uqt2Uk9MCFVOHswod6LAMkA&gclsrc=aw.ds
I'm not handy when it comes to these things. So if I were to redo the silicone can I just do a bead on top of this one or is it mandatory to take off the old one before?
I would just put some tape on the glass along the seam and put a little silicone on your finger with a glove and fill in the gaps. I wouldn't bother redoing the whole seam. It's only a cosmetic flaw so I think removing the whole bead it more trouble than it is worth. Just filling it will work well enough since it's not a strucural issue and should be an invisible repair.
soulpatch
New member
I would just put some tape on the glass along the seam and put a little silicone on your finger with a glove and fill in the gaps. I wouldn't bother redoing the whole seam.
I would do the same personally....
RogueGrown
New member
+2 easy peasy
Make sure to use masking tape where you dont want the silicone to be, mask it off lay the bead down and then pull the tape straight up and away from the bead. It'll make a nice clean line.
Thanks great tip.
Just wondering when they originally make the tank is the silicone that's holding that tank together and the silicone on the inside done on 2 separate steps or one step?
Also if I were to cut this one out and redo it how far down do I cut because on the bottom it might become complex because all 3 corners coming together don't wanna mess that up.
Also if I were to cut this one out and redo it how far down do I cut because on the bottom it might become complex because all 3 corners coming together don't wanna mess that up.
RogueGrown
New member
Cut the seal flush with the side glass first and then carefully peel and cut the front side second. Make sure not the cut between the two pains of glass, as soulpatch said, thats where your seal truly is. Clean, tape, lay bead, cure, hurry up and wait then fill.
soulpatch
New member
most manufactorers do it in 2 steps. The silicone between panes is done first and weight applied or tank strapped. Once seams are solid then they put on the protecting inner bead.
You could cut out the bad sections and just redo those as well if you dont want to just touch them up. I still say to just touch it up but your choice.
You could cut out the bad sections and just redo those as well if you dont want to just touch them up. I still say to just touch it up but your choice.
RogueGrown
New member
I agree with the touch up in this case.
most manufactorers do it in 2 steps. The silicone between panes is done first and weight applied or tank strapped. Once seams are solid then they put on the protecting inner bead.
You could cut out the bad sections and just redo those as well if you dont want to just touch them up. I still say to just touch it up but your choice.
How would you go about touching it up?
Also if it's true that silicon thousand bond with silicone that well then why touch up?
soulpatch
New member
Same as stated above. Clean the glass under the breaks and dap on silicone.How would you go about touching it up?
Also if it's true that silicon thousand bond with silicone that well then why touch up?
That way it would seat to the glass for most part. Silicone doesnt mesh to itself that great which is why i would not redo the whole seam but small patches are fine especially in non structural areas
Sent from my SM-G935T using Tapatalk
Similar threads
- Replies
- 8
- Views
- 352
- Replies
- 9
- Views
- 346
- Replies
- 0
- Views
- 147
- Replies
- 76
- Views
- 877
- Replies
- 7
- Views
- 284