You are using an out of date browser. It may not display this or other websites correctly.
You should upgrade or use an alternative browser.
You should upgrade or use an alternative browser.
Soulpatch's 150 SC build
- Thread starter soulpatch
- Start date
davocean
Active member
Looking forward to your cabinet design, I might need to appropriate some ideas as I am moving all my electrical into its own space next month and soon after adding an apex.
Sent from my iPhone using Tapatalk
Me too, I'm a big fan of the wood work, and since it seems you have most everything on your build figured out I wanted to comment w/ something of more value than "nice tank" even though it is!
7.5" of space, hmm, I'd almost be inclined to hog out some drywall for an inset shelf, but then I'm still single and can get away w/ stuff like that...
soulpatch
New member
So here is what I am thinking at the moment:
I have the hinged sliders. I will mount them to wall behind tank (this will be interesting as I have to use 90 deg bit as I only have 8 inches of play here...)
I will build a simple cabinet with a back panel of 26x24. This gives me an extra 2 inches on the back panel that will be used to attach to the sliders so unit can flip forward and give me access to back portion.
Back panel will have a "door" cut out roughly 18x18 so I can have full access to the rear of unit. Simple hole in the "door" will be used for me top open it as a knob would add space.
Sides and top would be 7 inches thus giving me a total of 7.5" depth that I can work with.
A board will be mounted using 1/4 MDF giving me a total of 6.75" of "usable space. The board will be mounted 3" from rear which should afford me space for wiring and power bricks on backside and the APEX components on the front that I can see. So the door on the rear gives me access to plugs and the front gives me all of the important items to plug into and the controllers. So when I slide it out against the wall I see the plugs and controllers and then flip it forward to have access to the back door which will conceal the wires in the "hidden" compartment.
I am not planning on any front doors at this moment as I cant find decent glass doors. I am thinking AV smoked glass doors. I might ping my local glass shop for something. I have rubber passthroughs coming for the cords and small extensions to join everything together. Also have a neoprene sleeve linked earlier to feed to the tank stand (I need flexiblility since the cabinet can move.)
Attachments
davocean
Active member
I have the milwaukee right angle adapter which is great for stuff like this, and should give plenty of clearance for you.
The only thing I'd do differently than your plan is use 1/4" ply rather than MDF, but that's just my preference for anything in close proximity of water.
Are you looking to do frameless glass doors?
The only thing I'd do differently than your plan is use 1/4" ply rather than MDF, but that's just my preference for anything in close proximity of water.
Are you looking to do frameless glass doors?
soulpatch
New member
I would like frameless glass doors yes. Saves on footprint and I could do the push to open/close magnets... Think a tv cabinet door.
I am not too concerned about moisture for this application as for the most part it will be pulled out on the wall next to the tank unless I need access to the closet with my sports gear (After recent surgery that is limited). MDF will also be sealed in primer and then painted so should be fairly hardy. My issue now is color options. HA HA. I have blue, white, and orange paint sitting around to be used. I might grab some gray and do it all in Neptune color scheme.
All that said flipping to PLY is not a concern either. Talking all of $15 in material.
Also thinking of flipping my idea for the brackets to be outside the tank. That way since the "cabinet" will be on the wall next to the tank most of the time you wouldnt see the bars extending out of it. You would only see the tracks when I push it behind the tank potentially. I need to mock it up as the hinge adds some thought to it all.
I should have some time Saturday night to start making cuts and mocking things up.
I have a right angle adapter as well somewhere. I just need to find it or it gives me excuse to buy more tools. LOL. Contemplating getting the Kreg jig as well as opposed to using corner brackets....
theMerchant
New member
What not just build a thin cart on casters and slide it back there?
Sent from my SM-N910T using Tapatalk
Sent from my SM-N910T using Tapatalk
davocean
Active member
I really gotta get a kreg jig myself.
Those milwaukee adapters are pretty inexpensive and work really well, nice to have in this sort of pinch.
My preference for ply over MDF is not only for moisture buy also holds screws better and longer, and an awkward drill space like that it's easy to get sloppy.
Bending over, I laugh, I've been suffering all week from throwing my back out just reaching far back into sump, this is fairly new to me, good lord getting old sucks!lol
soulpatch
New member
Yeah I was looking at the kreg and MDF and while it is done it is not the most secure. So I will grab some 1/2" and 1/4" ply project panels when I get the kreg. Kreg is only good for the 1/2 material so I can still corner braket the false wall...
So I was also looking at my hinge setup last night that I have now and no longer want to use it. The way it is set up I would need the cabinet flipped forward to hide it and I dont want that for the cabinet so slight redesign needed.
What I want to do now is instead of a door on the rear I leave the rear as solid and simply add internal hidden hinges on the one side with magnetic catch on other side so that the cabinet opens from the rear panel. The rear itself will be on basic sliders so that while next to tank you cant see them but when slid behind the tank you coudl see the arms (Or I mount arms behind the tank but then I always see them...)
I think I like the idea of the cabinet out all the time and I might add a few hooks to the side for nets and such and possibly a paper towel holder. LOL.
I am going to a frag swap Saturday morning so we shall see how much I spend there and how long I am away for that but I hope to have the system build this weekend...
Last edited:
tropicaldreams
New member
Sure but as with anything I wish I had taken more pics during the process.
As is I used these for the length so that the fixture sits on these:
http://www.homedepot.com/p/Crown-Bolt-1-1-4-in-x-48-in-Zinc-Plated-Punched-Angle-41790/202183466
I put corner bracing on the one end:
http://www.homedepot.com/p/Everbilt-3-in-Zinc-Plated-Heavy-Duty-Corner-Brace-2-Pack-15444/202034217
On the ends I used these. I cut them in half and doubled up both ends for strength:
http://www.homedepot.com/p/Crown-Bo...d-Flat-Bar-with-1-16-in-Thick-18040/100337901
On the end where the splash shield slides out I put these:
http://www.homedepot.com/p/Everbilt-8-in-Zinc-Plated-Corner-Brace-15215/202033926
The last two were important as I mount them on one point so that they can rotate down ever so slightly and allow me better access to pull out the shield.
The frame was mounted to these sliders: http://www.homedepot.com/p/Liberty-...xtension-Drawer-Slide-1-Pair-942405/205171306
I had to use some 2x4 to allow me to drop everything low enough to give clearance for the cord.
I also had to go with a 48" unit so that I had space on the sides of the light for cooling since the unit exhausts from the opening on the shield so have to keep clearance there and room directly above it for air circulation.
Here are a couple more pics and a short vid. Though I moved the Kessils later from the video as they did not fit well with the eurobrace.
Video: http://vid4.photobucket.com/albums/y115/soulpatch/20160131_190748_zpsedzvf6vo.mp4


I found this post after replying to the other, whatever the first item is home depot doesn't carry any longer or shows up as an error. I believe its just the l channel that you used to actually hold the light
soulpatch
New member
Yup cup hinges. Couldn't think of the name off the top of my head but yes. What I would like to try to find tonight are ones that have the built in extension. Gives me a bit more wiggle room joining everything together. I will have to see what all I stumble into and what all I will decide to use. I could also use a piano hinge but they I have to worry about leaving a slight gap to afford room to open.
And I really need to figure out colors as well. LOL I need it to look good...
And I really need to figure out colors as well. LOL I need it to look good...
soulpatch
New member
So I decided to spend the day yesterday at the gym and my LFS as we talked about him potentially going online with his sales. Grabbed a cool new SPS piece I willpost tonight or tomorrow once it pops out again. He also had a magnificant foxface that will be coming home with me once he gets in my bartlett anthias.
BTW if anyone has any Live aquaria coupons hook a brother up. I have a couple things to order (reef cleaners and a fish or two)
I wont get to the cabinet till this Friday but I do have a 3 day weekend so by the end of the weekend it should be good to go and I also hope to have the calcium reactor started.
soulpatch
New member
Bartlet Anthias and my Magnificent Foxface should be in this week and then will go directly into TTM. Both are coming from a place who does actually QT their fish but still not taking a chance. TTM is a MUST for me. I might shorten the post TTM period since these guys are picky eaters and the anthias will benefit from multiple feedings a day though.
I have also decided to add one layer to my "stand improvement" project this weekend. A simple ATO slide out. I will put it on a board with sliders so I can pull it out to fill it. Right now I either use a hose line to it or a spare pump in a bucket. I would like to simply pour the bucket in as it has a large openeing. I have toyed with the idea of running another line to the tank from my mixing station to just have a valve but honestly it is not top of my list to add a point of failure...
I have also decided to add one layer to my "stand improvement" project this weekend. A simple ATO slide out. I will put it on a board with sliders so I can pull it out to fill it. Right now I either use a hose line to it or a spare pump in a bucket. I would like to simply pour the bucket in as it has a large openeing. I have toyed with the idea of running another line to the tank from my mixing station to just have a valve but honestly it is not top of my list to add a point of failure...


soulpatch
New member
G9t the box made. Daughter had tubes put in ears yesterday so it was a mess and i made mistake of taking them with me to pet store on sunday. So now i have a fw guppy tank upstairs... grr.


Tonight i will sand and prep for paint when it isnt raining cats and dogs.
I have back plate cut so will sand and paint that as well.
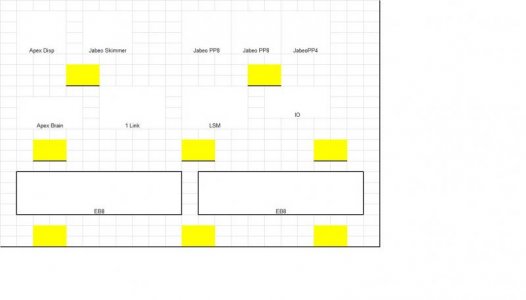
Still need to cut and paint actual panel for electronics. Ill likely measure all components and make carboard cutouts so i can play with spacing so i know where everthing will fit...
Sent from my SM-G935T using Tapatalk
Tonight i will sand and prep for paint when it isnt raining cats and dogs.
I have back plate cut so will sand and paint that as well.
Still need to cut and paint actual panel for electronics. Ill likely measure all components and make carboard cutouts so i can play with spacing so i know where everthing will fit...
Sent from my SM-G935T using Tapatalk
Similar threads
- Replies
- 3
- Views
- 320