Stand build - How to get an even paint coat?

ThRoewer

New member
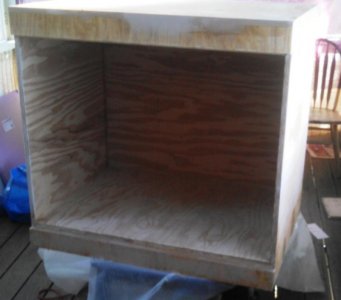
I've build my tank stand out of marine plywood. And the idea is to give it a black lacquer finish and add a final coat with a urethane floor sealer.

As surface treatment I started with sculpt wood to fill all screw holes and imperfections in the wood.

attachment.php


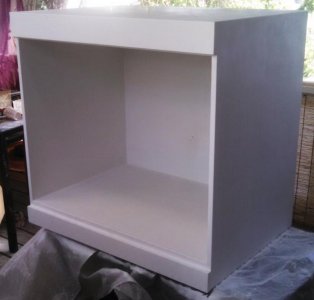
Next I added several coats of white primer (Zinsser 123). First layers rolled on and a last applied with spray cans:

attachment.php


attachment.php


This was almost a perfect finish, just the wrong color.

Next I tried flat black with spray cans. The idea was to add the gloss with a clear coat at the end. The cans gave a good enough cover but didn't

Spraying on the flat black worked OK, but it was so sensitive to touch that you couldn't handle it without messing up the uniformity of the finish. Also the spray can finish wasn't too uniform to begin with.

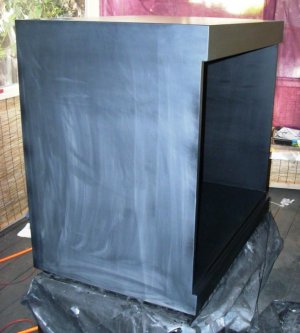
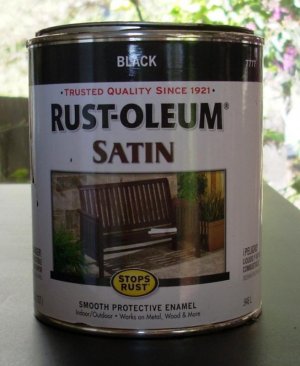
So I decided to try satin, applied with a spray gun.

attachment.php


Whatever I tried I always get an uneven paint coat. Either the paint was too thin and didn't cover enough or too thick and left stripes. And whenever I got an acceptable coat a fly decided to land on it and ruin it :headwalls:

After about 10 coats that all didn't come out good enough I decided to give rolling a try and it actually worked perfectly on all areas that are narrower than the roller. But on the large surfaces I got these god-awful stripes.

This is the current state after sanding the last layer even:

attachment.php


I'm at my wits end and need some input how to get this done right quickly.
 

Attachments

  • IMG_20150221_102123_719.jpg
    IMG_20150221_102123_719.jpg
    39.8 KB · Views: 0
  • IMG_20150306_150653_211.jpg
    IMG_20150306_150653_211.jpg
    39.7 KB · Views: 0
  • IMG_20150306_150703_931.jpg
    IMG_20150306_150703_931.jpg
    20.1 KB · Views: 0
  • DSCN1396.jpg
    DSCN1396.jpg
    59.8 KB · Views: 0
  • DSCN1394.jpg
    DSCN1394.jpg
    56 KB · Views: 0
Can't see your pictures. I'm no professional painter, But my quests is that you will need to sand between coats.
 
I've sanded like crazy after every coat. The surfaces are as smooth as you can get them manually and with power tools.
 
Do you have a HVLP gun? For my larger wood working projects that is how I apply my finish.

Prep is the most tedious part of finishing a project. Any impurity in your surface will show in your finished product.

1. Break the current product (paint, primer, etc...) back down to wood as much as you. can. Start with 120 grit; or 80 if need be, and work the finish until smooth with 600 grit.

2. Wipe down the wood with water to raise the grain. This will allow you to see any grains that may pop up in the future. If they raise up knock them down with some 600 grit sand paper.

3. If you are using a HVLP or suction type gun make sure you mix your paint correctly. Those $1 cups at the hardware and paint stores are a life saver for that task. Only mix enough paint for the project with a little extra.

4. Spray your base coat light roughly 8-10" from the work surface. If there are any imperfections after your flash time LIGHTLY knock them down 1000 grit sand paper. Repeat this process until your coverage is nice with no runs or blisters.

5. Apply your finish. Again, reduce your finish according to the instructions of the product you get. Just like your color, start with a light coat at first. After that I start spraying a little heavy. After every coat I let it flash and hit it with 600 grit sand paper for a smooth finish. 3-4 coats should be enough if your are using lacquer.

6. After the last coat of finish let it cure overnight. Finally, get some 0000 steel wool and some Johnson's Paste Wax. Load the 0000 with wax and polish the finish. Wipe off with microfiber and repeat if necessary as this will give you the glass finish.

7. Once it is as smooth as you want, go over the project again with the wax and a microfiber cloth. Let it set up and get hazy and then buff off with a foam pad or a clean microfiber cloth.
 
I used to do auto paint many years ago, and was very good. Using all the right equipment, and knowing the paint system resulted in a top notch finish every time.

With home DIY projects, using most average box store oil base/water base products, I've found it ranges from super easy, to difficult, to impossible to spray a perfect finish. Some products just don't like to be sprayed, or are so thick a pressure feed gun is required, and if it dries/flashes too fast the finish is poor. Or, some products have to be reduced/thinned out to spray, if reducing is even ok for the product. And, some difficult products take perfect air/fan settings, pressure settings, on a large tip size to spray right.

Be sure that your selecting products than can mesh together. For example using all solvent/oil base, or water base products. Some water based primers work fine with oil base paint, but I don't know if the opposite is ok.

I'm no expert on spraying/rolling average box store DIY products, but I mess around here/there. My advice would be to take a scrap piece of ply, and use it as a test panel / practice panel. Even run thru and layer all products to observe the final product. Its not going to be quick, unless someone happens to select easy to spray products, and using all the right equipment. This way your developing a technique that works good, then applying it the build.

Achieving a perfect finish can be hard. Black is the most difficult because it shows any and all imperfections. You can take a piece of tape, and try to softly pluck a fly out of the paint with the sticky side bent in a circle. Sometimes it works, or sometimes there is a mark, but not as bad as a fly that dries into the paint.

Using a spray gun can result in a nice finish. Its best to select products that are known for being spray gun friendly, non-toxic/smelly once cured, even if its costs much more.
 
A high gloss shows imperfections, a flat finish can show smudges and appear blotchy if not done right.

Black being the darkest color shows imperfections, black gloss is going to really show any imperfections.

Whites seem to hide the most. A semi gloss or satin white should be easy.

I would focus on adjusting your gun settings, pressure and spray technique. The color shouldn't matter for the actual spraying. Its just some colors, and gloss types highlight imperfections/flaws. Ideally its best to use a product that can be reduced/thinned to the right viscosity for spraying with a certain tip size. Or, using a product that is specific to spray gun application. All that, and dry/cure to a durable finish.
 
The problem is to get the right viscosity of the paint. The pure paint out of the can is way too thick for spraying - I tried and that layer had the worst outcome.
Also what thinner is best, acetone or a plain paint thinner? I found oil based thinners to delay the drying and to change the finish to be more glossy.
 
Don't know if this will help or not, but they make some stuff called floetrol that you can add to latex paint. IIRC, it decreases the viscosity and slows the drying time slightly so there are fewer brush marks. It may help your problem.
 
Regular paint thinner will work to lower the viscosity. Although I don't know what the very best solvent base specific product works the best, for this rustoleum. Stronger solvent will evaporate quicker, which might help overall drying process, for a hard surface finish.

For thicker paint like this I use a 2.5 mm tip.
 
I'm going to suggest a completely different approach.

I like a product by Target Coatings called EM6000. I've used it as a clear coat but it is available in black.
http://targetcoatings.com/products/pigmented-top-coats-interior/em6600raven-black-lacquer/

This is a water based pigmented lacquer. Dries fast (helps with insect issues), easy to apply multiple coats and does not need to be sanded between coats. Each coat melts into the previous coat, unlike polyurethane. It self levels very well.

I usually spray two coats, do a light sanding just to get rid of dust nibs, wipe down with a damp rag and then spray a final coat. I spray with a HVLP conversion gun.

The down sides of this product are it's not available locally, is a bit expensive and you should wear a respirator. Well that's not really fair, you should always wear a respirator when spraying ANY paint.

That sounds like what I need.
How do you order it (the buy now link doesn't work for some reason)

BTW I always wear a respirator when spraying paint or dry sanding it.
 
Also what thinner is best, acetone or a plain paint thinner? I found oil based thinners to delay the drying and to change the finish to be more glossy.

Never use acetone for thinning anything except nail polish. The correct thinner for alkyd or oil-based paints is almost always VM&P Naphtha. The paint can should tell you (if it doesn't, it's probably not meant to be sprayed). Mineral spirits is usually acceptable, but it's a poor second to naphtha.

In order to get the best finish, you don't want the material to dry too quickly. It needs a little time to flow out before it sets up... but you also don't want it to be too slow drying, which allows sags and runs to occur very easily if you're even just a little too generous with the coating. Most alkyd/oil-based coatings are very slow drying.

Like Woodaquanut, I was going to suggest an alternative product to the Rustoleum. I've used the Target Coatings EM6000 products, and they are very good quality (but not cheap and not always easy to find). I've used a lot more of Hydrocote's products, which I find extremely high quality and suitable for the finest finish on anything from fine furniture to musical instruments. You might give them a look. Their products are available through a number of e-tailers, although I've only very rarely found them in brick-and-mortar stores. They do have a black lacquer available, although I haven't used it in many years.

http://hydrocote.com/our-products.htm
 
The can actually stated to use acetone or mineral spirits to thin it.

I already ordered the Target Coatings EM6600. It's specifically for spray application which should be better than the Rustoleum paint that seems to be primarily intended for brush application.
 
The can actually stated to use acetone or mineral spirits to thin it.

I already ordered the Target Coatings EM6600. It's specifically for spray application which should be better than the Rustoleum paint that seems to be primarily intended for brush application.

Sorry about the slow response. :(

Glad you found your way thru their confusing site to order it! Let us know how it works for you. About 10 minutes after you spray it you'll think you made a horrible mistake. It gets all 'puckerie' :) As it dries it all comes together.
 
Do you have a HVLP gun? For my larger wood working projects that is how I apply my finish.

Prep is the most tedious part of finishing a project. Any impurity in your surface will show in your finished product.

1. Break the current product (paint, primer, etc...) back down to wood as much as you. can. Start with 120 grit; or 80 if need be, and work the finish until smooth with 600 grit.

2. Wipe down the wood with water to raise the grain. This will allow you to see any grains that may pop up in the future. If they raise up knock them down with some 600 grit sand paper.

3. If you are using a HVLP or suction type gun make sure you mix your paint correctly. Those $1 cups at the hardware and paint stores are a life saver for that task. Only mix enough paint for the project with a little extra.

4. Spray your base coat light roughly 8-10" from the work surface. If there are any imperfections after your flash time LIGHTLY knock them down 1000 grit sand paper. Repeat this process until your coverage is nice with no runs or blisters.

5. Apply your finish. Again, reduce your finish according to the instructions of the product you get. Just like your color, start with a light coat at first. After that I start spraying a little heavy. After every coat I let it flash and hit it with 600 grit sand paper for a smooth finish. 3-4 coats should be enough if your are using lacquer.

6. After the last coat of finish let it cure overnight. Finally, get some 0000 steel wool and some Johnson's Paste Wax. Load the 0000 with wax and polish the finish. Wipe off with microfiber and repeat if necessary as this will give you the glass finish.

7. Once it is as smooth as you want, go over the project again with the wax and a microfiber cloth. Let it set up and get hazy and then buff off with a foam pad or a clean microfiber cloth.

Can you source some of the paints you use? I would be very interested in being able to apply a professional finish. I have all the air tools and spray guns to do it right, just lack know how and haven't wanted to take the time and money to try multiple products. I have used the SW pro-classic waterborne alkyd and it does OK. Definitely not showroom, but I also didn't run down to 600 grit and use steel wool
 
...
Glad you found your way thru their confusing site to order it!
It certainly is a confusing site.

Let us know how it works for you.
I certainly will.


About 10 minutes after you spray it you'll think you made a horrible mistake. It gets all 'puckerie' :) As it dries it all comes together.

Good to know.

I have the Kobalt spray gun kit - will this work or do I need a better spray gun?

Is this color spray ready or do you have to thin it down?
How long does it take to dry and when can you apply the next layer?

I will sand the current paint layer to be as evenly structured as possible. After all the painting and sanding I did it is already pretty flat and smooth. Only issue with the last coat was that some areas came out shinier than others.
 
Back
Top