Starting my DIY LED System

Boxfish

Member
Well after all my reading and research Ive decided to build my own lights and see how it goes. Now that I think about it Ive built every light system for my tank from PC to MH combo to T5's which I currently have.
Anyway I thought I would post some pics of my build as I go along. Thanks to all for the fantastic reading and research you all have done and DIY post.
Special thanks to Dennis "TropTrea" for all his advice and design help and man especially just for his time helping me out!!!!

So Im pretty much finished with the frame which I think turned out pretty well and will work for my needs. I have an odd footprint for my tank its actual dimension are 72 x 17 x 27 with actual usable top foot print of 60 length due to a large overflow box.

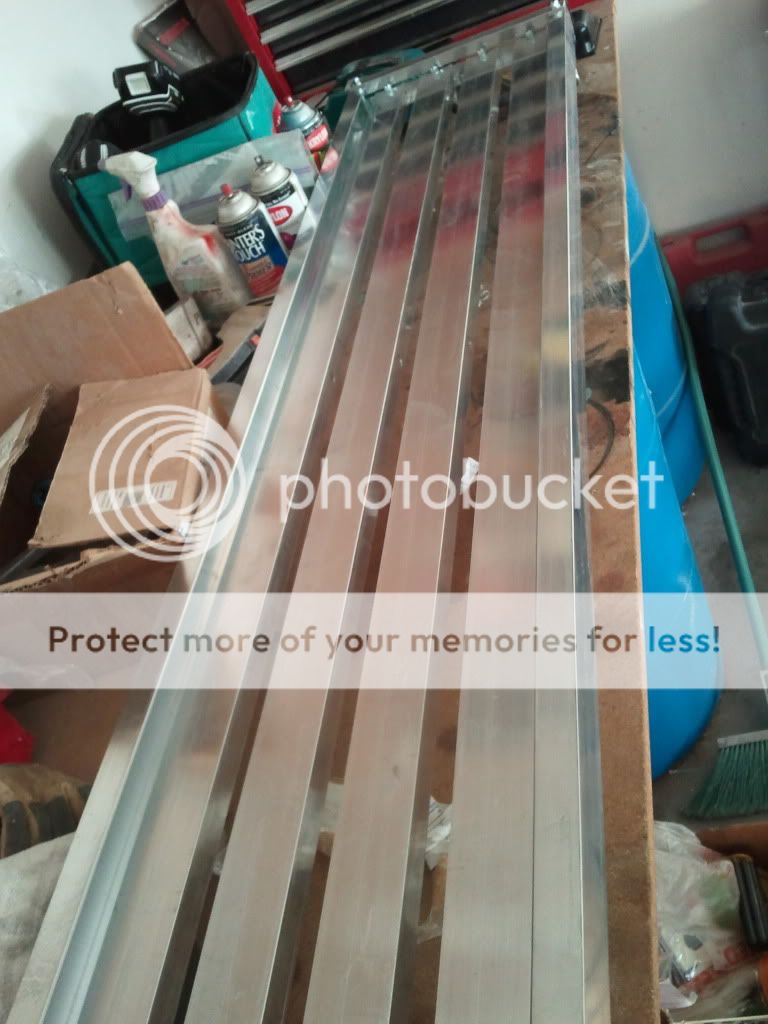
Anyway for the frame I am using 2 x 1 aluminum channel and 1 x 1 L channel for end frame pieces. Im using four 60' 2 x 1 for the lights doing eventually 20 lights per rail for a total of 80 lights, 3w cree's.
Two 60' 2 x 1 for side rail frames on their side so if I decide to do a splash guard I can slip it in below the lights with no trouble.
This will be hanging inside a wall so no need for case.

Here is a first look!!

Initial parts cut to spec

2012-03-13164638.jpg


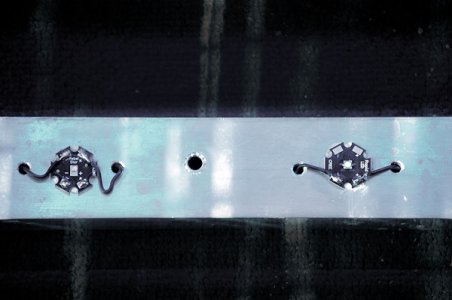
Bolted together heres a top view. If you notice in the following pics I drilled out the rails for wire. All wire will be on the back side of the channels. Will be drilling holes by each light to feed wires through. More work yes but I like a clean look.

2012-03-13183329.jpg


Top view

2012-03-13183324.jpg


Light side view

2012-03-13183152.jpg


2012-03-13183142-1.jpg


So thats where Im at. Lights should be coming today or tomorrow from Rapidled.
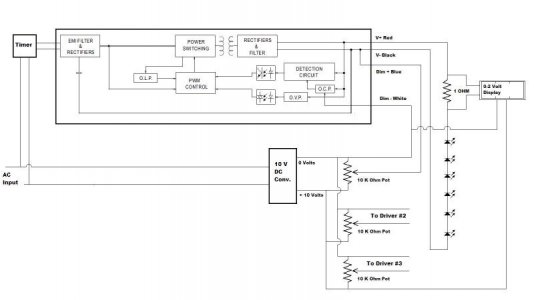
Running 5 ballast 1 fixed and 4 dimmable hoping to dial it in to what I want.

Will get you light specs etc as I go.
 
I'm in the same boat - after all the reading on the Chinese fixtures I somehow decided to DIY - I guess I share your commitment to acting as a glutton for punishment….
what were the pros & cons of aluminum channel vs. a heatsink - in other words what swayed you to use the channel over a premade sink (other than price)
Did you get the channel at one of the regular "home improvement stores" - not sure if I can use the name but one of their grey bags is on your workbench in one of the pics

I like the design allowing for the splashguard – is there room for the optics? I’m guessing you’ll have about 5/8” clearance – if my math and assumptions of dimensions are correct.
 
Looking good from the pictures.

I do like the Eye Hooks for hanging the fixture.
I also like your elastic Stop nuts it eliminates the need for lock washers.

You may want to remove the end l pieces when your installing your LED's to make them more accessable when your soldering them.

Looking at the your final product we might want to go with 19 LED slots per rail rather than the original 20. This will allow your LED's to sit 3" from the edge of the rails. If you use the paretn for a lay out I gave you there are enough slots to do this change. You will have the ability to expand to 76 LED's max instead of the 80 we originaly made slots for. to change the plan leave the center row initialy open and then compress the other open slots on each rail so that they are spread out.

I'll add a couple pictures of the way I ran mine once my batter battery recharges. But I drilled a small 1/8" hole on each side of the LED's to run the wiring through the channeling.

I'm back to sawing wood now. Warm weather could hit 80 here today and the yard is a mess. Two trees down from the winter plus loads of big branches. Then there is the area they put our new septic system in. So with warm weather my online time and reef time gets cut back drasticly.
 
I guess I share your commitment to acting as a glutton for punishment"¦.
what were the pros & cons of aluminum channel vs. a heatsink - in other words what swayed you to use the channel over a premade sink (other than price)
Did you get the channel at one of the regular "home improvement stores" - not sure if I can use the name but one of their grey bags is on your workbench in one of the pics

I like the design allowing for the splashguard "“ is there room for the optics? I'm guessing you'll have about 5/8" clearance "“ if my math and assumptions of dimensions are correct.

Well as far as punishment it has actually been kinda fun. If ya have a place to do the stuff and the tools its pretty easy(have a good neighbor).

I went for the channeling for price and better layout and spread. Works fine if you space lights correctly.
Got it at a metal place Home Depot didnt have it. Got the nuts and bolts there.

Im not using optics but I would also guess about 5/8ths on space left.
 
Looking good from the pictures.

I do like the Eye Hooks for hanging the fixture.
I also like your elastic Stop nuts it eliminates the need for lock washers.

Yea I like the eye hooks too I will be using small chain and miny caribeaners
I used lock washers too :-)


You may want to remove the end l pieces when your installing your LED's to make them more accessable when your soldering them.

Im a pretty fast solderer I should be fine. Had my own recording studio and soldered all my own stuff

Looking at the your final product we might want to go with 19 LED slots per rail rather than the original 20. This will allow your LED's to sit 3" from the edge of the rails. If you use the paretn for a lay out I gave you there are enough slots to do this change. You will have the ability to expand to 76 LED's max instead of the 80 we originaly made slots for. to change the plan leave the center row initialy open and then compress the other open slots on each rail so that they are spread out.

Think Ill stay with 20 should have enough room

I'll add a couple pictures of the way I ran mine once my batter battery recharges. But I drilled a small 1/8" hole on each side of the LED's to run the wiring through the channeling.

Like to see it

I'm back to sawing wood now. Warm weather could hit 80 here today and the yard is a mess. Two trees down from the winter plus loads of big branches. Then there is the area they put our new septic system in. So with warm weather my online time and reef time gets cut back drasticly.

Sounds like fun only hitting 60 here which is way warm for this time of year
 
Hi boxfish. I just put together my led and heatsink together from rapid led and have never done much with wiring. I was wondering if you could explain in detail or point me in a direction on how to wire up the driver to potentiometer to dim the lights. I have looked around buy have not found anything in detail about wiring up the potentiometer.

Thanks.
 
It is suposed to rain tomarrow. If it does I'll draw and post a schematic for the potentiometer wiring as well as my the way I run the wires for the LEDs.

As far as the diference between the heat sinks and using channels the big thing is total area you need to cover and the area for cooling. With 2" X 1 " channeling the cross section of the channel is 8" and with a 4" spread betwen LED's you get 24 square inches of surface area. This is enough cooling without fans for an XP sereis LED at about 950 ma. With a calculation on Boxfishes tank this allows 20 LED's per channel and with 4 channels a total of 80 LED's. From my experience he should not need to go anywhere near 80 LED's for his tank.

On the lens this is fairly debatable of an issue. The further the distance from the substrate to the LED's and what you want to put into the tank are the big variables. I tried 60 degree lenses on my 40 breeder with the LED's 21" inches over the substrate and did not like there effect. To me they created to harsh of a shadowing and you could tell where each LED was. However on a tall tank 24" or taller and with the lights 8" or more above the tank lenses probably will work out much better. The big determing factors are how much room spill you have of light and much light you wanted forced to the bottom of the tank if you want SPS corals on the botttom.
 
Like I said TropTrea a huge bowl full of knowledge!!!!!!!! I will also be waiting for the Pot. schematic :-)
Flipmark wiring isnt really all that difficult especially with a good schematic. Just take your time.
 
Here is the schematic Hopefully it makes sense to everyone. There is a lot of repeated parts of the final but this is the basic layout so hopefully everyone can under stand it from here.
 

Attachments

  • Boxfishschematic.jpg
    Boxfishschematic.jpg
    32.4 KB · Views: 9
This is how I run my wires so they are not flopping around on the bottom and can be layed neatly in the channel.
 

Attachments

  • Rail.jpg
    Rail.jpg
    66.7 KB · Views: 9
Back
Top