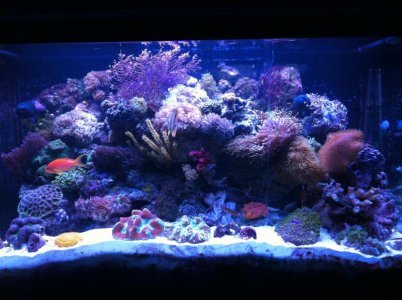
The Life of Blue Spots Tank 1800L

The Life of Blue Spots Tank 1800L


  • Total voters
    67

Blue spot

Member
So This is going to be my new Thread for my New tank. I have recently upgrade from a Red sea max 250 to a custom 8ft X 2.5ft X 2.8ft reef tank. The aim for my tank is to create conditions for my favourite fish (as my name suggests) the blue spot jaw fish"¦"¦"¦ and try and pack in as many interesting things at the same time without jeopardising this key goal. I will try to explain the problems I have faced, the questions I have had and also any solutions I've found along the way. So I'll start from where I have left off , how did I leave the red sea before breaking it down"¦.. Oh and I'll also need to learn how to write a thread at the same time
 

Attachments

  • IMG_0865.jpg
    IMG_0865.jpg
    82.4 KB · Views: 31
onto the new

onto the new

So as I said I had a red sea max and learned a lot ! the first thing I found was that I could not keep my ideal fish (blue spot) in the red sea max due to the excessive temperatures . my tank ran for a year and never dipped below 81 deg. I also found that if you keep any type of sand sifter although fine sand is good for their feeding habits it creates a permanent sand storm (love the fish, not the permanent particles in the water) but my sand was always kept pristine (I will always keep one of these fish, love them) I learned that PH is more stable if the air is fresh on the skimmer intake , I had permanent problems with PH drop then I read on reef central that someone pumped fresh air in, I hooked a tube up to the outside and had much better stability (might have been coincidence but it worked for me) and the other key thing I learned was never go on holiday and leave you're mother in charge of you're tank ! They may find that the fans are "too noisy for them" in the middle of summer and turn them of causing a massive temperature spike, killing half of you're fish (My only wipe out to date) So onto the new
 
onto the new

onto the new

right the new , tank size 8ft X 2.8ft X 2.8ft sump 7ft X 2.5 ft X 1.3ft. double thickness base, low iron front panel, braced and LH corner overflow 3 holes 2 to sump 3/4 inch and 3/4 inch return sump fairly simple 3 chamber and 1 separate top off.
picture.php
 
scaping

scaping

once in place
picture.php

it was time to start scaping. for me this was a nightmare. bought on by myself. I had read so many things in preparation about flow, the golden rules for aesthetics, spaces for the fish to swim naturally, type of rock and the list goes on and on and on. it became a chore rather than the pleasure it was supposed to be. In the end I got a grip put these things in my mind and got on with it. I chose dry rock mainly because in the old the I had a few of the unwanted hitchhickers (including a war on flat worms"¦.I HATE FLATWORMS !) I also decided to cure the rock in the tank (no acid baths, didn't trust myself) .I was going to use tap water get things moving and then replace the water with RO (Not what happened but I will explain this later) I also chose three types of rock to create different structures, Again I know this is not the best for bacteria concentrations, but I liked the look. I scaled dry and rodded for stability , again this was something learned from previous tank although I like to tinker i.e take everything out and end up with a completely different looking tank by the end of the day , i lost more corals from rock falls than anything else. Anyway heres the dry scape.
picture.php
 
Very nice start. I really like your aquascape.

I am planing out my 265 in my head more and more each day. I am going to do all dry to start out with also. Is there a structure under the rock for support?

+1 on the flatworms. I got some and well.. I got a 6line and it has taken care of all of them in my 180. Onto my 120 next.


So, what is under the hood?
 
onward

onward

thx worm look forward to seeing the 265 and nice tip on the wrass. As for structure the one end with all the plating rock is rodded. well 1 big rod a lot of sawing and balancing to get this how i wanted it. I found the best was to put everything on where you want it (leave the rod long) feel the top of the rod to find out where the structure is biasing and cut the bottom rock to offset this. took about three attempts but the structure on the far side is relatively self supporting. This way I did not have to tie it in cable it or anything, looks small on the picture but I assure you this is a big chunk of rock. In all I was plead with this bit.
picture.php

Now because i had damped the rock down to saw easier and hosed a few pieces off, my relaxing plan of taking my time and getting everything how I wanted went a bit by the by after a sort off harbour smell started to go through the house, after receiving a considerable amount of moaning I sped the last bit up so the rest is only sawn on the base and then placed. In the end though this worked to for the best as I ended up with a solid structure but not set forever. As mentioned earlier I do like to move things around.
 
the fill

the fill

so As mentioned previously their was a smell which meant I needed to get the water in quickly so I had 500 l of ro water in my mixing tanks. remember i was going to tap water but read that the rock would leach quicker with ro. so in it went. then i had to wait a day to get another 500 , in that went, ad so on. All through this time I had not placed any heater or pump in the tank"¦"¦. yes I know now ! this happened !!! and the smell was something else
picture.php
picture.php

so of to my lfs in a flap to find to what I should do . the answer was , get the water over the top, get some circulation, get the temp up and get the salt in. I thought well I am going to have the same problem if I start again as I could not produce enough ro to get into the sump in under 4 days so I will try and save this water.
 
saving the water

saving the water

after some phos ban lots of carbon and an earlier than planned uv introduction I ended up with this after 3 days.
picture.php

at this point I had a chill in the top and went to work on the sump.
 
top spec

top spec

So to finish off in the top I have 4 gen 3 pro radions on a custom hanging fixture (made from bosch ally extrusion) I didn't want anything detracting or hanging above the tank so I made a custom one on rollers so that the whole unit can slide out of the way for access. flow is from the return and 2 gyre's. love these but noisy (for me) even after breaking in. glad I had 2 so that i can run at lower power and combat the noise. I have a apex feeding station attached to the extrusion and a cover net. remember I want blue spots. that reminds me ..substrate . Although I appreciate the benefits of a substrate free tank I never like the look of them. but i didn't want masses of sand as I know that this can be a detritus trap. So I used rock rubble in certain areas where i wanted the jawfish to be (I know long shot but I figured if I gave the right conditions they might find this area) Oh that also reminds me I want to try 2 jawfish . covered this with crushed coral again in certain areas. The covered everything with a medium sand ramping it up at the back to help with perspective. this gave what I felt was a nice effect and gave plenty of building material.
 
top done onto the sump

top done onto the sump

sump houses in order form flow though

theiling rollo mat (My favorite thing, no more socks, i can overfeed as much as I want to and if anyone takes a trip to the sump they sit in the box till I'm home)
skims sm253 skimmer with auto clean head
Uv steriliser
phos ban reactor
big refugium
variable speed jebao return pump 12000
2 titanium heaters
auto top off section with reef octopus top off into
apex unit monitoring ph. temp. ORP, Cond
and ecosmart marine. Didn't take any pictures at the time so I've just got some as it is now. Don't mention the wires"¦. i know"¦. I've got some tidying to do , but a couple more things to add in yet. then the big tidy.
picture.php
picture.php
picture.php
picture.php
picture.php
picture.php
picture.php
 
There is something wrong with your temp. It is a tad too warm!! That is like 170 american. WOW...
 
Temp question

Temp question

What temp would you recommend ? I ask lots of people and find people are all over the place. I was worried it was to cold for the coral but lowerd it cause of the jaw fish. Currently I am doing 77.5 to 77.8.
 
I think Worm is teasing you a bit. Your temperature reading seems to be in degrees Fahrenheit. If it had been in degrees Celsius (UK) then you'd get the conversion 77.6°C = 171.69°F.

I usually aim for 26°C/78°F. I think your temperature is just fine.

Dave.M
 
Back
Top