SantaMonica
Well-known member
Using Seaweed to get rid of nuisance algae in your aquarium or pond, part 5
Let's start building! The device we'll be using to remove nutrients is called an "algae scrubber". It does exactly as was described in the previous 4 articles and it's called a "scrubber" because it grows algae to "scrub" (remove) nutrients from the water. The first algae scrubber we'll build is a waterfall style, in the shape of a pole. This type of algae scrubber was created by SantaMonica in 2016 to make DIY versions very easy to build. (The very first waterfall design by SantaMonica was in 2008). It also has a great feature: It cannot clog like other filters can.
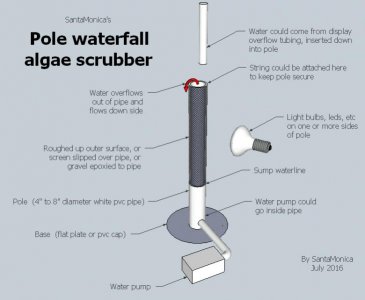
Here is the drawing of the pole waterfall style algae scrubber made with a pvc pipe. If you already have the water pump, and you don't mind taking the time to rough up the outside of the pvc pole, and if the pole is big enough to put the pump inside it, then the pole is the only part that you'll need to buy (the bottom will need to be sealed shut). This means that this pole version can be made with just one part (see attachment).
The pole sits on the bottom of your sump, and water is pumped into the pole (or pulled into the pole if the pump is inside) so that the water overflows out the top of the pole. Or water can be fed into the pole using the overflow tubing from your display. The further down into the pole you put the overflow tubing, the more even and level the water will flow out of the pole to all parts of the pole. And since the pole has a large opening at the top, it can can never clog up with debris or algal growth.
After overflowing the top of the pole, water flows down the outside of the pole and in doing so makes a thin turbulent air/water interface layer which removes the boundary layers around the algae (meaning it lets you get nearer to the oven as explained in previous articles). The light shines on this turbulence, and grows algae which attaches to the rough surfaces. This growth of course is what removes nutrients from the water because nutrients are what algae consume. Then you just clean the algae off of the pole, and maybe feed some to your fish and snails.
Although any pipe can be used for the pole, white pvc solid NON-PERFORATED pipe of the sewer/drain "SDR-35" type is thin, super cheap, lightweight, and works great. 4" (10cm) diameter is probably the smallest you'd want to use because light from the bulb will miss a lot of the pole if the pole is smaller. And if you can go bigger, then 5" or 6" (12.5 or 15cm) diameter pipe would catch even more of the light from the bulb, but of course would take a larger water pump. This pipe is readily available at any pipe, plumbing, or irrigation supply store, or online. You can ask them to cut it to length for you, but usually you have to buy a long length and cut it yourself. The pole must be NON-PERFORATED (meaning solid, no holes drilled in it). Google this: 4 inch pvc solid pipe sdr35 custom lengths
The pole should definitely be white, because white reflects the most light back to the algae, effectively doubling the amount of light the algae gets, and this keeps the "roots" of the algae alive longer. If the roots die and let go, the algae fall off and you lose your filter. Therefore the pole needs to be very, very rough so that the algae can hang on without being washed away by water. There are 3 basic choices of how to do this, and this step is where you will spend most of your DIY time:
1. A hand drill, or Dremel moto-tool with a steel cutter attachment, can be used to make the outside of the pole extremely rough like a cactus. This only works with pvc pipe; it does NOT work on acrylic pipe because acrylic does not leave the cactus-like protrusions that you need. Give yourself several hours to do the grinding, and do it outside. You will have a pile of plastic dust on the ground and in your hair and clothes, when done.
2. A sheet of white plastic canvas (knitting screen) can be REALLY roughed up by hand with a wood saw blade, and then wrapped around the pole. The screen will need to fit tightly so that water does not go under the screen. You can glue a peg at the bottom of the pole or a hook at the top, for the screen to sit on, or the screen can just slide all the way to to the bottom of the pole and sit there.
3. White aquarium gravel, or course sand, can be epoxied to the outside of the pole. A size of 1 to 3 mm gravel works well, and Devcon 2-ton epoxy or similar will be permanent. It may take several applications to cover the entire distance around the pole, but it will be the roughest thing you've ever made. One way to do it is to put the epoxy on the entire pole and let it harden about half way, then roll it through the gravel.
The water pump needs to be able to supply at least 35 gph per inch (60 lph per cm) of circumference distance around the pole. A 4" pole has a circumference of 4 x 3.14 = 12.6" and thus needs at least 35 x 12.6 = 441 gph of flow out of the top of the pole. Simplified:
GPH Flow out of top of pole = 110 x pole diameter in inches
LPH Flow out of top of pole = 188 x pole diameter in cm
Because of the tallness of the pole, the "head" of the pump needs to be taken into account. To keep it simple, you could start with a pump that is rated for twice what the calculation says; any extra flow just overflows more, which helps.
The height of the pole above the sump waterline needs to be enough to catch most of the light from the bulbs or LEDs. Also, the lights might shine down into the sump water and cause unwated algae growth there, so making the pole taller with rough surfaces at just the upper part helps keep the lights farther away from the sump water. A general starting point is the height of the pole should be at least 8" (20cm) above the waterline if this entire 8" is roughed up. So if the water in the sump is 8" deep, then the pole would be 16" (40cm) tall. The pump will have an 8" head to pump up to. 12" above the waterline is probably easier to work with however, because there is more pole to point the lights at.
There is no maximum height that the pole could be, however. If you have a large sump and you want the lights way up high, you could make the pole 36" (90cm) above the sump waterline and rough up the top 24" (60cm) of the pole. Of course this greatly increases the head that the pump must handle, and you will need to watch for water that might "spray out" sideways from the pole when the waterfall hits a big piece of algae. One solution to this is to lay a sheet of plastic sandwhich wrap over the pole so the water stays behind it.
The base of the pole needs to keep the pole from falling over, and also keep water inside the pole. Two easy ways to do this are either with a sheet of flat plastic glued to the bottom of the pole, or with a string attached to the top of the pole that also attaches somewhere to the top of your sump area. If using a string, then a cap will need to be used to seal the bottom of the pole closed. This cap will need to be completely flat, not domed, so that the pole will sit flat. It's hard to tell from online pictures if a cap has a dome or not, so it might be best to buy it at a store. If you use the SDR-35 sewer/drain pole mentioned above in a 4" size, then one cap which works is a 4" number 406 drain cap made by NDS. When turning the water off, the water will drain backwards out of the pump, but if your pump for some reason does not do this then just drill a small hole at the bottom of the pole; it won't affect the pump flow too much. You could plug the hole if you want during normal use.
A neat space saving version is to use a big enough pole that you can put the water pump inside it, and cap off the bottom of the pole; the pump can pull water into the pole through a hole. The pump will act as a weight to keep the pole in-place, and the top of the pole can be tied with a string. The only space that this version takes up is the diameter of the pole. If you want to go real big, say 8" (20cm) diameter with a flat bottom cap and the pump inside, then you probably won't need a plate on the bottom or a string on the top because it will be stable from the weight of the water alone.
Cleaning is the fun part, because all that algae (and nutrients!) gets removed from your water. When new, all algae scrubbers in both salt and freshwater will grow a slime that will need the rough surface taken to a sink or outside to be scraped and sprayed off. In saltwater, after the growth gets thick, you might be able to just pull algae off without taking the rough surface to the sink, but freshwater will always need the rough surface to be scraped and sprayed in a sink or outside because freshwater always grows thin slime that you cannot pull off. So the way you want to clean it will determine what version you should build.
For cleaning, as shown in the picture with a base plate and a separate pump, and if there is no removable screen on the pole, then the pump will need to be disconnected and the pole and base plate lifted out so it can be cleaned in a sink or outside. If the base plate is removable from the pole, then the plate could stay in the sump, but removable plates are harder to build. If the water pump is inside the pole, then the whole thing can be taken to your sink or outside. If a removable screen is slid over the pole, then the screen could just be lifted off by itself.
The lights are basically what fits the pole best. LED or CFL plant-grow lights in the red or pink color are good. A 30 watt light about 6" (15cm) from the pole, on one or several sides, should work well. Algae scrubbers and the lights are normally sized based on how much you feed, but for this pole waterfall version the size of the pole is going to determine a lot because it supports everything. A good starting point is two 30 watt lights, one on each side of the pole. The lights can simply be clipped on to any nearby part of your sump or cabinet.
Cleaning is every 7 to 10 days, or when growth is thick. The scraped off growth can be thrown away or put into your garden or lawn, or if it's thick green seaweed from saltwater then some of it can be fed to your dogs and cats. Some can even be fed back to your fish and snails; that's what a lot of them eat naturally.
So happy DIY'ing... and post pics of your build for others to see!
Let's start building! The device we'll be using to remove nutrients is called an "algae scrubber". It does exactly as was described in the previous 4 articles and it's called a "scrubber" because it grows algae to "scrub" (remove) nutrients from the water. The first algae scrubber we'll build is a waterfall style, in the shape of a pole. This type of algae scrubber was created by SantaMonica in 2016 to make DIY versions very easy to build. (The very first waterfall design by SantaMonica was in 2008). It also has a great feature: It cannot clog like other filters can.
Here is the drawing of the pole waterfall style algae scrubber made with a pvc pipe. If you already have the water pump, and you don't mind taking the time to rough up the outside of the pvc pole, and if the pole is big enough to put the pump inside it, then the pole is the only part that you'll need to buy (the bottom will need to be sealed shut). This means that this pole version can be made with just one part (see attachment).
The pole sits on the bottom of your sump, and water is pumped into the pole (or pulled into the pole if the pump is inside) so that the water overflows out the top of the pole. Or water can be fed into the pole using the overflow tubing from your display. The further down into the pole you put the overflow tubing, the more even and level the water will flow out of the pole to all parts of the pole. And since the pole has a large opening at the top, it can can never clog up with debris or algal growth.
After overflowing the top of the pole, water flows down the outside of the pole and in doing so makes a thin turbulent air/water interface layer which removes the boundary layers around the algae (meaning it lets you get nearer to the oven as explained in previous articles). The light shines on this turbulence, and grows algae which attaches to the rough surfaces. This growth of course is what removes nutrients from the water because nutrients are what algae consume. Then you just clean the algae off of the pole, and maybe feed some to your fish and snails.
Although any pipe can be used for the pole, white pvc solid NON-PERFORATED pipe of the sewer/drain "SDR-35" type is thin, super cheap, lightweight, and works great. 4" (10cm) diameter is probably the smallest you'd want to use because light from the bulb will miss a lot of the pole if the pole is smaller. And if you can go bigger, then 5" or 6" (12.5 or 15cm) diameter pipe would catch even more of the light from the bulb, but of course would take a larger water pump. This pipe is readily available at any pipe, plumbing, or irrigation supply store, or online. You can ask them to cut it to length for you, but usually you have to buy a long length and cut it yourself. The pole must be NON-PERFORATED (meaning solid, no holes drilled in it). Google this: 4 inch pvc solid pipe sdr35 custom lengths
The pole should definitely be white, because white reflects the most light back to the algae, effectively doubling the amount of light the algae gets, and this keeps the "roots" of the algae alive longer. If the roots die and let go, the algae fall off and you lose your filter. Therefore the pole needs to be very, very rough so that the algae can hang on without being washed away by water. There are 3 basic choices of how to do this, and this step is where you will spend most of your DIY time:
1. A hand drill, or Dremel moto-tool with a steel cutter attachment, can be used to make the outside of the pole extremely rough like a cactus. This only works with pvc pipe; it does NOT work on acrylic pipe because acrylic does not leave the cactus-like protrusions that you need. Give yourself several hours to do the grinding, and do it outside. You will have a pile of plastic dust on the ground and in your hair and clothes, when done.
2. A sheet of white plastic canvas (knitting screen) can be REALLY roughed up by hand with a wood saw blade, and then wrapped around the pole. The screen will need to fit tightly so that water does not go under the screen. You can glue a peg at the bottom of the pole or a hook at the top, for the screen to sit on, or the screen can just slide all the way to to the bottom of the pole and sit there.
3. White aquarium gravel, or course sand, can be epoxied to the outside of the pole. A size of 1 to 3 mm gravel works well, and Devcon 2-ton epoxy or similar will be permanent. It may take several applications to cover the entire distance around the pole, but it will be the roughest thing you've ever made. One way to do it is to put the epoxy on the entire pole and let it harden about half way, then roll it through the gravel.
The water pump needs to be able to supply at least 35 gph per inch (60 lph per cm) of circumference distance around the pole. A 4" pole has a circumference of 4 x 3.14 = 12.6" and thus needs at least 35 x 12.6 = 441 gph of flow out of the top of the pole. Simplified:
GPH Flow out of top of pole = 110 x pole diameter in inches
LPH Flow out of top of pole = 188 x pole diameter in cm
Because of the tallness of the pole, the "head" of the pump needs to be taken into account. To keep it simple, you could start with a pump that is rated for twice what the calculation says; any extra flow just overflows more, which helps.
The height of the pole above the sump waterline needs to be enough to catch most of the light from the bulbs or LEDs. Also, the lights might shine down into the sump water and cause unwated algae growth there, so making the pole taller with rough surfaces at just the upper part helps keep the lights farther away from the sump water. A general starting point is the height of the pole should be at least 8" (20cm) above the waterline if this entire 8" is roughed up. So if the water in the sump is 8" deep, then the pole would be 16" (40cm) tall. The pump will have an 8" head to pump up to. 12" above the waterline is probably easier to work with however, because there is more pole to point the lights at.
There is no maximum height that the pole could be, however. If you have a large sump and you want the lights way up high, you could make the pole 36" (90cm) above the sump waterline and rough up the top 24" (60cm) of the pole. Of course this greatly increases the head that the pump must handle, and you will need to watch for water that might "spray out" sideways from the pole when the waterfall hits a big piece of algae. One solution to this is to lay a sheet of plastic sandwhich wrap over the pole so the water stays behind it.
The base of the pole needs to keep the pole from falling over, and also keep water inside the pole. Two easy ways to do this are either with a sheet of flat plastic glued to the bottom of the pole, or with a string attached to the top of the pole that also attaches somewhere to the top of your sump area. If using a string, then a cap will need to be used to seal the bottom of the pole closed. This cap will need to be completely flat, not domed, so that the pole will sit flat. It's hard to tell from online pictures if a cap has a dome or not, so it might be best to buy it at a store. If you use the SDR-35 sewer/drain pole mentioned above in a 4" size, then one cap which works is a 4" number 406 drain cap made by NDS. When turning the water off, the water will drain backwards out of the pump, but if your pump for some reason does not do this then just drill a small hole at the bottom of the pole; it won't affect the pump flow too much. You could plug the hole if you want during normal use.
A neat space saving version is to use a big enough pole that you can put the water pump inside it, and cap off the bottom of the pole; the pump can pull water into the pole through a hole. The pump will act as a weight to keep the pole in-place, and the top of the pole can be tied with a string. The only space that this version takes up is the diameter of the pole. If you want to go real big, say 8" (20cm) diameter with a flat bottom cap and the pump inside, then you probably won't need a plate on the bottom or a string on the top because it will be stable from the weight of the water alone.
Cleaning is the fun part, because all that algae (and nutrients!) gets removed from your water. When new, all algae scrubbers in both salt and freshwater will grow a slime that will need the rough surface taken to a sink or outside to be scraped and sprayed off. In saltwater, after the growth gets thick, you might be able to just pull algae off without taking the rough surface to the sink, but freshwater will always need the rough surface to be scraped and sprayed in a sink or outside because freshwater always grows thin slime that you cannot pull off. So the way you want to clean it will determine what version you should build.
For cleaning, as shown in the picture with a base plate and a separate pump, and if there is no removable screen on the pole, then the pump will need to be disconnected and the pole and base plate lifted out so it can be cleaned in a sink or outside. If the base plate is removable from the pole, then the plate could stay in the sump, but removable plates are harder to build. If the water pump is inside the pole, then the whole thing can be taken to your sink or outside. If a removable screen is slid over the pole, then the screen could just be lifted off by itself.
The lights are basically what fits the pole best. LED or CFL plant-grow lights in the red or pink color are good. A 30 watt light about 6" (15cm) from the pole, on one or several sides, should work well. Algae scrubbers and the lights are normally sized based on how much you feed, but for this pole waterfall version the size of the pole is going to determine a lot because it supports everything. A good starting point is two 30 watt lights, one on each side of the pole. The lights can simply be clipped on to any nearby part of your sump or cabinet.
Cleaning is every 7 to 10 days, or when growth is thick. The scraped off growth can be thrown away or put into your garden or lawn, or if it's thick green seaweed from saltwater then some of it can be fed to your dogs and cats. Some can even be fed back to your fish and snails; that's what a lot of them eat naturally.
So happy DIY'ing... and post pics of your build for others to see!