Mav2
New member
Before I begin, I would like to say a massive thank you to all those who are part of reef central/Reefkeeping, your tanks, experience and knowledge of keeping water have been invaluable.
I would like to say a special thank you to Twiggy, Speckled Grouper, Last Light (God Bless) and Paul Brun; whose foam rock walls and beautiful tanks have been an inspiration to me.
I set up my first Reef tank 5 years ago. After seeing a friend's 50 gallon tank I was hooked and decided to set up my own. After 6 months of fishes and corals dying on me for no apparent reason, I gave up and broke down the tank.
7 months ago I decided to build a 60 gallon tank. 44" x 24" x 15".
Today, after 3 months of planning I decided to upgrade to a 120/150 gallon tank. The tank would be a peninsula style tank with a central overflow and the main structures would consist of a foam rock wall and a central rock pillar (to hide the overflow)
Tank and sump specifications
48" x 30" x 24" "“ Display tank
(Ground and polished edges, Black silicone)
36" x 20" x 16" "“ Sump and refugium
(Mangroves, Sand/Miracle mud)
Central overflow with Rectangular glass insert
Aqua medic Turboflotor 1000 Multi SL
Eheim 1250 Return Pump
Tunze 6045 x 2
2 x 39watt T5's, 4 x 54watt T5's, 2 x Aqua-rays LED's
2 x 300watt Heaters (In sump)
Ventron UV 15 (Temporary)
Live rock for Sump and Main display
Live sand refugium
Stand specifications
Travertine Honed and Filled natural Tiles
48" x 30" x 36"
¾ Marine Ply construction
(2 inch Ventilation/Access holes to Right side)
Removable Front Panel
Friday 12th March 2010
After finishing my final designs on the tank and sump, decided to order it today. ETA 7-14 days.
Sunday 14th March 2010
Picked up the tiles from Topps tiles. 17 (600mm x 600mm tiles (plus 1 freebie!). Tiles, Grout and adhesive cost £130.
Ran through designs with Dad and parted with the "œcash" for the materials. ETA 4-6 days.
Monday 15th March 2010
Popped into the LFS to get an update on the tank. (A little early I know"¦so what"¦I'm excited)
Tuesday 16th March 2010
Had, day off work today. Bad cold, I would say Flu but everyone seems to "œscoff" at the mention of the word"¦.as if it's only reserved for people over 70. Made good use of my time thought:
Ordered On-line
1) 6 x 54watt T5 bulbs (3 marine whites, 2 daylights and 1 actinic)
2) 3 bottles of Bob Smith industries epoxy resin for my "œRock wall"
3) 2 cans of "œRock Fix" pond foam "œRock wall)
4) 2 x Egg crate sheets of 24" x 24"
5) Jaeger 300watt heater
Wednesday 17th March 2010
Still off work. Light bulbs were delivered. Wow that was fast!
Ordered On-line
1) Aqua medic Turbo Floater 1000 SL Protein Skimmer
2) 2 x Twin Arcadia Lighting controllers
Just received a call that one my deliveries (no idea which one) had been delivered to the wrong address and was now back in the Royal mail office. Rushed down there, but they shut at 1.00pm. Not happy. Will pick it up on Saturday. Think I'll do a little research on "œReef Central" tonight. I need to work out the best way to transfer livestock from my current tank (60 Gallon) to the new (150 Gallon). I would really like to eliminate the cycle, if possible.
Thursday 18th March 2010
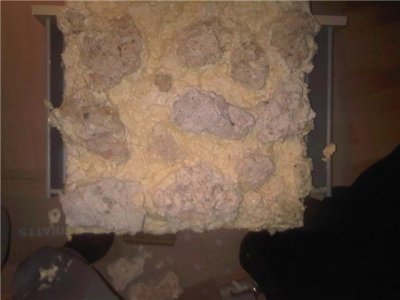
On the way home from work I picked up 30Kg of base rock for the Rock wall , 4 kg bag of Tropical marine sand, some cable ties and my pre-ordered; tins of pond foam "œRock fix" by NT Labs. Arrived home, to find a couple of parcels. The Egg crate and Heater had been delivered.
Here's a shot of my "œinitial" lay out:

I would like to say a special thank you to Twiggy, Speckled Grouper, Last Light (God Bless) and Paul Brun; whose foam rock walls and beautiful tanks have been an inspiration to me.
I set up my first Reef tank 5 years ago. After seeing a friend's 50 gallon tank I was hooked and decided to set up my own. After 6 months of fishes and corals dying on me for no apparent reason, I gave up and broke down the tank.
7 months ago I decided to build a 60 gallon tank. 44" x 24" x 15".
Today, after 3 months of planning I decided to upgrade to a 120/150 gallon tank. The tank would be a peninsula style tank with a central overflow and the main structures would consist of a foam rock wall and a central rock pillar (to hide the overflow)
Tank and sump specifications
48" x 30" x 24" "“ Display tank
(Ground and polished edges, Black silicone)
36" x 20" x 16" "“ Sump and refugium
(Mangroves, Sand/Miracle mud)
Central overflow with Rectangular glass insert
Aqua medic Turboflotor 1000 Multi SL
Eheim 1250 Return Pump
Tunze 6045 x 2
2 x 39watt T5's, 4 x 54watt T5's, 2 x Aqua-rays LED's
2 x 300watt Heaters (In sump)
Ventron UV 15 (Temporary)
Live rock for Sump and Main display
Live sand refugium
Stand specifications
Travertine Honed and Filled natural Tiles
48" x 30" x 36"
¾ Marine Ply construction
(2 inch Ventilation/Access holes to Right side)
Removable Front Panel
Friday 12th March 2010
After finishing my final designs on the tank and sump, decided to order it today. ETA 7-14 days.
Sunday 14th March 2010
Picked up the tiles from Topps tiles. 17 (600mm x 600mm tiles (plus 1 freebie!). Tiles, Grout and adhesive cost £130.
Ran through designs with Dad and parted with the "œcash" for the materials. ETA 4-6 days.
Monday 15th March 2010
Popped into the LFS to get an update on the tank. (A little early I know"¦so what"¦I'm excited)
Tuesday 16th March 2010
Had, day off work today. Bad cold, I would say Flu but everyone seems to "œscoff" at the mention of the word"¦.as if it's only reserved for people over 70. Made good use of my time thought:
Ordered On-line
1) 6 x 54watt T5 bulbs (3 marine whites, 2 daylights and 1 actinic)
2) 3 bottles of Bob Smith industries epoxy resin for my "œRock wall"
3) 2 cans of "œRock Fix" pond foam "œRock wall)
4) 2 x Egg crate sheets of 24" x 24"
5) Jaeger 300watt heater
Wednesday 17th March 2010
Still off work. Light bulbs were delivered. Wow that was fast!
Ordered On-line
1) Aqua medic Turbo Floater 1000 SL Protein Skimmer
2) 2 x Twin Arcadia Lighting controllers
Just received a call that one my deliveries (no idea which one) had been delivered to the wrong address and was now back in the Royal mail office. Rushed down there, but they shut at 1.00pm. Not happy. Will pick it up on Saturday. Think I'll do a little research on "œReef Central" tonight. I need to work out the best way to transfer livestock from my current tank (60 Gallon) to the new (150 Gallon). I would really like to eliminate the cycle, if possible.
Thursday 18th March 2010
On the way home from work I picked up 30Kg of base rock for the Rock wall , 4 kg bag of Tropical marine sand, some cable ties and my pre-ordered; tins of pond foam "œRock fix" by NT Labs. Arrived home, to find a couple of parcels. The Egg crate and Heater had been delivered.
Here's a shot of my "œinitial" lay out:


![IMG00248-20100401-2120[1].jpg](https://reefcentral-data.xenforo.cloud/attachments/22/22725-3941e87f2d77f3a9fa3950d35115ead0.jpg?hash=OUHofy1386 "IMG00248-20100401-2120[1].jpg")
![IMG00248-20100401-2120[1].jpg](https://reefcentral-data.xenforo.cloud/attachments/22/22729-3941e87f2d77f3a9fa3950d35115ead0.jpg?hash=OUHofy1386 "IMG00248-20100401-2120[1].jpg")


