340 gallon+ Frankenstein Build

60 cube foam/rock wall project

60 cube foam/rock wall project

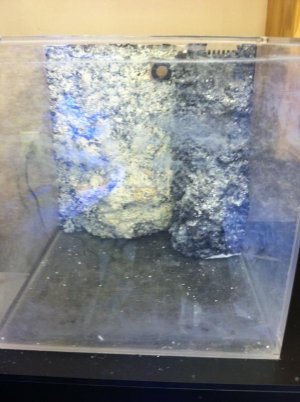
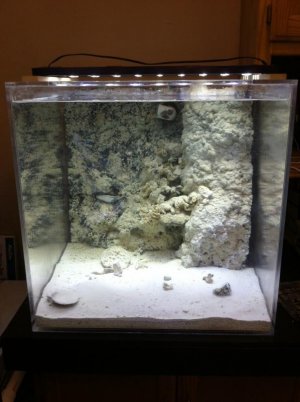
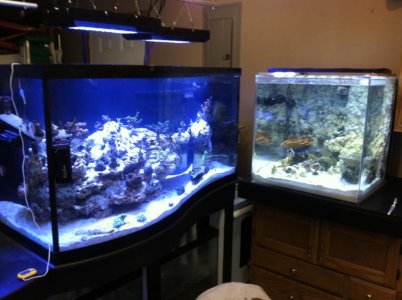
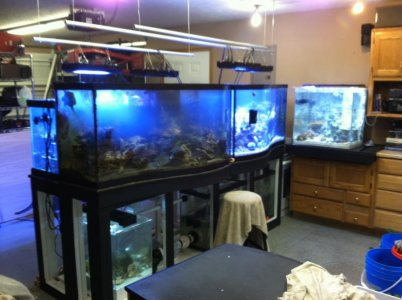
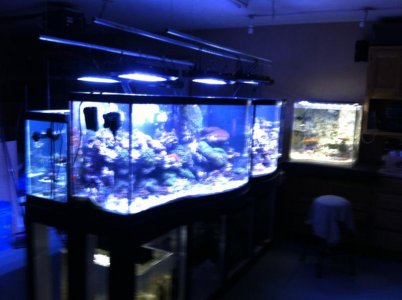
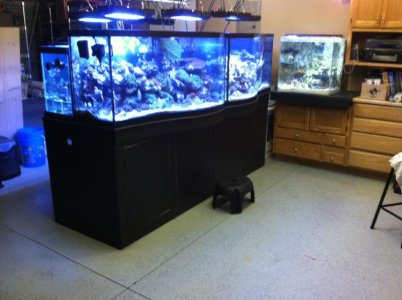
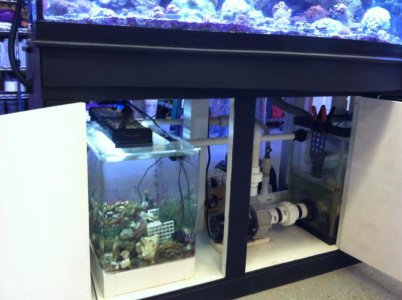
The rock project for the SPS wave only fueled my need to keep playing with foam so I continued in this fashion in aquascaping the 60... The aquarium had a corner overflow so I knew a wall would conceal it and hopefully look a little different from the other aquariums.

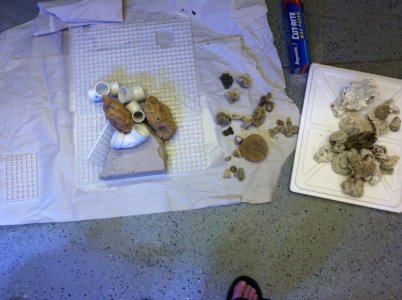
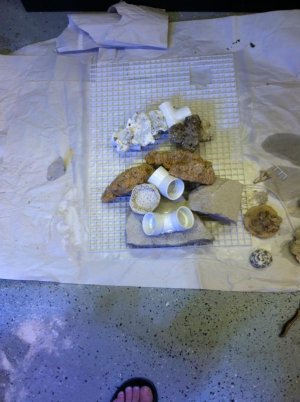
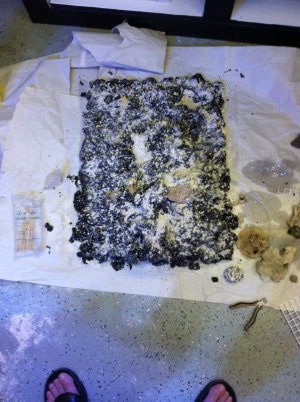
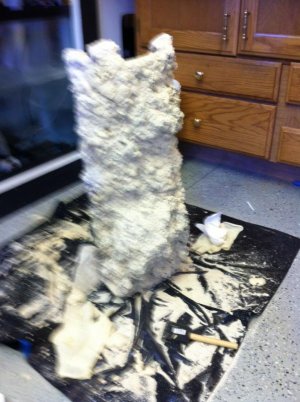
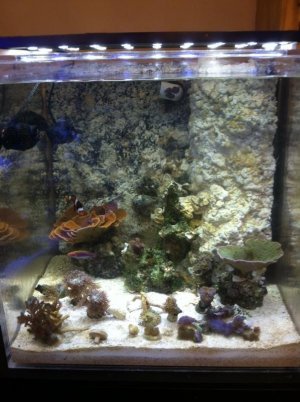
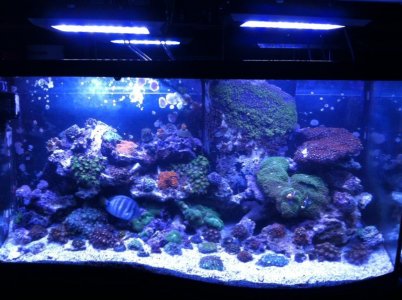
The process involved cutting some eggcrate to form the back bone and canvas for the wall... I then ziptied some pvc elbows and leftover base rock in a random pattern. I used the regular yellow great stuff foam to start building the base up... then used the black pond foam on top to get final shape that looked natural. I took care to leave the pvc elbow ends open as I figured my bi color blenny would enjoy using these for his home (he does)... I let the foam cure overnight and the next day did a little carving and shaping with a rasp to get rid of bubbles, etc... I then applied gorilla glue with a cheap paintbrush on the structure, dabbing away the bubbles over the next 20-30 minutes and while it was still tacky I dusted it with sugar fine aragonite sand... Also, don't forget to wear some latex gloves as the foam is some sticky stuff :)

Ty
 

Attachments

  • cubetank2.jpg
    cubetank2.jpg
    69.9 KB · Views: 9
  • cubetank3.jpg
    cubetank3.jpg
    68.2 KB · Views: 9
  • cubetank4.jpg
    cubetank4.jpg
    90.2 KB · Views: 7
  • cubetank5.jpg
    cubetank5.jpg
    55 KB · Views: 7
A few more 60 wall pics

A few more 60 wall pics

A few more...

Ty
 

Attachments

  • cubetank6.jpg
    cubetank6.jpg
    63.1 KB · Views: 7
  • cubetank7.jpg
    cubetank7.jpg
    61.4 KB · Views: 7
  • cubetank8.jpg
    cubetank8.jpg
    75.5 KB · Views: 7
  • cubetank9.jpg
    cubetank9.jpg
    59.8 KB · Views: 7
Thanks, I've heard a little about your system as well as I have a secret spy who lets me in on your aquarium project while you're overseas serving our country :) Hopefully, when you get back the two of us will have some stuff to help fill your tank :dance:

Ty

Well, that would be quite a treat! It's still a work in progress, but when is it not....in this hobby. :) There's so much to do when I get back, and more systems to set up in my basement. I will have to schedule some time with you to personally see your system and bounce ideas around. In the meantime, I will get my reef-fix vicariously through your's and Dendro's threads!

Thanks, Ty!
 
Lighting

Lighting

At the time of the build I had 1 taotronic non dimmable led box (120w). I was very pleased with the color and the corals responded well to it. It is a little on the blue side but thats what I like :). After running this fixture for a while, I purchased two more 120w black boxes that included 4 uv leds and were dimmable. I liked the ability to dim the leds when acclimating new corals. I ordered 3 more 120w fixtures to get a set of two each on the two waves and the 75long. I purchased a 48" marineland reef capable fixture from a local for $50... I cut it in half and did a little wiring and was able to make it fit the 24" cube. The marineland light uses 1w leds and is more yellow than I'd like... to solve the lower intensity. I eventually traded some frags for an ATI 4 bulb t5 fixture to help it out.

The lights are not fancy and I am sold on the benefits of LED... I have used both t5 and halide systems and they probably have a little bit of an edge colorwise on LEDs, but for me the corals seemed happy and growing so I won't mind not having to pay for yearly bulb replacements.

I need to organize the move pictures so they will appear shortly :)

Ty


'
 
SPS move

SPS move

For post fifty I will post a few pics of moving the Sticks to their new home... They settled in quickly as I added a wp40 to help with varying the current... I also put a few of the cap colonies in the 60 cube due to their larger size... enjoy :)

Ty
 

Attachments

  • move1.jpg
    move1.jpg
    62.9 KB · Views: 7
  • move2.jpg
    move2.jpg
    70.3 KB · Views: 7
  • move3.jpg
    move3.jpg
    61.1 KB · Views: 8
  • move4.jpg
    move4.jpg
    78.8 KB · Views: 7
Original wave move

Original wave move

The next few pic to show right after the move of the original wave tank to its new home with the other tanks... It took about 4 hours from start to finish. I started filling some spare coolers and fish boxes with H20 to hold the coral encrusted rocks... and slowly started placing them in the coolers and catching the fish was easier once the rocks were removed. I planned on keeping the old sandbed so I slowly gravel vaccumed the sand to remove as much detritus as I could... I then called a friend to help with lifting the aquarium over to the new spot... I then leveled and started filling the new tank and hooked it inline with the new system. I usually don't use the old H20 as I filled up with new H20... Cleaner is better :) Since it was getting late in the evening, I placed the rocks back in trying to not smother any corals(zoas and mushrooms) and placed the fish in and called it a night.

Ty
 

Attachments

  • move7.jpg
    move7.jpg
    60.3 KB · Views: 7
  • move8.jpg
    move8.jpg
    79.1 KB · Views: 8
  • IMG_0332.jpg
    IMG_0332.jpg
    51.2 KB · Views: 8
Cabinet doors

Cabinet doors

A few pics after adding some simple doors...
 

Attachments

  • cabinetdoors.jpg
    cabinetdoors.jpg
    61.7 KB · Views: 7
electrical work

electrical work

I added a new breaker and made some conduit outlets... The sequence pump is on one circuit and the circulation pumps are on the other in case one trips. I also want to add the fact that I also have a generator just in case of outages as we occasionally deal with those in windy Kansas :) My wife has even commented that she knows I bought the generator for the fish not for her when the next icestorm hits(lol)...

Ty
 

Attachments

  • elec1.jpg
    elec1.jpg
    96 KB · Views: 7
  • elec2.jpg
    elec2.jpg
    39.7 KB · Views: 7
Here's a few more random pics... refugium for chaeto and frag plug storage... The 55g sump, clean and simple with three baffles and a few heaters.... The last two show the "backside", 35g h20 mixing vat, ato with float valve for Kalk and vinegar, and chiller and skimmer...

Ty
 

Attachments

  • refugium.jpg
    refugium.jpg
    56.1 KB · Views: 7
  • sump.jpg
    sump.jpg
    55.2 KB · Views: 7
  • backside2.jpg
    backside2.jpg
    54.4 KB · Views: 7
  • backside3.jpg
    backside3.jpg
    69.3 KB · Views: 7
Interesting build. I know it is tought to get attention on RC unless you are spending thousands of dollars on a build.

Wanted to give a shout out to a fellow Kansas reefer.
 
Thanks for the praise :) I've been doing it for a little while and I have met many fellow aquarists and read lots of good stuff here on reef central... I'd sure like to spend thousands but I've kinda kept it simple and it's worked for me. My approach centers on taking care of the water and everything else takes care of itself... maybe an oversimplified statement but it is the heart of aquarium husbandry. I just need to take some updated pics..

Ty
 
Back
Top