You are using an out of date browser. It may not display this or other websites correctly.
You should upgrade or use an alternative browser.
You should upgrade or use an alternative browser.
A Reef in the Sky
- Thread starter v1...rotate
- Start date
v1...rotate
A Reef In The Sky
Seen the tank....awesome!!!!!!!!!!!! A lot of work has gone into this.......well done Andrew!! Now hurry up and finish so you can start building mine!!! :fun4:
Nice!!! Glad the fill went ok! There is a 75GPD RODI ready to go!
Thanks boss... yes will do. You have all the equipment, now you just need a tank!

My RODI was producing 002 TDS :eek1: which I wasn't expecting?? So I decided to plug yours in and it's working a treat, 000TDS :bounce3:
Can you go a little faster please!
Question: What's the difference between a jet engine and an airline pilot?
Answer: A jet engine stops whining at the gate.
Hehe... in the biz myself. New York based.
I love the blue doors. .. I'll be doing a high gloss white laminate on mine.
Lol!! :lolspin: Sweet, usually in New York (JFK) once a month. Wish I was there when that kid was clearing aircraft to take-off at JFK :eek1:
Thanks... There appeared to be nice flow being produced from the fresh water run so I'm looking forward to seeing how it does over time.Great Work so far.
I wouldn't be worried about the check valve. IMHO it is not necessary at all. Doesn't matter if the water equalizes between tank and overflow. In the event of a power outage it will be all limited by the height of the standpipes.
Thanks Mav. Much appreciated!NM my other post..hehe. I'm already digging the tank w/o anything in there. Great job!
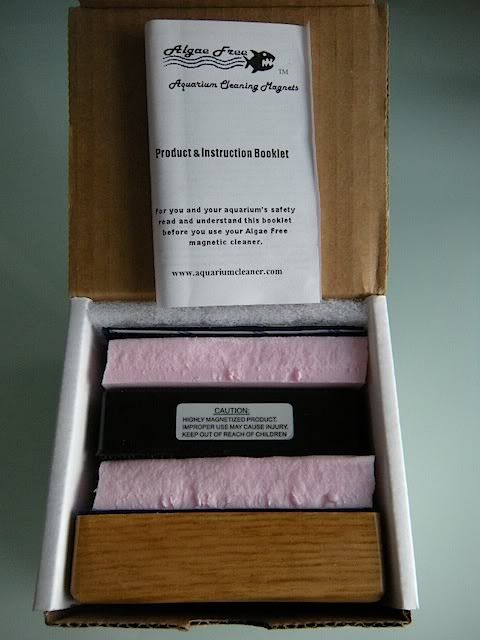
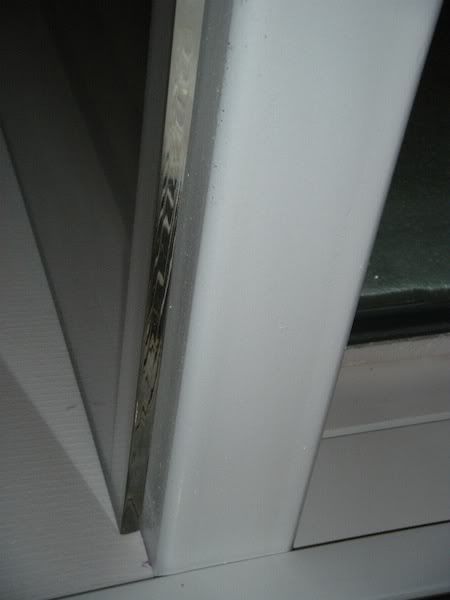
Magnet Cleaner
Received this today! Was after a magnet that could be used on 3/4" (19mm) glass and floated if it detached. Tunze magnets looked great but didn't float!

A magnet that comes with instructions!! How sweet is that?
:thumbsup:
shaggss
Active member
Thanks boss... yes will do. You have all the equipment, now you just need a tank!
And an understanding wife!!! :eek1:
My RODI was producing 002 TDS which I wasn't expecting?? So I decided to plug yours in and it's working a treat, 000TDS
No probs...glad to help and at least someone is using it!!!
See ya Wednesday!
How do you know your in a room with a pilot?
Don't worry, he'll tell ya!
badazztealcobra
New member
Magnet Cleaner
Received this today! Was after a magnet that could be used on 3/4" (19mm) glass and floated if it detached. Tunze magnets looked great but didn't float!
A magnet that comes with instructions!! How sweet is that?
:thumbsup:
If you didnt get one, get an EZ Blade attachments for that algae free magnet, theyre worth their weight in gold..... :thumbsup:
Unbelievable build by the way..... I thought I was going high tech on my 90g rimless, Im not even close to this..... Ive had my Profilux for awhile now, but just picked up a doser to try balling light myself... Im definitely going to be taking it slowly... :rollface:
****ed a little in my pants! just as expected, your tank looks amazing!
love the algae free. problem with those magnet types is when sand or any particle gets in it, it'll surely scratch your tank. ive had that problem in my previous setup, scratches started appearing over time. but then again, mine was only a magfloat")
love the algae free. problem with those magnet types is when sand or any particle gets in it, it'll surely scratch your tank. ive had that problem in my previous setup, scratches started appearing over time. but then again, mine was only a magfloat
kc350twin
New member
v1...rotate
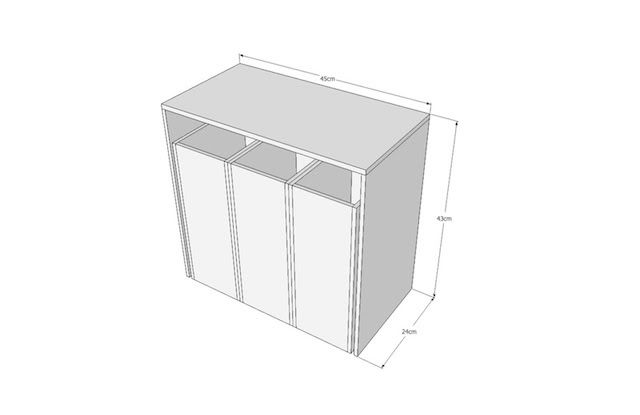
Can you do me a favor and post a pic of your stand with both front doors slid all the way open? I want to utilize this style opening on mine. I saw it on a guy's thread and he had tile on the front and said he had no binding. Do you get any binding at full open?
Also, how long are you Drawer slides?
Thanks
KC3
badazztealcobra
New member
****ed a little in my pants! just as expected, your tank looks amazing!
love the algae free. problem with those magnet types is when sand or any particle gets in it, it'll surely scratch your tank. ive had that problem in my previous setup, scratches started appearing over time. but then again, mine was only a magfloat
Thats another great thing about the EZ blade, you angle the blade down towards the sand, and you can clean the glass all the way to the sand and if you take your time, no particles of sand will get into the pads and scratch your glass. :thumbsup:
v1...rotate
A Reef In The Sky
Very true...!!And an understanding wife!!! :eek1:
No probs...glad to help and at least someone is using it!!!
See ya Wednesday!
How do you know your in a room with a pilot?
Don't worry, he'll tell ya!
If you didnt get one, get an EZ Blade attachments for that algae free magnet, theyre worth their weight in gold..... :thumbsup:
Unbelievable build by the way..... I thought I was going high tech on my 90g rimless, Im not even close to this..... Ive had my Profilux for awhile now, but just picked up a doser to try balling light myself... Im definitely going to be taking it slowly... :rollface:
Have you got a link for the EZ blade... tried looking but not sure? I use a Kent Marine blade at the moment. Would that suffice?
Thanks... Yeah, the Profilux can do some awesome stuff... looking forward to putting it to good use.
Lol.. thanks Vic. Yeah, learnt my lesson on my current tank. Usually use my Kent Marine scrapper near the sand to avoid, any how.. that's the plan at this stage.****ed a little in my pants! just as expected, your tank looks amazing!
love the algae free. problem with those magnet types is when sand or any particle gets in it, it'll surely scratch your tank. ive had that problem in my previous setup, scratches started appearing over time. but then again, mine was only a magfloat
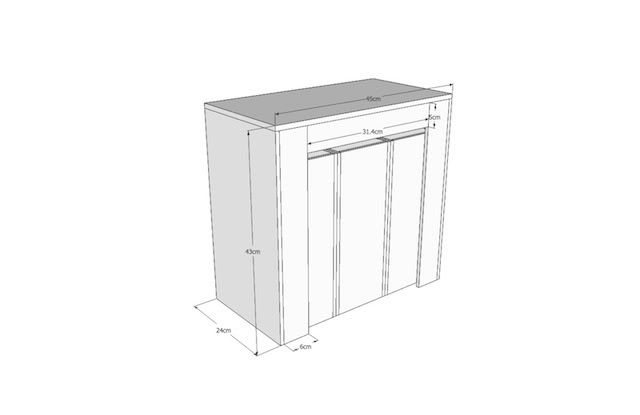
Sorry no picture as one door is completely removed at the moment while I confirm dimensions of the shelf and balling canisters. There are some sketches/pics earlier on in the thread showing the doors open. Here is an old drawing showing how they were connected.v1...rotate
Can you do me a favor and post a pic of your stand with both front doors slid all the way open? I want to utilize this style opening on mine. I saw it on a guy's thread and he had tile on the front and said he had no binding. Do you get any binding at full open?
Also, how long are you Drawer slides?
Thanks
KC3
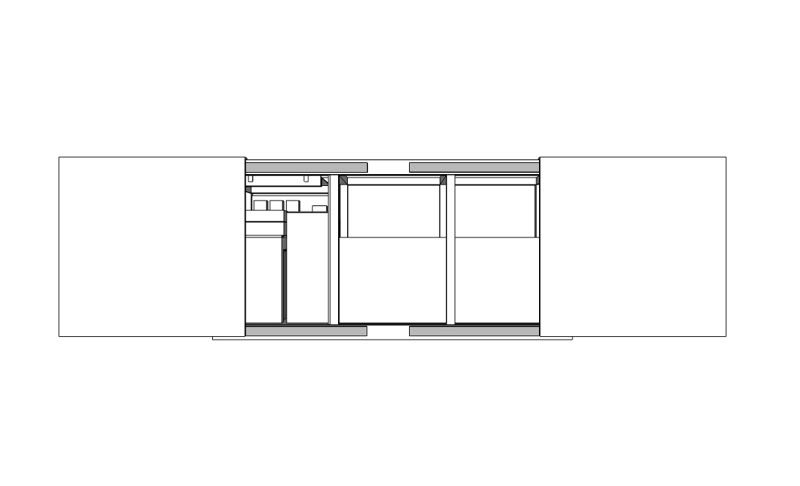
There is no bending of the sliders at full extension. I made sure I ordered ones that could support the weight of each door. The sliders are 28" long (the longest in this model you can buy) and are 100% extend able. Also, the longer the slider, the less weight is can support.
***There is a picture in my next post that shows how ones of the sliders are mounted.
Hope that answers your questions.
Kent Marine scrapper similar?Thats another great thing about the EZ blade, you angle the blade down towards the sand, and you can clean the glass all the way to the sand and if you take your time, no particles of sand will get into the pads and scratch your glass. :thumbsup:
Thanks... welcomeawesome build taggin along
v1...rotate
A Reef In The Sky
Filling Up
The misses is not that pleased at the moment since I've created myself a 'fish' room out of our guest bathroom. I've insisted it's not for too long
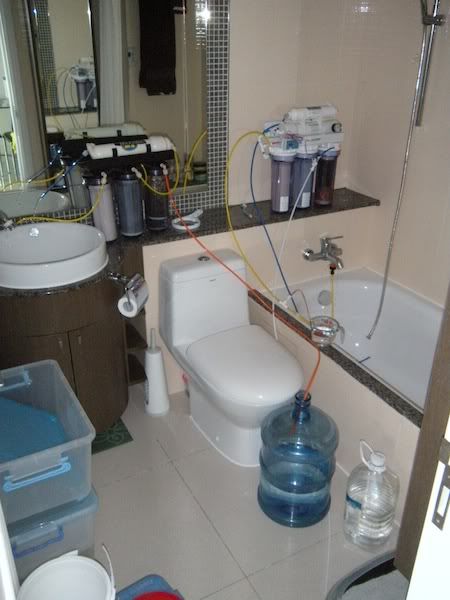
Slowly adding the RODI water. Around 20hours in and this is all I have to show. Still a while to go.
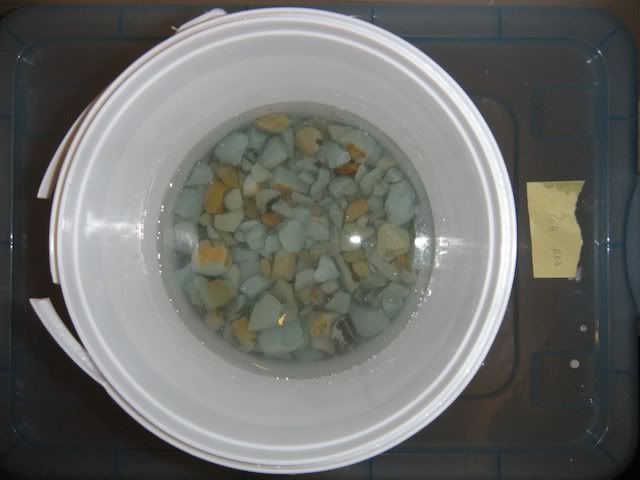
I started preparing the Zeolites today... rinse well and then leave to soak in RODI water for 2 days min... changing the water daily.
Aragonite is in the container below soaking... got the PO4 down to 0.03 :bounce1:
The misses is not that pleased at the moment since I've created myself a 'fish' room out of our guest bathroom. I've insisted it's not for too long
Slowly adding the RODI water. Around 20hours in and this is all I have to show. Still a while to go.
I started preparing the Zeolites today... rinse well and then leave to soak in RODI water for 2 days min... changing the water daily.
Aragonite is in the container below soaking... got the PO4 down to 0.03 :bounce1:
Last edited:
badazztealcobra
New member
Have you got a link for the EZ blade... tried looking but not sure? I use a Kent Marine blade at the moment. Would that suffice?
Thanks... Yeah, the Profilux can do some awesome stuff... looking forward to putting it to good use.
http://premiumaquatics.com/store/me...e_Code=PA&Product_Code=EB-SA-K&Category_Code=
Then just buy some of the SS blades at the bottom of the page.... You can see a quick video how they work on that page as well..... The thing works wonders. :thumbsup:
illsquaddotcom
New member
Well done on this one man. I was subscribed to your earlier thread in the reef section and must have missed the jump to this one. It was a treat catching up. Kind of like getting to watch an entire season of LOST or Dexter from DVD...
TriggerHappyDude
New member
Wow, ahhh, wow...did I say wow yet? WOW. Nice work. Can I hire you to help me design my next tank? I love your style and completeness. Serious, can I pay you to do the mock ups for me in sketch and the other program you use? I will pay you!
velvetelvis
Active member
nice build cant wait to see it filled with coralz!
+1 The suspense is killing me! :bounce2:
+1 The suspense is killing me! :bounce2:
+2 :beer:
v1...rotate
A Reef In The Sky
haha... I certainly don't mind it as it is :lmao: Hope to take some room shots once it's all set up.Dude your bathroom looks slick! I think we need to see the rest of the house too.
Thanks for the link. Appreciate it. Will look into it for sure as I just ordered from them so will wait until next time.http://premiumaquatics.com/store/me...e_Code=PA&Product_Code=EB-SA-K&Category_Code=
Then just buy some of the SS blades at the bottom of the page.... You can see a quick video how they work on that page as well..... The thing works wonders. :thumbsup:
Thanksnice build cant wait to see it filled with coralz!
Thanks... yeah, maybe I should dig that thread up again and post the link to this thread again. I hope you don't get LOST in my build though :fun4:Well done on this one man. I was subscribed to your earlier thread in the reef section and must have missed the jump to this one. It was a treat catching up. Kind of like getting to watch an entire season of LOST or Dexter from DVD...
No problems man... when you starting? :thumbsup:Wow, ahhh, wow...did I say wow yet? WOW. Nice work. Can I hire you to help me design my next tank? I love your style and completeness. Serious, can I pay you to do the mock ups for me in sketch and the other program you use? I will pay you!
+1 The suspense is killing me! :bounce2:
Me too...+2 :beer:
v1...rotate
A Reef In The Sky
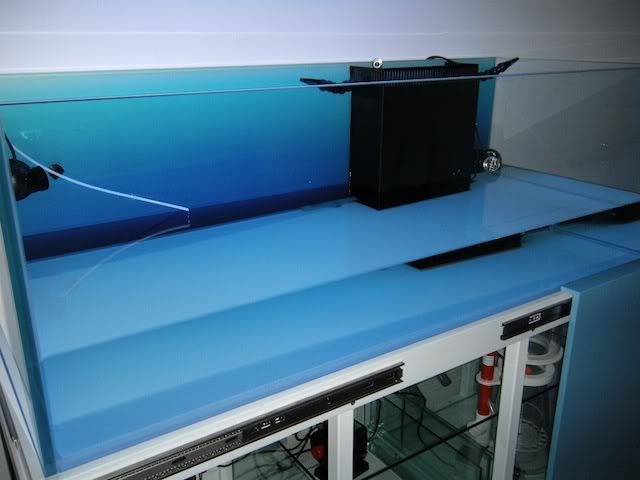
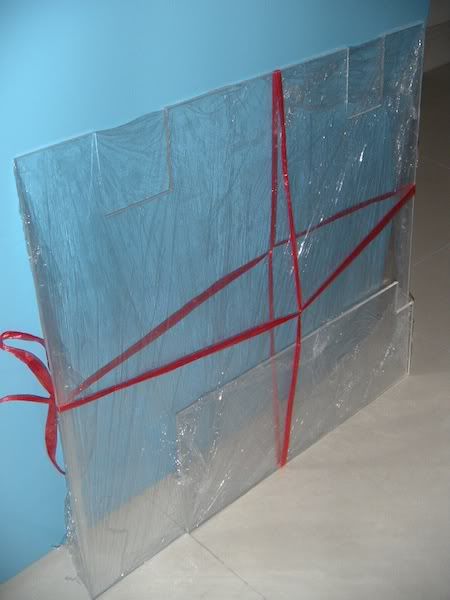
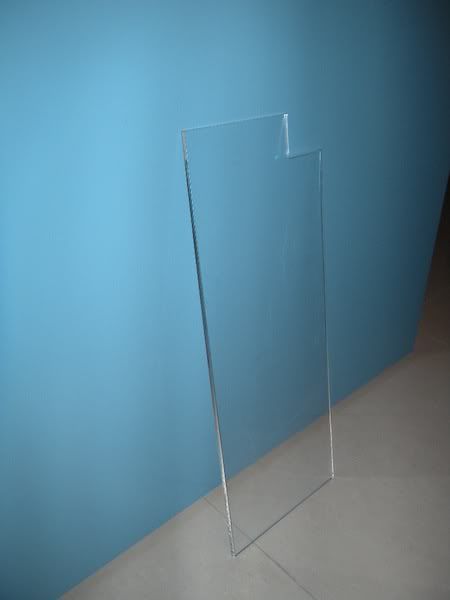
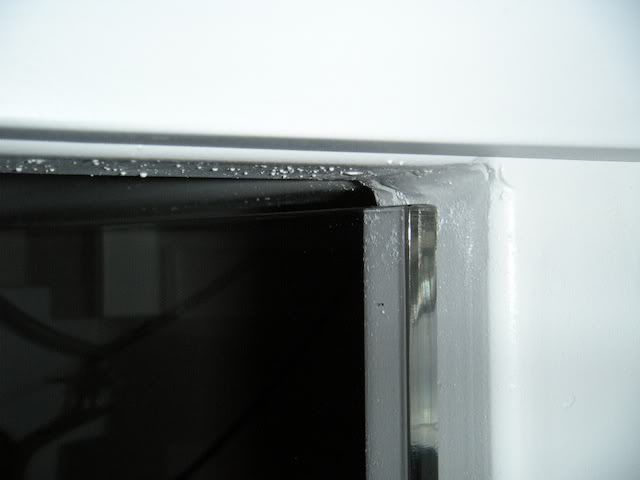
Finishing Touches Inside Cabinet... Part 1
I ventured out today with sketches in hand, in search of a shop which I was recommended to get some custom acrylic items made. The ideas have been with me a while but wasn't able to get anything made until everything was in place as to confirm sizes, etc.
Items made... on the spot (got to love the service)
ATO Container Top: Corner section cut out to allow tubing
Section Divider: Placed between the sump and ATO container to reduce chance of salt creep on the electrical items. Can easily slide in/out with two sections cut out for cords/plugs to pass through. Wanted clear acrylic to keep an open appearance underneath.
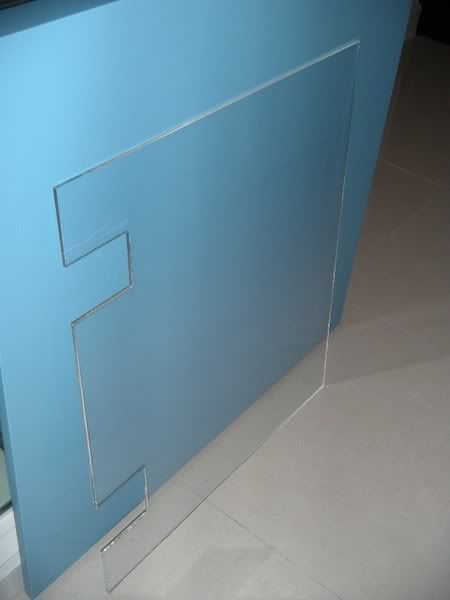
Nice fit
Plenty of room for cords and plugs to pass through
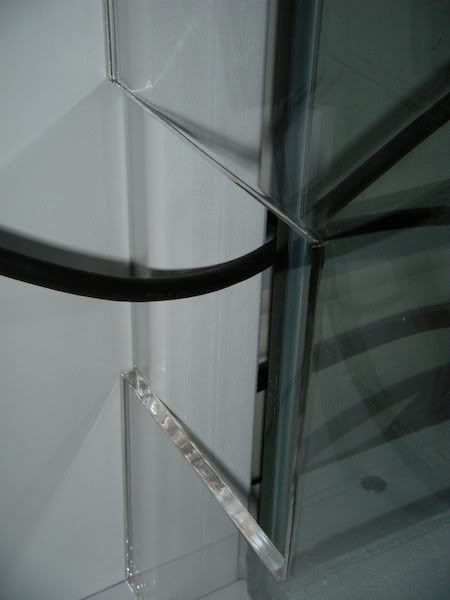
Had to leave a small gap at the top so it could be slide in/out
Getting this made too... takes a little longer though
Had to stop by another awesome street where there are heaps of bits n' pieces. This is where I got the LED lights from so I thought I'd take a few snaps for you guys. Decisions.....


Part 2 continued soon...
I ventured out today with sketches in hand, in search of a shop which I was recommended to get some custom acrylic items made. The ideas have been with me a while but wasn't able to get anything made until everything was in place as to confirm sizes, etc.
Items made... on the spot (got to love the service)
ATO Container Top: Corner section cut out to allow tubing
Section Divider: Placed between the sump and ATO container to reduce chance of salt creep on the electrical items. Can easily slide in/out with two sections cut out for cords/plugs to pass through. Wanted clear acrylic to keep an open appearance underneath.
Nice fit
Plenty of room for cords and plugs to pass through
Had to leave a small gap at the top so it could be slide in/out
Getting this made too... takes a little longer though
Had to stop by another awesome street where there are heaps of bits n' pieces. This is where I got the LED lights from so I thought I'd take a few snaps for you guys. Decisions.....
Part 2 continued soon...
Finishing
Had to stop by another awesome street where there are heaps of bits n' pieces. This is where I got the LED lights from so I thought I'd take a few snaps for you guys. Decisions.....
Part 2 continued soon...
wow where's that? Street name?
I am fascinated to have some of that for my tank!
Fantastic build bro! Keep it up
Happy Reefing,
Marc J.
Similar threads
- Replies
- 24
- Views
- 782
- Replies
- 6
- Views
- 338