Acrylic fabrication questions? I can help!

Question about a topbrace crack.
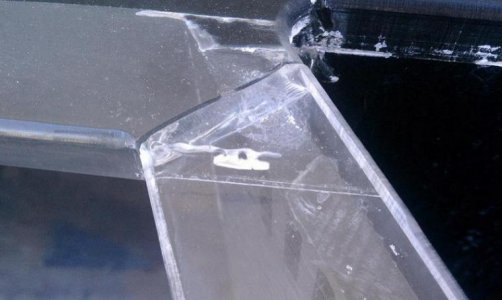
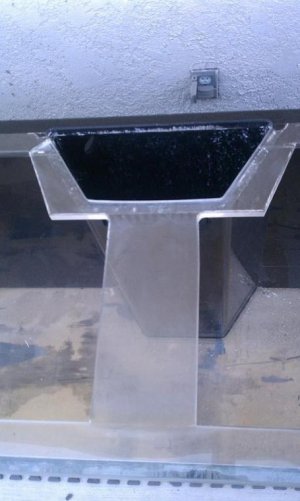
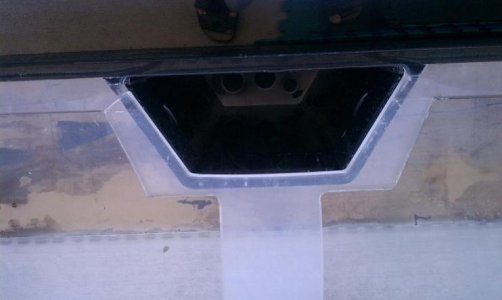
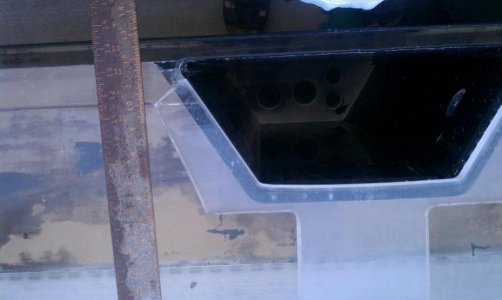
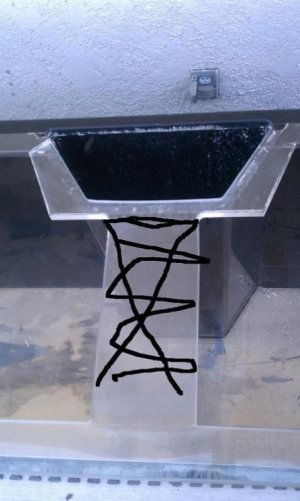
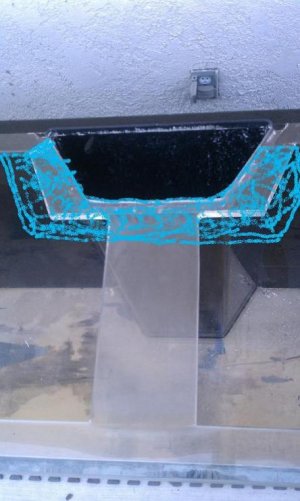
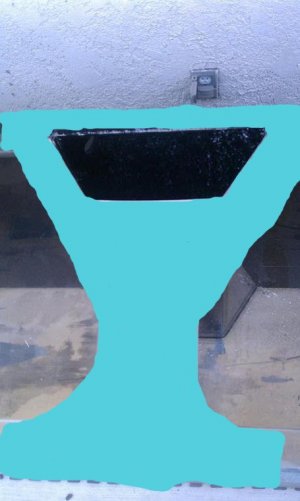
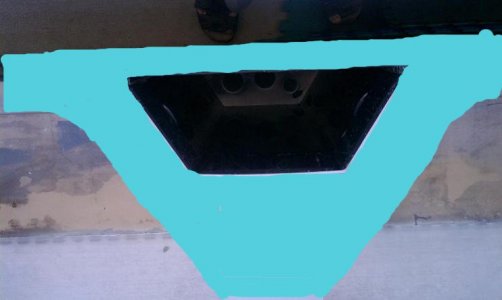
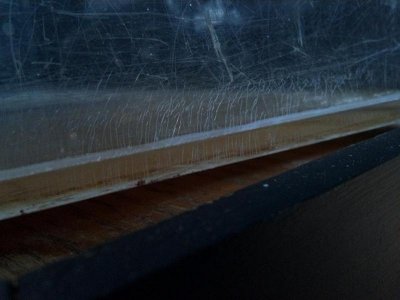
I recently purchased an aprox 5 year old 300+ tank setup. During the move the topcrossbrace was cracked. The tank is 84"L x 36"H x 24"W, it has 1 inch acrylic for the sides and I think the bottom, the top brace is 3/4 inch. There is only one overflow box in the back center with 2 drain and 2 return holes in the bottom. The remainder of the tank appears sound w good joints / structure. It holds water (clamp was used for safety) the max seperation of the crack was just under 1/4 inch. Here are the picts. My ideas to follow but recomendations are sought on this matter. The tank manufacturer is unknown.
Thanks
Sam
 

Attachments

  • closeup crack.jpg
    closeup crack.jpg
    39.4 KB · Views: 8
  • crossbrace.jpg
    crossbrace.jpg
    39.8 KB · Views: 11
  • overflow.jpg
    overflow.jpg
    27.9 KB · Views: 11
  • Tsquare.jpg
    Tsquare.jpg
    32.7 KB · Views: 9
The design of the brace around the overflow I believe is the problem. I do not know if it was modified or not or what was done prior. The bracing around the rest of the top is 3 inches but around the overflow it is uneven and as narrow as just over an inch. My thought for repair.
1. repair crack, cut out cross brace that traverses the tank but leave the brace around the top of the overflow. I would add a 5 inch wide cross braces to either side of the overflow.
by having 2 crossbraces instead of 1 it will decrease the size of the top openings but each should still be close to 2 feet long. New braces not shown in the picts.
2. Replace the section of acrylic over the overflow with a much wider more uniform piece.

My use of the paint program is stellar, I know. You get the idea.

Thanks again
Sam
 

Attachments

  • crossbrace remove cross.jpg
    crossbrace remove cross.jpg
    43.1 KB · Views: 11
  • crossbrace replace overflow top.jpg
    crossbrace replace overflow top.jpg
    45.5 KB · Views: 9
The #1 place that fails on acrylic tanks is the eurobrace because the corner radius is never enough (unless you get your tank from James or another reputable builder) or the euro is too thin. In your case, you have almost zero radius on the inside corners where it should be a minimum of 2", and your euro is probably too narrow as well. This may be offset slightly by the fact that the tank is made from 1" & 3/4" material, but then again it's 36" tall so it's not offset by that much.

But there's just no excuse for that 1" wide section at the transition point from the brace to the overflow cutout. That's just poor craftsmanship. Sorry had to say it.

I know that James is keeping busy these days so he may not respond, hopefully some of the other longer-time acrylic workers can chime in and confirm or deny my following suggestion:

First, neither option #1 or #2 is advisable. Don't cut anything out.Leave the existing brace in place.

Step one is repair the break.

Step two is re-inforce the brace.

Step one: I'm assuming here that the tank is empty (God I hope it is!). Use a couple of bar clamps to bring the broken joint back together to verify that you can line up the break. This has to be able to be done, or else stress can be created in another area of the tank (the other corners). Then get yourself some Weld-on. Probably 40/42 would be best in this case, but you could use #4 or #5 (which is being produced again, yay!). The problem is that the WO 4/5 will tend to run right out of the crack as you apply it. The 40 will not (as much). So if you do 4/5 then the crack will have to be clamped so that the pieces are in very close proximity so that cappilary action holds the solvent in long enough for it to bite into the material. And you don't want anything in contact with the backside that would wick it out. Same for 40. 40 is thicker so it might be better here, but wicked nasty smelling and expensive. You might be able to get away with #16 here too, since you're going to do Step 2

Either way, once you give the solvent time to bite in, tighten the clamps enough to bring the piece together, but not enough to smash all the solvent/dissolved material out, just bring the joint back together. Same for 40 but if you go that route, you may want to wait a little longer (I'm not the expert on 40 - only used it once).

Step two is similar to your option 2, except I would get your hands on a thick piece of cast acrylic, probably 1/2" minimum and either Polycast or Plexiglas-G, maybe Acrylite GP, in that order. Get a piece that is wide enough to extend about 6" on either side of the overflow box. Make a cutout that matches the hole in the overflow box and cut the acrylic to match the shape of the euro around the overflow box, except make it at least 4" wide. Think of it as a triangular piece with the base lining up with the back of the tank and the peak pointing toward the front, right in the middle of the center cross brace. If it were me, I would make a piece with a triangular base which then transitions to a rectangular extension at the top which would match the width of the top brace and extend that all the way to the front of the tank, and maybe continue it for a bit along the front edge and provide for some larger radius transitions.

I did my own paint work and attached some pics.

Laminate this piece on top of the existing euro and Weld-on 40 is probably the ideal weapon of choice here. WO #16 isn't the greatest product but here is actually where it can come in handy, and I've done patches with 16 (to cover up holes) and if you put it on evenly and get a lot of weight on it, you can actually get a pretty clear looking bond (maybe a few bubbles). What you want to do it build a brace out of 2x4s inside the tank to support the crossbrace, put the 16 down, lay the patch brace on it, then put a bunch of weight on it. Careful of squeeze-out, and hold the piece in place as it will tend to float around until the 16 starts to set up, which can take a few minutes. Getting some mini-clamps to hold it in place would help.

Third, you should probably put a smaller patch on the underside of the crack. This can probably be a thinner material and may require a little sanding to remove any solvent or melted acrylic that smushed out when you fixed the break, then just apply the patch with 16 and clamp.

After all of this, you want to let this thing cure up for a while, a week or probably 2 or 3 to be on the ultra-safe side.

It's probably a little overkill, but that tank brace was weak to begin with and you're lucky this didn't break with the tank full.
 

Attachments

  • crossbrace.jpg
    crossbrace.jpg
    37.1 KB · Views: 11
  • overflow.jpg
    overflow.jpg
    26.1 KB · Views: 8
Thanks for the reply.
The tank is empty.
I agree the design of the crossbrace around the overflow is bad. W/ the rest of the tank appearing to be designed well, I don't know what happened there.
Once again the brace was broke when the tank was empty / being moved. The crack edges w/o water in the tank is close together but would need a slight clamp (about 5-10lbs of front-back pressure) for the crack to do a capillary action w/ WO 4. The crack lines up well w/ no pressure for the WO 40 to fill the narrow joint. I have WO 40, just need to get the acrylic for the brace / laminate piece.
Thanks again for the advice.
Sam
 
I have a couple questions.

I just bought a used 55gal corner acrylic aquarium. when i bought it i didnt realize that it had some crazing (i think that is what this is in the pic?) on some of the lower edges. it holds water, and it doesnt appear that they go into the bond area (still looks clear). is this anything to worry about? or is it just cosmetic? and is there anything that can be done about it?

also, on the top acrylic sheet bonds i can see separation starting in some of the bonds.. can i just flow new glue (and which glue is best?) into these spots to re-bond?

Thanks in advance!
 

Attachments

  • 2011-09-28_07-40-26_538.jpg
    2011-09-28_07-40-26_538.jpg
    44.7 KB · Views: 13
I originally placed a thread here http://reefcentral.com/forums/showthread.php?t=2076198 about my plan. It was suggested I placed it here. Here's a copy/paste from the tread.

I'm in the process of designing my build. The design is L-Shaped, will be 800-900 Gallons. Dimension are 90" Length 1 x 66" Length 2 x 36"w x 48"h. Here's my questions

1. I'm planning to use 1" Cell Cast Acrylic, plan for top bracing will be cut outs, is this thick enough?

2. why is pricing all over the board, for a 4'x8' sheet, I'm getting pricing from $500-$1200.

3. Where the two lengths meet, the inside corner of the "L", should this be a 45 mitered edge? Think of the inside corner in crown molding.

4. the bottom and top plates, where they meet for the "L", should a estimated 6" brace be placed on top and/or bottom for extra support.

Any thoughts/suggestions would also be appreciated.

thanks

JR
 
I have a couple questions.

I just bought a used 55gal corner acrylic aquarium. when i bought it i didnt realize that it had some crazing (i think that is what this is in the pic?) on some of the lower edges. it holds water, and it doesnt appear that they go into the bond area (still looks clear). is this anything to worry about? or is it just cosmetic? and is there anything that can be done about it?

also, on the top acrylic sheet bonds i can see separation starting in some of the bonds.. can i just flow new glue (and which glue is best?) into these spots to re-bond?

Thanks in advance!

anyone have an answer please? post with pic is 2 above this..
 
Adding glue may cause more crazing.
The crazing you have presently cosmetic and nothing to worry about. Just keep an eye on it for growth.

James
 
Adding glue may cause more crazing.
The crazing you have presently cosmetic and nothing to worry about. Just keep an eye on it for growth.

James

Thank you! That was the conclusion I was coming to, but I wanted someone with experience in the matter to reassure me.
 
I have a material question, James I have a feeling you have the answer to this one.

Apparently Arkema makes a sort of 'generic' grade of Plex-G without any print on the mask. From what I'm being told, it's of a slightly lower spec or grade of quality, and may have some black specks in it or a little less clarity. It's about 20% cheaper than Plex-G with a printed mask (for 3/8" anyways). I am guessing that this material is probably acceptable for sumps and maybe small frag/nano tanks because it's still made by Arkema in Mexico and it's cell cast so better than extruded/continuous cast. It just might not be the perfect material for a display tank.

Any concerns?
None whatsoever. I haven't even seen printed Plex-G in a while and I use the unprinted stuff for display cases frequently. Haven't heard the "generic" thing yet though. Just that they stopped using printed paper to save $$ but I dunno..

James
 
Good to know. The 1/4" stuff I get (black and clear) always has printed paper, then after I questioned them about the 3/8" stuff w/o print, they said there is a version with the printed mask that is the "high grade", something about having a warranty, etc, that is basically voided when you cut and bond it so what's the point...

Thanks James!
 
laser and flame polished edges are no good for bonding. The quick heating and cooling stresses the edges, bonding them will leave joints weak and crazed.
 
Hi James,
Need your expertise. I want to build 72" x 24" x 24" @ 1/2 inch cell cast
1. Is 1/2 inch okay with this dimension? or Should I go with 72" long x 24" wide X 20" high
2. How many cross brace do I need?
3. How wide should the euro brace be?
4. Is crazing very common on acrylic tank? and what causes it? can it be prevented?

Thank you
 
I am looking for suggestions on how to remedy a mishap during assembly.

I was pulling the pins and the tank fell over. My center temporary support collapsed. It's not the end of the world.... but one panel that I had glued earlier this morning (6 hours ago) separated.

The issue is I now have 4 surfaces that have been exposed to glue and need to be reglued, the joint that failed when it rolled over and the joint I was working on at the time. I had already flipped the tank over so I'm pretty confident the joint was sound, not pretty, but sound..... I believe that it hadn't developed alot of strength yet.

What is the best way to re-dress the joint prior to re-gluing? I'm leary of running the router over it, but I have a trim bit with a bearing. That seems to be the best way to fix the front and back. Sanding seems like it would be a nightmare. If I can salvage the panel I was attaching that would be ideal, otherwise I can re-cut it. I'm not worried if the tank is 35-15/16" on one end and 36 on the other. :) The tank will be an in-wall design and framed with trim. I seriously doubt anyone will ever notice. What is important to me is that the joints are secure and sound.

My understanding is that the best assembly technique is sides to back, back+sides to front, top to sides, add the bottom.

I am using some solid core .030 MIG welding wire for my pins. I suspect the issue was that the assembly being glued was exerting alot of force and I was having trouble getting my pins out. I'm not sure that a regular pin would have been any different, but I'm open to suggestions. I personally think something thinner would be better, but .030 is pretty thin to begin with.
 
Hotpuppy, is this the 330 in your signature?

Either way, if you had a joint at another point in the build separate, then that joint was not fully cured.

I read through this entire thread (all 3 splits) and one thing I remember reading is that you should wait a bare minimum of 2 hours, 4 hours really, and ideally overnight before touching a joint. I am in the process of building a 30g sump out of 3/8" and I'm waiting at least overnight (10 hours) before moving to the next joint. I thought I hosed one joint trying to get bubbles out (made a dumb mistake) so I let it sit for a full 24 hours and it turned out OK.

If the joint separated, versus the acrylic breaking near the joint, that tells me that you didn't wait long enough to handle the joint (esp if this is your 330).

But help me understand where you were at in your build - had you done sides to back and then were doing back+ sides to front? Is that when your center support came out (the one holding the middle of the back panel from bowing)?
 
Hotpuppy, is this the 330 in your signature?


If the joint separated, versus the acrylic breaking near the joint, that tells me that you didn't wait long enough to handle the joint (esp if this is your 330).

But help me understand where you were at in your build - had you done sides to back and then were doing back+ sides to front? Is that when your center support came out (the one holding the middle of the back panel from bowing)?

Yes, that's the tank.....

It did separate at the glue, so you are right, it probably wasn't ready to be moved. According to IPS the joint should have 800psi after 2 hours, but this was like 6 hours. I'll add more time. I think it's a combination of a crappy joint and falling over.

Yes, the "stuff" i had under the center of the tank shifted when I was trying to pull my pins.

I went to Home Depot and found some thinner steel wire, 28 gauge.... that should help, I think my wire was too thick.

I bought another laminate bit and was able to nicely clean up the 3/4" panel, the 1/2" panel I put on the router table and let's just say it's now eligible for something else. It's edges were rougher and I don't like the quality of the routed edges. After I got them where I want them I had lost too much material.

I had an extra 1/2 sheet of acrylic... well okay, not extra, but not committed yet either. :) So I cut another side out of it.... ouch!

I'm going to eat dinner and see if I feel up to routing the panel down to size. It's 1/4" oversize in both directions to allow for routing of the edges I cut. That should allow an 1/8" to be removed from each side with the router.

Is the factory edge good enough for gluing? or does it need to be cleaned up? Arkema Plex-G (printed paper I might add... lol)

I find I can get more consistent results with the router by clamping the acrylic to the table and clamping a guide edge down. Moving the tool seems to be more consistent for me than moving the work, mainly because I'm having trouble with a 2x3 panel on a 18"x16" work surface. :)

The downside is it's really time consuming to measure and clamp... but it's the end result that matters.
 
Back
Top