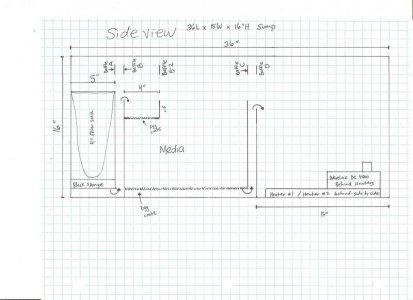
So what you do is start by bonding all the panels one at a time to the front panel. Order doesn't matter, it depends somewhat on baffle spacing. Up/downs are the toughest. More on that later
All baffles that touch the bottom panel need to be square and identical in relation to the other panels that also touch the bottom. If you can stack and tape and square them together, then mark one side as a reference so that side on all panels is facing the same direction, then if you're off-square you're OK because they're all equally off.
Now, you flip the entire assembly over on to the back panel. Bond one end panel and let it sit for a few hours. Right after you pull the pins and before the joint sets up, make sure that the other end panel lines up right, if not, then all the panels will be off.
After 2 hours, pin the next joint & set. Check last end panel alignment again. Wait 2 hours. Keep going until you have them all done.
If you have a set of up/downs that are 3 in a row with an inch or less between them, the middle one will be hard to get at. However the middle one is usually an 'up' baffle and has no pressure on it. So for this one, I pin it along with the next baffle and do them both at the same time. Or, if you can rig it up (usually by putting a 5lb weight on the top of the assembly) you can get all 3 baffles at the same time, but this can get tricky because #1 and #3 need to be flush with the bottom joint and lining up 2 of these at the same time can be problematic. So I usually do #1, and #2 together, or #2 and #3 together so I only have to line up one critical panel at a time. What you may find is that even with CNCd parts, things don't always want to line up dead-on because of variations in the thickness of the acrylic sheet (this is a known issue and not much you can do about it) which will cause a perpendicular bonded panel to line up differently (a few mm) depending on where you bond it.
Anyways, when you set a joint if it doesn't line up quite right then you essentially have to push it into position and hold it there for a few minutes until the solvent starts to set up, and in some situations, you need to use a large bar clamp to keep it there, even some shims in really bad lineups. I'll have to dig up a pic of one huge sump I did that I have to get creative on.
So once you get all the baffles in, they are all pin set joints and very solid. Then you scrape all the junctions on the bottom & top of the assembly to get rid of any lips, ridges, and solvent drips/finger smudges and bond the euro on, then the bottom, flush trim, done
You can use #16 if you have a bubble in a baffle joint that leaks (from one side of the baffle to the other) but this is pretty rare if you are able to pin the joints. For the 'up' baffle, this is generally not structural and so you can just wick it in afterwards if you want, but I would pin it on the first side so that you only have to do one joint this way (and put it on the back so no one sees it)


