CADlights 39g Pro build thread

20k should look nice but mine was very dim when installed in the cad fixture. I ran it previously on a jbj ballasts and it was much more intense. If I try it again, I would use a blue life sps T5 or a geisseman midday T5 bulb for balance and added growth.

I'm happy with my 13K/pure actinic combo.
231.jpg

cadwithzeo004.jpg

235.jpg
 
pictures look great, as always tivo!

i have such a hard time evaluating bulbs from pictures, just because i don't have much personal experience with different halide bulbs. you do have some nice looking colors in there, though.

i'm getting some new corals from AtlantisAquariums.net shipped to me (to arrive Saturday), so I'll throw some pictures up here after they get in the tank!
 
Thanks timdanger!

I have the same problem as you when I see the pics posted. I look at my tank and say "wow" that looks great, I've got to take a pic! I then look at it on my tiny camera and say "nice shot,that will look nice". They always look quite a bit different when posted. I think my colors are better with my bulb combo and zeovit but I'm still researching the Maxspect G2 fixtures. My electric bill is a bit high for my taste during the summer months because my chiller is always battling the halide to maintain 77 degrees. I'm very interested in the Maxspect because I would only need to run 1 over the tank as opposed to most likely needing two AI's for the coverage I would like.

Get those coral pics up soon!

tivo
 
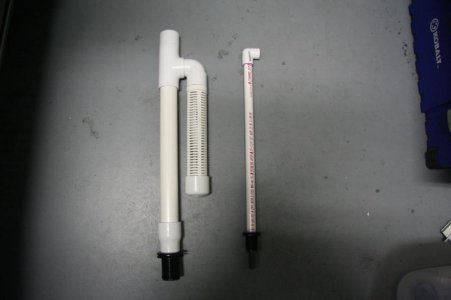
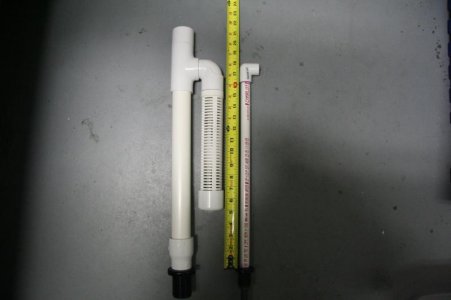
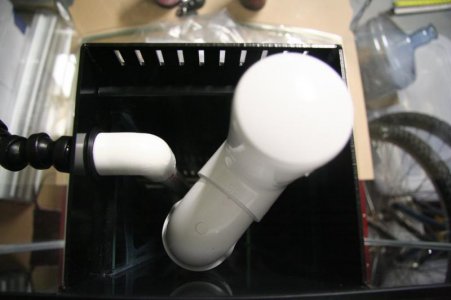
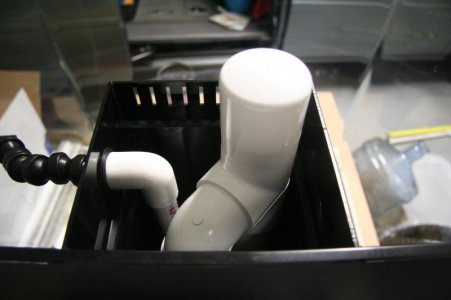
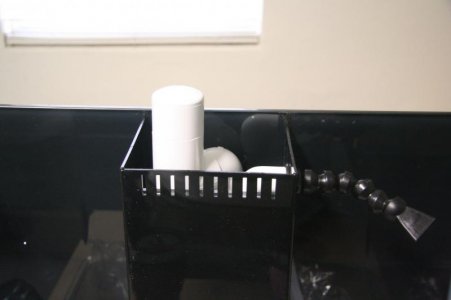
Just a little update on the progress of my 39G Pro. Been fighting a cold so I did not get much done this weekend. However, I did get some of the plumbing done. With Eddie's new design, I was able to fit a full-size Durso standpipe in the overflow (in addition to a 1/2" plumbed return pipe). This should eliminate any waterfall noise. I ordered the Durso directly from the inventor himself, Richard Durso. It is well-made with nice, clean cuts and carefully taped with Teflon. For $40 shipped, I think it's well worth it. I ordered mine a little longer than I needed so that I can cut it down if I need to do so (which I'll probably do since it sticks out above the tank, but I'll try it as is first). While reading about the Durso design, I learned one fatal flaw about Eddie's design of the Durso. In addition to Eddie's Durso being too short, it needs to be wider. Richard Durso writes about this on his site. The standpipe should be 1.25" wide and then fitted with a coupling that allows it to fit into the 1" bulkhead. Richard Durso has written that he's heard of lots of gurgling/sound issues when the standpipe is only 1" into a 1" bulkhead. Durso also uses thinner Sched 26 PVC which makes it easier to fit into the overflow.

Here are some photos of the full-size Durso and my custom return pipe (which only cost me $1.50 in PVC parts from HD). My guess is that if anyone is willing to give up one of their loc-line return holes, the full Durso would fit and eliminate any waterfall noise.

IMG_4910.jpg

IMG_4911.jpg

IMG_4912.jpg

IMG_4913.jpg

IMG_4915.jpg
 
Just a little update on the progress of my 39G Pro. Been fighting a cold so I did not get much done this weekend. However, I did get some of the plumbing done. With Eddie's new design, I was able to fit a full-size Durso standpipe in the overflow (in addition to a 1/2" plumbed return pipe). This should eliminate any waterfall noise. I ordered the Durso directly from the inventor himself, Richard Durso. It is well-made with nice, clean cuts and carefully taped with Teflon. For $40 shipped, I think it's well worth it. I ordered mine a little longer than I needed so that I can cut it down if I need to do so (which I'll probably do since it sticks out above the tank, but I'll try it as is first). While reading about the Durso design, I learned one fatal flaw about Eddie's design of the Durso. In addition to Eddie's Durso being too short, it needs to be wider. Richard Durso writes about this on his site. The standpipe should be 1.25" wide and then fitted with a coupling that allows it to fit into the 1" bulkhead. Richard Durso has written that he's heard of lots of gurgling/sound issues when the standpipe is only 1" into a 1" bulkhead. Durso also uses thinner Sched 26 PVC which makes it easier to fit into the overflow.

Here are some photos of the full-size Durso and my custom return pipe (which only cost me $1.50 in PVC parts from HD). My guess is that if anyone is willing to give up one of their loc-line return holes, the full Durso would fit and eliminate any waterfall noise.

View attachment 108589

View attachment 108590

View attachment 108591

View attachment 108592

View attachment 108593

Purdy!

There isn't a problem with Eddies design. Granted, they could have gone a bit larger with the standpipe but IMO the primary issue with gurgling noise is the inconsistency of tube length with the kits and the gph. His original tests were with a lower gph pump than many are using and that combined with the shorter pipes create more of a vacuum in the drain, resulting in gurgling. The way most of us are solving this is to use RO or Airline tubing down the vent to breach the water entering and relieve the vacuum pressure in the void space at the top of the durso.

My only sounds are a very slight waterfall sound from the wier in the overflow and my fan in the fixture which is barely audible.

While my original plumbing works great for me, I do like the one you purchased better (nice choice!). You should have no gurgling problems and can run the higher gph pumps without issue.

Keep the pics coming!!

Tivo
 
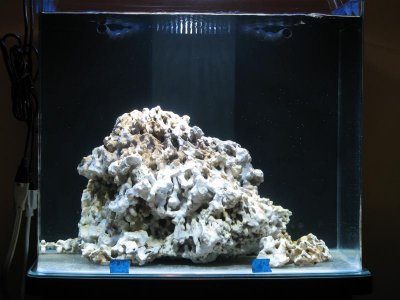
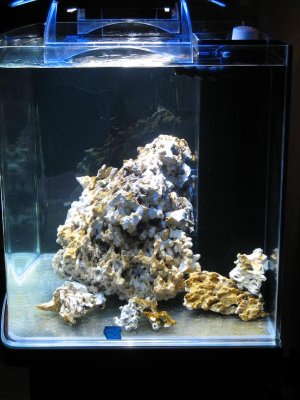
I figured it's time to finally post a photo to show I do actually have a tank! It's the old style system. Still working on the final set up, but it does have water, pump, light, heater and live rock. No skimmer yet - mine never worked properly. Will be using two Koralia Evo 750 PHs. With info from this thread, and help from thread posters, I've managed to get my first reef ready tank running! Thanks.

I did resolve my microbubble problem via the filter sock, and smaller flow pump (Tunze 1073.020). Actually, the replacement pump also resolved the waterflow noise in overflow without having to resort to a sponge, CD case, plastic bag or other method.

I have one large LR in tank, which I tried to break up a bit - it tended to just break into small pieces, so I stopped after a little shaping. Carved out enough to fit around overflow box. Will give it a go "as-is" and add a couple more smaller pieces. LR is uncured and in tank almost a month, so diatoms have just started.

Wasn't planning on one large rock, but that's what I bought. It has lots of holes and openings to place frags. Later, I can cut off pieces with fragging tool, if I need to shape more. Any suggestions or opinions using one large rock over several stacked smaller rocks?

During cycle, how long should I run lights (I'm running about 5-6hrs/day)? Also, when should I add sand - before(too late)/during/after diatom bloom/cycle?
 

Attachments

  • 4835_FTS.jpg
    4835_FTS.jpg
    56.3 KB · Views: 12
  • 4838_TankSide.jpg
    4838_TankSide.jpg
    68.7 KB · Views: 15
Nothing wrong with that piece! Looks very nice!

Some of the fish choices may be limiting because there wont be many places to hide if they feel threatened but if you mostly plan to keep corals then a few small reef friendly fish would do very well in there.

I run my lighting at 8 hours and always start off with a live sand base (caribsea aragalive or ocean direct) right off the bat. You could put in sand now and it will help speed up the cycle right away.

Rock looks great and lots of places for frags!

Great job!

BTW, mailing BM friday

Tivo
 
a few pic updates:

growth update on my orange digitata:

then, on 1/20
4292282952_662819c7e4_b.jpg


now, on 4/13
DSC_0005-2.jpg


crappy pic of my frogspawn, but i finally captured the colors correctly under the halides:
DSC_0060.jpg


now, my new lid! it fits perfectly inside the rim of the tank. i made the curve by tracing the front of my tank on a 2x4 board, then nailing nails along the line about every 2", and then manually (CAREFULLY! this stuff will kink very easily) bending standard window screen framing around the curve. i then nailed a nail on the opposite side of the curve to hold it in place for a few minutes, and voila! perfect curve! i did have to add/subtract a little from the curve with some manual bending/straightening after the fact to get it to fit properly (the front of the tank isn't a perfect curve, and my nails weren't perfect on the line, so...). anyway, here it is! doesn't take away too much from the rimless look, and definitely isn't getting close to hot enough to melt. it also serves the dual purpose of keeping jumpy fish out of the overflow!

DSC_0002-7.jpg


and, although i don't have clips to hold it up like a shelf, i had the idea to suspend it from above using little plastic tabs. this is not the actual way it works right now (still haven't gone to get a tab), but this picture shows the basic concept:
DSC_0001-7.jpg
 
also, got a few new pieces from Atlantis Aquarium (dot net) -- very displeased with the whole process, but we'll see how these corals end up.

1. ATL Intense Lime in the Sky Acropora Pulchra: DOA.
DSC_0058.jpg


2. ATL Ocean Blue Papillare: note the tissue recession it arrived with
DSC_0064.jpg


3. ATL Pink Flamingo Selago: i like this one a lot, but it looks very little like the picture on their website (frankly, none of them look anything like the pictures on their website from what i've seen)
DSC_0021-1.jpg

DSC_0006-4.jpg


4. ATL Intense Blueberry Tip Prostrata: shown in actual "intense" color.
DSC_0013-5.jpg


5. Tyree Idaho Grape Montipora (Undata?): complete with eroded/trashy look and black spots! the owner at least told me he'd refund my money if it doesn't recover.....
DSC_0008-3.jpg


It's certainly possible that these will color back up, but still. i feel like i got very little for my money, even if i manage to turn these into something worthwhile.
 
I'd recommend buying a 250ml bottle of pohls xtra and dose .25ml every other day and watch those suckers color up with better polyp extension.

they don't look bad. just lonely!

Love the orange monti. I have one as well and the base and branches are growing like mad. It looks like you branches are slightly thin so you may want to divert more flow towards it. That will thicken the growth.

Still looks great though!

Tivo
Sorry timdanger,

Disregard my pohls xtra suggestion because now that I think of it it has aminos in it and most likely will not be algae friendly. You could run biopellets in a reactor for a few weeks until nutrients are down and then try the xtra.

The xtra supplement is awsome but should be used in a low nutrient environment.

Tivo
 
I've made some progress. The stand is together and I've been aquascaping. A few pics:

I love PVC and pond foam!
IMG_0567.jpg


Getting ready for epoxy and sand.
IMG_0571.jpg


This takes a while.
IMG_0575.jpg


Not quite done but I think it will be worth the effort.
IMG_0581.jpg

IMG_0582.jpg


The lights are next...
LEDPrototype.jpg
 
nice job! looks great!

How are you moving the water in the spaces between the diffuser and the tank walls?

Hidden PVC w/ power head?

I was going to go that route because it looks so nice but was lazy and affraid of detritus build up behind the panels.

Looks like you've solved that problem.

Also, How about silicates with the foam? I've read that many of the reactive resins have a silicate component along with the inert resin and MDI (isocyanate).

I really love that look buddy and I'm jealous!!

It's going to be sick!

tivo
 
Nothing wrong with that piece! Looks very nice!

Some of the fish choices may be limiting because there wont be many places to hide if they feel threatened but if you mostly plan to keep corals then a few small reef friendly fish would do very well in there.

I run my lighting at 8 hours and always start off with a live sand base (caribsea aragalive or ocean direct) right off the bat. You could put in sand now and it will help speed up the cycle right away.

Rock looks great and lots of places for frags!

Great job!

BTW, mailing BM friday

Tivo

Thanks. I have mixed feelings - nice not having to stack rock, but it's a big rock. Wife likes the looks, so it'll probably stay.

Good point about the fish - never though of that. It's actually much more open than it looks, so a firefish probably could swim inside, but it doesn't have the hiding spots a stack of rock would. Will be adding sand this weekend with a bit of cycled LR and sand. Do you think this rock would tend to accumulate detrius more than other rock?

Thanks again for comments and BM - just PM the details. One day, I hope to have a tank that looks as nice as yours and others have posted!
 
How To Lose The Sock (and the Micro-Bubbles)

How To Lose The Sock (and the Micro-Bubbles)

I've been thinking about Marinetankdiver's efforts to eliminate the filter sock (and micro-bubbles) so I thought I'd give it a try - Turns out the solution was simple...

1) Remove the label, clean and cut the top 4" of off a 2-liter bottle.

2) Remove the filter sock and replace with the 2-liter bottle (if you have the standard Cadlights sump, it will be a tight fit.)

Viola! - No more micro-bubbles. The bottle prevents the return from injecting the bubbles directly into the first bubble trap. It even works in my high flow sump (1000+ GPH.)

Sock_Replacement.jpg

It's very difficult to see the bottle as it virtually disappears under water. The red arrow marks to top of the 2-liter bottle.

I've only had this in place for a couple of days - Here are my observations so far...

Pros
Micro-bubbles are GONE
No more weekly filter sock maintenance
Pods survive the trip with a chance to return to the DT to keep my Mandarin happy.
Skimmer efficiency should increase with raw water feed
Significant increase in PE
Happy filter feeders (My Porcelain crabs are loving it.)


Cons
Although the water is crystal clear (compliments of BRS ROX .08 GAC) there are a lot of micro-particles in suspension. I thought these would dissipate but as of yet, haven't. I suspect this is also explains the PE.

When I think about how much GUNK is in the filter socks after just a week, I'm concerned about on-going water quality. Hopefully the skimmer (helped by my DSB) will pick up the slack, but time (and water tests) will tell the story.
 
nice job! looks great!

How are you moving the water in the spaces between the diffuser and the tank walls?

Hidden PVC w/ power head?

I was going to go that route because it looks so nice but was lazy and affraid of detritus build up behind the panels.

Looks like you've solved that problem.

Also, How about silicates with the foam? I've read that many of the reactive resins have a silicate component along with the inert resin and MDI (isocyanate).

I really love that look buddy and I'm jealous!!

It's going to be sick!

tivo

I molded this in by shooting the foam in the tank. The 39G is so small, I just layed it on it's back, fit the frame in over waxed paper and shot. I have a bit of gap behind and below the Korilia. There's a 1 1/2" PVC cave opening right under the Korilia with two other openings lower down. I think there will be flow.

Silicates? well, life's a series of experiments. I'm not expecting problems, but we'll see. What's there to do without problems to fix?:beer:

We're doing some remodeling and I have some time to kill before I can put it in place. So, I'm playing here.
 
I've been thinking about Marinetankdiver's efforts to eliminate the filter sock (and micro-bubbles) so I thought I'd give it a try - Turns out the solution was simple...

1) Remove the label, clean and cut the top 4" of off a 2-liter bottle.

2) Remove the filter sock and replace with the 2-liter bottle (if you have the standard Cadlights sump, it will be a tight fit.)

Viola! - No more micro-bubbles. The bottle prevents the return from injecting the bubbles directly into the first bubble trap. It even works in my high flow sump (1000+ GPH.)

Sock_Replacement.jpg

Clever solution. I'm going to have to try this.
 
reduced skimmer maintenance

reduced skimmer maintenance

I'm planning a long trip in June so I need to make sure my tank can manage without maintenance for at least 7 days. Part of that is increasing the capacity of the skimmer cup so the tank doesn't have to run without the skimmer while I am gone. The solution was rather simple. I had an extra bottle from Bulk Reef Supply that fits perfectly in front of the sump so I drilled a hole in the top an ran the skimmer drain tube to it. The skimmate that has collected in this picture is from about 2.5 weeks of running without touching the skimmer.

picture.php


Here is a top down picture of the tube.

picture.php


Now I just need to plumb my RO/DI into the sump and get rid of my tiny top off tank of 1.5 gallons. You can see part of that on the left side of the first picture.

The skimmer overflowing and running out of fresh top off water are my main concerns. I know a lot more can go wrong but at least I won't come home to a wet smelly floor from a skimmer overflow or a SG of 2 and a burnt out return pump from evaporation.

And to put Tom's soda bottle idea in place and that will be another thing I don't have to worry about - changing the filter sock :)

I've also got my web cam set up so I can watch my fish while I am on my trip, or every other day while I am at work
 
Back
Top