- Forum
- More Forums
- Reef Club Forums
- SouthEast Region-Reef Club Forums
- Florida Marine Aquarium Society (FMAS) - Miami/Ft.
You are using an out of date browser. It may not display this or other websites correctly.
You should upgrade or use an alternative browser.
You should upgrade or use an alternative browser.
Deep Down Florida 300g In-wall Build
- Thread starter bmanzie
- Start date
TheFishMan65
New member
Light Lifts
Light Lifts
Can you give me a hint? I know you said you found the lifts from another member, I think I read the same thread. But know I can't find it.
Thanks
Light Lifts
Can you give me a hint? I know you said you found the lifts from another member, I think I read the same thread. But know I can't find it.
Thanks
bmanzie
New member
Can you give me a hint? I know you said you found the lifts from another member, I think I read the same thread. But know I can't find it.
Thanks
http://goldcoasthydro.com/shopsite_sc/store/html/LightMovers.html
Fifth one down.
TheFishMan65
New member
Thanks
jdantunes
New member
Beautiful build. Very clean and professional.
Hope everything runs good with your skimmer, read the different opinions. But like you said time will tell.
I think the next step after you finish the tank will be isolate your garage and run A/C. It will be to much in stake to just rely on a chiller. Just a thought...
Hope everything runs good with your skimmer, read the different opinions. But like you said time will tell.
I think the next step after you finish the tank will be isolate your garage and run A/C. It will be to much in stake to just rely on a chiller. Just a thought...
David - Miami
Aquanot!
Yes. Relying on one chiller may be pretty risky. Do you have a backup?
bmanzie
New member
Thank you everyone for your kind words. It was certainly a task that took all my time for a few weeks. Now I am tweaking the system with all of the little things. For one I am changing the Koralias for the new Vortecs. the Koralias gave me no control over the flow.
Also I am going to complete my auto top off this weekend. These are just a few things that I am working on this weekend. I will post pictures as I make changes.
Also I am going to complete my auto top off this weekend. These are just a few things that I am working on this weekend. I will post pictures as I make changes.
bmanzie
New member
It has been a while since I last posted. Here are a few updates that I made to my tank.
I wasn't happy with the amount of flow passing through my glass-holes overflow so with the craftsmanship of MRX66699 I changed that into a coast to coast overflow. I also changed my 4 Koralia 8's for 4 Vortech EcoSmart 40W (see picture 1).
Since I already had two drilled holes and didn't (couldn't) drill more, I had to come up with a solution that could use the two existing holes and still utilize a BeanAnimal overflow design. Again with the help of MRX66699, we constructed an acrylic box for the back that now holds the BeanAnimal (pictures 2 & 3).
For some reason, my Phosphates were really high so I decided to get a phosban reactor 550 to help me out. At the same time I said what the hell and got another one to hold carbon (picture 4).
And of course, because we are in Florida and the majority of my tank is in the garage I ended up getting a 1/2 hp chiller (picture 5).
The last picture is how the setup from the back currently looks, at least for now....
Picture 1

Picture 2

Picture 3

Picture 4

Picture 5

I wasn't happy with the amount of flow passing through my glass-holes overflow so with the craftsmanship of MRX66699 I changed that into a coast to coast overflow. I also changed my 4 Koralia 8's for 4 Vortech EcoSmart 40W (see picture 1).
Since I already had two drilled holes and didn't (couldn't) drill more, I had to come up with a solution that could use the two existing holes and still utilize a BeanAnimal overflow design. Again with the help of MRX66699, we constructed an acrylic box for the back that now holds the BeanAnimal (pictures 2 & 3).
For some reason, my Phosphates were really high so I decided to get a phosban reactor 550 to help me out. At the same time I said what the hell and got another one to hold carbon (picture 4).
And of course, because we are in Florida and the majority of my tank is in the garage I ended up getting a 1/2 hp chiller (picture 5).
The last picture is how the setup from the back currently looks, at least for now....
Picture 1
Picture 2
Picture 3
Picture 4
Picture 5
David - Miami
Aquanot!
Looking great! I think that is one organized setup!
bmanzie
New member
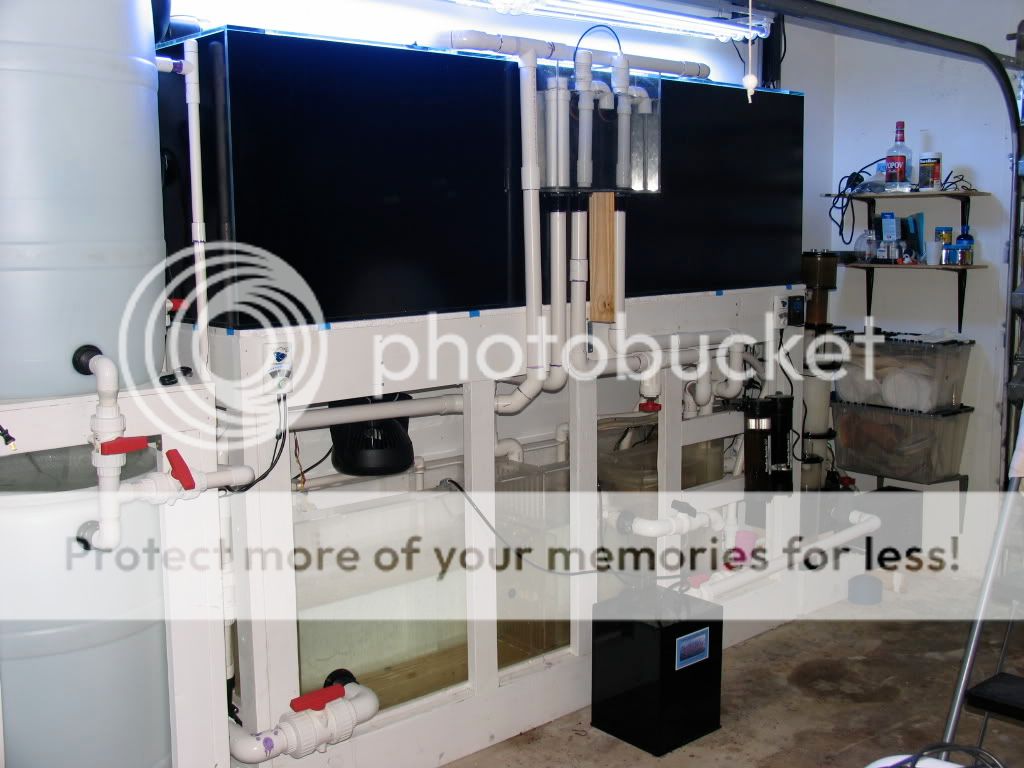
Well it has been a while since I posted anything so I thought I would through a couple of pictures up.
I have since changed out my skimmer for a different design. I did this for two reasons. The big Beckett skimmer I had before was very tall and I need to move the skimmer up so I can position the chiller underneath. This would have made managing the skimmer tough. Also, I think to get the full potential out of that skimmer I would have needed the second Beckett. I didn't want to spend more money on it.
So I replaced it with a Reeflo Orca Pro. This thing is great and better on electricity.
In the picture you could also see I have place the chiller underneath the skimmer as I wanted. I did this so i could create the exhaust chamber which leads into the attic and out the front.

This picture shows the plumbing I did for the UV sterilizer. Nothing special...

And this is how the tank looks now from the front. Nothing special just some more fish.

I have since changed out my skimmer for a different design. I did this for two reasons. The big Beckett skimmer I had before was very tall and I need to move the skimmer up so I can position the chiller underneath. This would have made managing the skimmer tough. Also, I think to get the full potential out of that skimmer I would have needed the second Beckett. I didn't want to spend more money on it.
So I replaced it with a Reeflo Orca Pro. This thing is great and better on electricity.
In the picture you could also see I have place the chiller underneath the skimmer as I wanted. I did this so i could create the exhaust chamber which leads into the attic and out the front.
This picture shows the plumbing I did for the UV sterilizer. Nothing special...
And this is how the tank looks now from the front. Nothing special just some more fish.


stangd1909
GO NOLES!
How much LR do you have, you set up look reall good!
bmanzie
New member
Honestly I don't know anymore. To give you and idea the tank is 8 feet long and 30 inches high.
How much LR do you have, you set up look reall good!
How much LR do you have, you set up look reall good!
his tank is the same size as your will be stanged1909
Similar threads
- Replies
- 12
- Views
- 2K
- Replies
- 21
- Views
- 567