DIY- "Pins" method of gluing acrylic.

A Mag 12 pushing up 4' high using 1.5" plumbing will produce roughly 1000gph, I would expect.

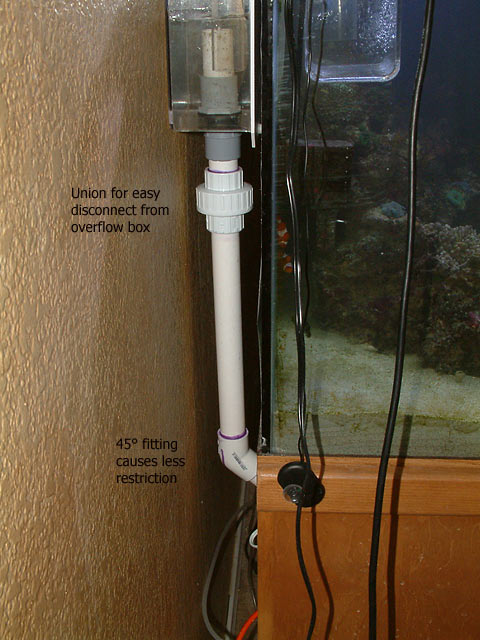
The overflow box will have to be drilled to accommodate the bulkhead(s). Once the holes are drilled and the edges smoothed carefully, you screw the bulkhead (flange and O-ring inside, nut on the outside) hand tight. Then connect your plumbing to that, such as this way:

pvc_union.jpg
 
awsome..... melev are you still useing the acupuncture needls for the pin method? I was thinking of ordering some 38 gauge 15mm/0.5inch 18mm & 36 gauge 15mm/0.5inch 20mm will these work ok? Oh and I bout that book slow mail :(

Thanx again
Allen
 
Last edited:
Yes, I still use them. I think they are .35 and about 2" long, maybe slightly less.

Slow mail? You just ordered it yesterday, on a Saturday. By next Friday you'll be so busy reading you won't post. ;)
 
Hi Zeph,
You have a very nice cut from the table saw.
What kind of blade you use on the table saw? How fast you feed it thru the blade?
Shin.
 
Hmm, I see. Well maybe I should ask a more general question. I'm working with 1/2" cast material and getting joints that are completely clear about 80% of the way across the joint. For some reason though, at either edge the joints are developing a small line of bubbles as they cure for the first hour or so. And, I just can't figure out what the cause is. My pins are 0.011 inches (28 gauge steel wire), the joints are square (the line of bubbles occurs on both edges, not just one), I'm using Weld-On #4 and letting the joints soak for about 30-35 seconds. Also, the bubbles occur along the entire length of the joint, not in isolated areas, so it isn't a shimming issue either. Help from anyone would be much appreciated. I'd take a picture for you, but my fiance stole my camera.
 
I think as it cures, it is drawing in air. Some have chosen after gluing to wait a short duration after the pins have been pulled to apply another run of Weld-On along the seam.

It happens to me as well when working with thicker material. One day I want to visit James and soak up everything I can to do better work.
 
That's what I think it is too. I tried applying a second bead outside the joint, but it didn't really seem to help that much. I applied it right as I noticed most of the excess solvent evaporating away from the fillet on the outside of the joint. Does that sound like a good time to do it? Maybe my ambient conditions aren't right and the solvent's evaporating too quickly? Maybe James will have a suggestion. So far, I'm just gluing up the sump and some practice pieces, so not too worried about appearances, but I really would like the joints on the display to look better, and I'm going to start gluing it up very soon.
 
<a href=showthread.php?s=&postid=9843871#post9843871 target=_blank>Originally posted</a> by woz9683
Hmm, I see. Well maybe I should ask a more general question. I'm working with 1/2" cast material and getting joints that are completely clear about 80% of the way across the joint. For some reason though, at either edge the joints are developing a small line of bubbles as they cure for the first hour or so. And, I just can't figure out what the cause is.
There are a number of variables.
What brand of acrylic is it? Also understand there can be variations from batch to batch from the same company.

Is the router/jointer blade *absolutely* straight? Test the acrylic edge by placing a straightedge on it to see if it wobbles.

Is the (horizontal) material warped? Same thing, put a straightedge on it to see if it wobbles.

Sometimes the solvent is just evaporating too fast (this is why I like mixing my own)

Even with all that, there are still mysteries for me too. I've never met anyone nor ever heard of anyone who can get perfect joints all the time with every material, just doesn't happen and I'm no exception by any means. Extruded acrylic is fairly simple since it muches out very easy, might get an ooze bubble but the joint will be clear. Cast can have fairly extreme variations in mole wt which helps determine the solvent used, or even if it will glue well at all. Some cell cast acrylics simply don't want to glue well.

Pray to the plastic Gods, spend a little time alone with the material, drink a beer, toast the plastic, talk to the plastic, pet it a little, and explain the situation. Trust me on this, it's my routine everytime we do a $10k glue joint. If you think I'm a bit superstitious, you'd be right :)

HTH,
James
 
Hey James,

Acrylite GP

I'll check the bits (or their corresponding cuts), but brand new whiteside straight cutters and flush cutters.

Materials good and flat. Using foam and shims where necessary, but I'm using my router table to glue on and it's dead level. I just checked it last night before I started gluing and shimmed it a touch to get it perfect (it was sagging about 0.02" across 4').

Any tips on slowing down the solvent's evaporation? It's Weld-On 4. Something as simple as raising or lowing the ambient temp maybe?

Maybe lengthen the soak time a bit before "dropping" the top piece? Could get more dissolved acrylic mixed in with the solvent making it evaporate slower if I wait a little longer?
 
The best way I know of is to mix other solvents in with it, acetic acid, ethylene dichloride, trichloroethylene, etc. If you let it soak too long, the solvent starts to set prior to dropping it which doesn't wrok too well. If you let it soak too long and the solvent starts to set (with the acrylic still raised), the on.y way to get it to squeeze out is by used of clamps which runs the risk of squeezing out too much. There is also a debate as to whether there can be too much acrylic in solution for long term strength. Ie, if you let it soak too long, is this actually good or bad?
Raising and lowering ambient temp *can* work sometimes but not necessarily, cold acrylic does not glue well strengthwise as the joints end up kinda brittle. WO4 and all the IPS line has some pretty wide tolerances so knowing exactly what you have can be tough as the ratios can be all over the place and still be within tolerance.

Wishing I had more answers,
James
 
When you are building a sump in what order do you glue the sides (Front , right side, ect.) I am trying to figure out in what order should I weld each side together.
Thanks in advance
 
Generally, I do the front and ends first along with any baffles, flip it over and glue to the back, then glue this assembly to the top, then do the bottom.

James
 
<a href=showthread.php?s=&postid=9854631#post9854631 target=_blank>Originally posted</a> by Acrylics
Generally, I do the front and ends first along with any baffles, flip it over and glue to the back, then glue this assembly to the top, then do the bottom.

James

Ditto. :)
 
<a href=showthread.php?s=&postid=9854631#post9854631 target=_blank>Originally posted</a> by Acrylics
Generally, I do the front and ends first along with any baffles, flip it over and glue to the back, then glue this assembly to the top, then do the bottom.

James

Same here.
 
Hey Marc!
This is one of the only two active subscriptions I have going right now. The other if the Acrylic Fabrication Questions thread. You, James and the rest of the contributions are a real treasure of information.
 
Last edited by a moderator:
Back
Top