Diy stand

javi78503

New member
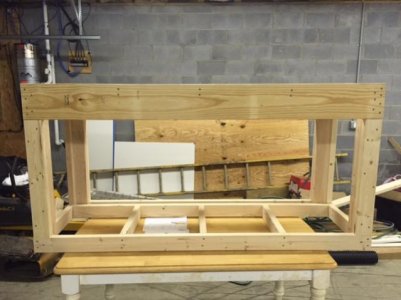
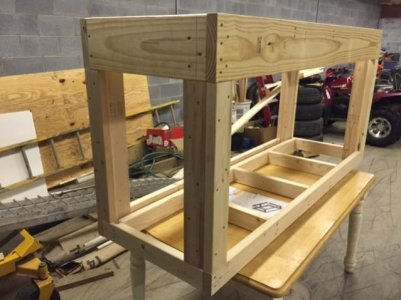
My second diy project: end of day 1

I managed to assemble the frame. It took way longer than I intended since the power drill I used is cordless and didnt have the umph to drive the 2.5 inch screws through the wood. I ended up predrilling the holes then driving the screws in by hand so I didnt get as far as I wanted to today. But this is where im at...
387dbbe1a513062f6f28f94b82fd3221.jpg


I hope to add more tomorrow, hopefully it will turn out ok. Im following diy kings guide and adjusting it to my tank which is a 99 gallon 36.5 x 25.5 x 24.5. I plan on finishing it up with some nice stained plywood. Possibly mahogany or cherry... and adding some nice molding to make it pop. Its 36 inches tall so with the tank it will be roughly 5 feet tall.

Supplies ive purchased so far total up to about 30 dollars, and they are:
1. eight 2x4x96 pieces of lumber
2. two boxes of number 8 2.5 inch screws
3. One 9/64ths drill bit to predrill for the
#10 screws.
 
There is one problem with your stand so far: There is nothing supporting the tank except the screws......A stand like that should have boards directly under the top box going straight down to the bottom box in order for there to be a proper load path.

Question, Is that pressure treated lumber?
 
There will be 2 snug fitting 2x4s around each corner between the top and bottom ledge to support the tank and take the pressure off of the screws and onto the legs themselves. According to the diy king after im finished each "leg" should be rated to support 800 pounds. But like the first post says its just day 1 :)
 
Yeah, I don't like that guy. To me he is just another self promoter who has only a basic understanding of what he is doing and provides advice that doesn't always follow the best practices available.

BTW, a single clear 2X4 can take a hell of a lot more than 800 pounds in straight compression. I wonder if he ran the numbers or just guessed. I've run the numbers.

Thread I started 8 years ago: DIY Stand Template

Still Active Thread.
 
In looking at the diagram on the thread you posted. The stand im building based on the design I mentioned is identical to your design. With that said im glad im on the right path :) makes me feel much better about the diy aspect since I'm not much of a hands on type of guy.
 
I built a stand today too. Look familiar RocketEngineer?(if you look closely at the second picture, your drawing is laying on the table) Look over the junk in the background :uhoh2:
 

Attachments

  • Mark's Stand.jpg
    Mark's Stand.jpg
    40.1 KB · Views: 7
  • Mark's Stand1.jpg
    Mark's Stand1.jpg
    45 KB · Views: 6
Nice, thats exactly what im building (or trying to) though, I have to say, its a lot harder than I imagined since my drill cant drive the screws in. Damned weak tools [emoji14]. Though, I did manage to build up a nice blister in my palm with the screwdriver...

Your stand looks great though! Hope mine turns out just as nice.
 
Nice, thats exactly what im building (or trying to) though, I have to say, its a lot harder than I imagined since my drill cant drive the screws in. Damned weak tools [emoji14]. Though, I did manage to build up a nice blister in my palm with the screwdriver...

I see your Ryobi drill in the background...oddly enough I have the same drill however I have the quick charger which makes it nice. Looking good!
 
I was tempted to go buy one of my own since that one belongs to my eh... significant other... im leaving one of the batteries charging overnight, hopefully it'll work better tomorrow with more juice
 
In looking at the diagram on the thread you posted. The stand im building based on the design I mentioned is identical to your design. With that said im glad im on the right path :) makes me feel much better about the diy aspect since I'm not much of a hands on type of guy.

I'm all for DIY. I just want folks to do it right and be successful. Too many folks just cut corners to try and save money only to spend more in the long run.

Check out my build threads. I have a 125g that is mostly DIY and a 40B I just started at work that has a bunch more.

As a side, I wonder if he used your template as a guide...

Wouldn't be surprised. I've found my diagram in several different locations. I've given up trying to limit its use anymore.

I built a stand today too. Look familiar RocketEngineer?(if you look closely at the second picture, your drawing is laying on the table) Look over the junk in the background :uhoh2:

I see directions :dance:. "The difference between knowledge and experience: Knowledge is what you get when you read the directions, Experience is what you get when you don't."
 
BTW, if you already have a drill, consider getting an "impact driver". I have both and use the drill for pilot holes and the driver for screws. Just be careful you don't strip the screws or overdrive them. It takes practice.
 
Now that I have the opportunity to ask. Whats the best type of foam or mat to place on top of the top sheet of plywood in case its not perfectly level? I read or saw somewhere there was stuff people used for that in case it wasnt 100% level.. and just as a note I wouldn't even know how to check if it was level. That statement is sad I know.. dont judge me haha
 
If you do other DIY projects, look into the impact driver. Its a must have. I use my dewalt all the time. For screws I use GRK brand with torx head. These screws with an impact driver are very easy to work with.
 
I have a Ryobi drill and thinking of getting an impact driver. The Ryobi I have is the newer model and can drive the screws but takes FOREVER to charge.
 
Now that I have the opportunity to ask. Whats the best type of foam or mat to place on top of the top sheet of plywood in case its not perfectly level? I read or saw somewhere there was stuff people used for that in case it wasnt 100% level.. and just as a note I wouldn't even know how to check if it was level. That statement is sad I know.. dont judge me haha

Don't use foam to correct that kind of problem. Use a sander and patience and get the board perfectly FLAT before adding the plywood. You don't need the top to be level with the floor because you don't know if the floor you build the stand on will match the floor you put the tank on. Instead, you want the top of the stand to be one plane, perfectly flat.

You would do well to get a 4 foot level. It will give you a straight edge to use when checking the top.

BTW, if the tank has plastic trim, using foam can cause it to leak down the road. Unless you have a custom built tank, foam is more problem than solution.
 
It is a rimless aquarium so i believe it will be a completely flat bottom. I'll work on getting the top of the boards perfectly flat today before I add any plywood. I don't have a sander so I'll probably go buy a cheap one today, Any suggestions as to which kind (orbital, sheet, etc...) and what grit of sand paper I should use? I seem totally useless with this stuff, it's cause I mostly am. :P

A thought: As a society why don't we just have a shop i can take my stand to that can burn the top of the boards level with a laser and charge me like 20 bucks... Someone should get on that right away, my life would be so much easier that way! lol
 
Back
Top