You are using an out of date browser. It may not display this or other websites correctly.
You should upgrade or use an alternative browser.
You should upgrade or use an alternative browser.
Gofor's 60"L X 30"W X 24"T LeeMar Upgrade
- Thread starter gofor100
- Start date
gofor100
New member
I've drilled the rocks and held them together with acrylic rod and hydraulic cement. Those seem to hold together better than using the putty. What sort of cement does Marco Rocks include with his stuff?
Nick
Attached is a picture of the stuff I got for free at RAP. The instructions say to mix with a solution included, attach the rocks, then let it set overnight, so I'll test it out this weekend and let you know how it goes.
If I end up drilling, what drill bit do you suggest? I don't have a powerful drill, but I might have to make a trip to Home Depot if the cement doesn't work.
Thanks,
Chad
maxxII
Super Housemonkey!
Any drill should suffice. A battery powered drill (like mine) will only go so long before needing a recharge, therefore the more powerfull cordless drills will go longer before needing a recharge.
I just use masonry drill bits. Marco rocks is pretty light and porous, so should be easy drilling. I have light porous stuff from Vanuatu and some older more dense stuff from God knows where. The dense stuff tends to heat up and fracture, so I dont drill it any more. The lighter more porous stuff drills ridiculously easy.
Best bet is to source your acylic rod first. That's going to determine the size bit you need.
I've been able to locate both 3/8ths inch acrylic rods and 1/2 inch acrylic rods locally. The 1/2 inch hold up better, but if you use more of the 3/8ths you'll do just fine. I've got one rock that is actually 5 smaller rocks held together acrylic rods. Its now going on 7.5 years old, no issues. It used to be 6 pieces of rock, but two of the rods broke about 1.5 years ago. The rods is clear and pretty much disappears underwater.
Like I said, source your rod first, determine the diameter, and then buy your drill bits. Most drills common homeowner drills have a 3/8ths inch chuck, meaning they can only handle bits up to 3/8ths inch. However, professional series drills can have a 1/2 inch chuck, so possible rental is one way to go. Also, bits are made up to 1/2 inch in diameter at the bit with a 3/8ths inch base to fit into smaller drills, however, these can be tougher to find, so look around. You're going to want both 12 and 18 inch long bits.
I would start off test drilling on some smaller pieces you wont be using for practice.
Also, you can use a mitre saw to cut the rock as well, if its porous and light. Heavier, more dense rock is going to need a tile saw.
Fun times ahead...
gofor100
New member
Any drill should suffice. A battery powered drill (like mine) will only go so long before needing a recharge, therefore the more powerfull cordless drills will go longer before needing a recharge.
I just use masonry drill bits. Marco rocks is pretty light and porous, so should be easy drilling. I have light porous stuff from Vanuatu and some older more dense stuff from God knows where. The dense stuff tends to heat up and fracture, so I dont drill it any more. The lighter more porous stuff drills ridiculously easy.
Best bet is to source your acylic rod first. That's going to determine the size bit you need.
I've been able to locate both 3/8ths inch acrylic rods and 1/2 inch acrylic rods locally. The 1/2 inch hold up better, but if you use more of the 3/8ths you'll do just fine. I've got one rock that is actually 5 smaller rocks held together acrylic rods. Its now going on 7.5 years old, no issues. It used to be 6 pieces of rock, but two of the rods broke about 1.5 years ago. The rods is clear and pretty much disappears underwater.
Like I said, source your rod first, determine the diameter, and then buy your drill bits. Most drills common homeowner drills have a 3/8ths inch chuck, meaning they can only handle bits up to 3/8ths inch. However, professional series drills can have a 1/2 inch chuck, so possible rental is one way to go. Also, bits are made up to 1/2 inch in diameter at the bit with a 3/8ths inch base to fit into smaller drills, however, these can be tougher to find, so look around. You're going to want both 12 and 18 inch long bits.
I would start off test drilling on some smaller pieces you wont be using for practice.
Also, you can use a mitre saw to cut the rock as well, if its porous and light. Heavier, more dense rock is going to need a tile saw.
Fun times ahead...
Awesome... thanks for the info. I'll see what the mortar does for me since I only have a few smaller rocks that I want to attach, but I'll definitely look into drilling if the weekend's mission is a failure
")
Thanks again,
Chad
gofor100
New member
Another quick update... I just ordered one of John's (from Advanced Acrylics) Black Acrylic ATO containers (see attachment for representative picture). I missed out on the group buy that was going on in another forum, but really liked the look of them and ended up going with a 25 gallon version. It'll be 10"X24"X24", so it can either be placed in my stand or, since it looks so nice, it can be moved outside of the stand if I need room for more equipment.
This should allow me to go at least a week in the hottest/highest evaporation without refilling the container.
I'll FINALLY be done with the ugly rubbermaid containers!!!")
-Chad
This should allow me to go at least a week in the hottest/highest evaporation without refilling the container.
I'll FINALLY be done with the ugly rubbermaid containers!!!
-Chad
mc-cro
(macro)
that is a very nice looking ATO container.
being that you live in california, you dont have to worry about the winters.
I actually lose almost 2 times the water during the winter than during the summer.
In the winter, the air is much drier, and it sucks the water right out of the tank. I am losing about 3g every day on my tank right now, and the humidity in the basement is a 39%.
During the summer, I struggle to keep my humidity in the basement under about 50%, and I only lose about a gallon or so a day.
gofor100
New member
that is a very nice looking ATO container.
being that you live in california, you dont have to worry about the winters.
I actually lose almost 2 times the water during the winter than during the summer.
In the winter, the air is much drier, and it sucks the water right out of the tank. I am losing about 3g every day on my tank right now, and the humidity in the basement is a 39%.
During the summer, I struggle to keep my humidity in the basement under about 50%, and I only lose about a gallon or so a day.
Yeah... we don't have to run the heater too often here in SoCal, thus the air in the house is not as "dry", which definitely makes the winters much less of a burden for topping off. When the summers hit, we have a pretty dry heat, so heat plus low humidity means I need to get a big ATO

Thanks,
Chad
gofor100
New member
Thats a great looking ATO container! Think I will have to add that to my list.
Does Advanced Acrylics have a website? I cant seem to find much about them.
I don't think he does. He's a local guy (SoCal) that is pretty well known around these parts for good lookin' stuff. He built my sump and I should have the ATO in a couple of days (probably after the weekend).
I'll post more pics when I get it, then maybe you can use those to get a guy in your area to make one.
Thanks,
Chad
gofor100
New member
Where in CA is he located? I have family im Corona that could pick it up for me.
He's actually just outside of corona I believe. So that would definitely work out!
Thanks,
Chad
gofor100
New member
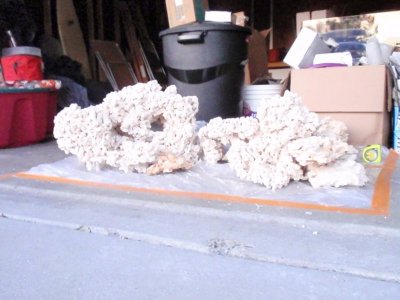
Alright... so I was able to play around with my rock a bit over the weekend, and I think I might have figured out roughly what I will settle on. Shooting for two main islands, with a little channel going down the middle, along with some overhangs and swim-throughs.
Let me know what you think!
Thanks,
Chad
Let me know what you think!
Thanks,
Chad
Attachments
gofor100
New member
Looking good! Just make sure there is enough space between the rock and glass so that you have room to clean it. Now you just need a tank to place it in.
Great point... luckily the outside of the orange tape are the dimensions of my tank, so as it currently stands, I should have a pretty good amount of room all the way around. Also, some of the pictures definitely look like there is less room on the sides then there actually is, I just can't wait to get the tank so I can put this rock to good use and post some NICE pics...
Thanks,
Chad
gofor100
New member
Some more frustrating news... even though this weekend was supposed to be the "earliest" the tank would be ready for delivery, it looks like it won't come until NEXT weekend (and I'm not even confident in that anymore).
Frustrated... now it will be a full month that I've waited BEYOND the original shipment date... awesome.
Warning: If you don't want to read me vent, then skip everything below...
Looks like AGE or any other tank manufacturer other than LeeMar will be getting my business on my next upgrade. I'm not questioning their quality by any means, but their lack of attention to detail (whoops, we didn't see that 3-inch long scratch on the front viewing panel before it left our shop) and their inability to make any effort to make me feel like a valued customer (sorry, we only make trips on Friday, and since Thanksgiving is this week, we won't make a trip this week and will be able to pick it up NEXT Friday then we won't even be finished for another 2 weeks on top of that) will definitely lead me in another direction.
All of this inconvenience without even offering a discount or at least expedited service (since this was no question THEIR mistake)... disappointed to say the least...
-Chad
kalgra
New member
That really sucks sorry to hear. I would recommend miracles in glass any day of the week for customer service. I had a tank made with very similar dimensions they delivered ahead of schedule and had excellent customer service. I would say however that AGEs precision and build quality is a little better from what I have seen but when I did the research on mine I was getting time estimates of 6-9 months for AGE. Miracles did it in 7 weeks delivered and the build quality was still more than satisfactory.
gofor100
New member
That really sucks sorry to hear. I would recommend miracles in glass any day of the week for customer service. I had a tank made with very similar dimensions they delivered ahead of schedule and had excellent customer service. I would say however that AGEs precision and build quality is a little better from what I have seen but when I did the research on mine I was getting time estimates of 6-9 months for AGE. Miracles did it in 7 weeks delivered and the build quality was still more than satisfactory.
Thanks for the heads-up... I thought I did my homework on this builder, but sometimes you just never know I guess. Hopefully my next post will be of an awesome tank sitting in my living room instead of me venting
-Chad
maxxII
Super Housemonkey!
One of the guys in our club has two large Miracles tanks...an 8 foot 300 gallon and 5 foot square by 30 inch 450 gallon semi-cube. He said the wait was longer than he was initially quoted as well.
If you read back on custom glass tank builds, one thing I see almost always is consistant.....a longer time to get the tank than was originally quoted. There are some real nightmare stories as well about designs not being what was originally spec'd out etc.
Bottom line is this...custom means one of a kind, which generally means longer than expected.
Sorry to hear about your delay.
Nick
mc-cro
(macro)
that does suck about the delay, and I would probably have the discussion about some sort of discount due to the scratch and the delay.
Although, I would not get too worked up about it, keep the big picture in sight, you are going to have this dream tank for years and years, so what is another couple of weeks of waiting besides some minor inconviences?
If you havent already, take this time to get that dry rock into some tubs and start curing it. Might as well get a head start on that.
Similar threads
- Replies
- 9
- Views
- 293
- Replies
- 38
- Views
- 3K