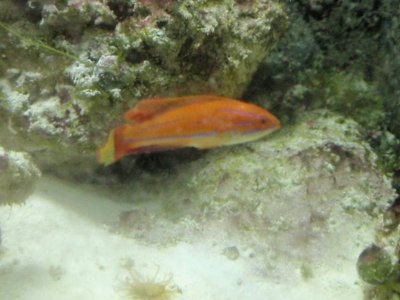
Gofor's Birthday Upgrade

Alright... here's an update I was hoping not to give...

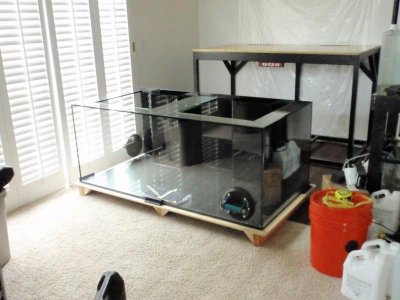
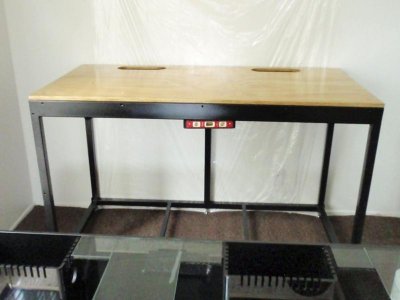
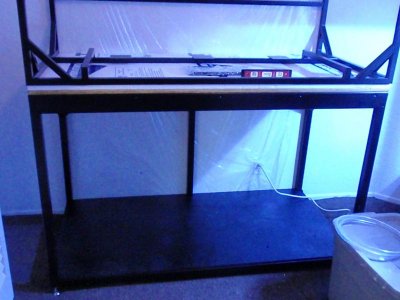
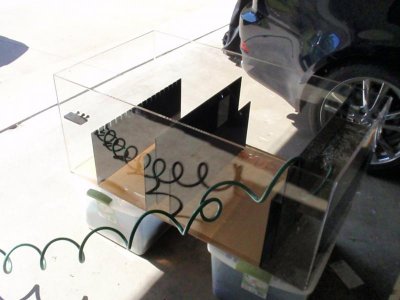
The good news is that the tank/stand/canopy were all delivered yesterday. The stand and canopy both look GREAT!!!

The bad news is that the tank had a nice 3+" scratch in the front viewing panel!!! :headwally::headwalls::thumbdown:furious::mad::sad1::uzi::angryfire: (add any other smilies that would depict the internal fire of rage that burned inside of me all day yesterday)

I was in shock first, then that turned to frustration that LeeMar would even let the tank leave their offices with such a blatant defect (not to mention there was a nice little crack in the bracing where it seems they didn't put enough silicone and it was glass on glass). Then this turned to pure rage burning inside me, which soon led to depression that the thing I've been looking forward to and planning for weeks will now be delayed another 2 weeks (MINIMUM)... probably more.

Needless to say, I'm not in the best of moods right now and the pics will have to wait... sorry guys.

-Chad
 
Sorry man, that stinks.

Thanks bro'...

What's even better (or worse if you don't want to be sarcastic) is that I just found out that because of Thanksgiving this week, they won't be picking up the tank from the store until NEXT Friday (December 2nd)- they apparently only schedule trips to LA (where the LFS is) on Fridays- then they'll have to work on the tank for 1 or 2 weeks until they can get it back to the store (who will then deliver it to me the following weekend).

So we're looking at having the tank AT EARLIEST by the December 9th weekend.

Not too impressed with LeeMar's customer service so far...

In the meantime, I'll be doing stuff to keep me busy and not thinking about how much this sucks... like cleaning approximately 200 lbs. of sand... fun times!

-Chad
 
Update time... and this time with pictures.

So the tank is due to be picked up this Friday by LeeMar, who will then replace the scratched glass. They say this should take a week, so I should have my tank by the following weekend. Crossing my fingers, but not holding my breath.

So in the meantime, I've been keeping myself busy... First, here's a picture of the tank and the stand/lightholder before I noticed the scratch and had to send the tank back.
 

Attachments

  • PB202989.jpg
    PB202989.jpg
    58.7 KB · Views: 27
  • PB202990.jpg
    PB202990.jpg
    39.2 KB · Views: 25
So, to keep myself from thinking about not having my tank, my brother and I (he's in the picture) went ahead and cut out a 1/2" plywood base for the sump and other equipment to sit on in the stand.
 

Attachments

  • PB273067.jpg
    PB273067.jpg
    51.9 KB · Views: 30
Also cleaned all of my sand so I don't have to waste my time doing this when I actually have the tank sitting in my living room...
 

Attachments

  • PB273065.jpg
    PB273065.jpg
    64 KB · Views: 28
And finally, I was able to pick up some fish, which are now staying in the 60 gallon/QT (sorry for the crappy pics). As you'll see, the first phase of fish include:

> Yellow Longnose Butterflyfish
> Yellow Wrasse
> McCosker's Flasher Wrasse
> Exquisite Fairy Wrasse
> Starry Blenny
 

Attachments

  • PB273069.jpg
    PB273069.jpg
    50.3 KB · Views: 33
  • PB273071.jpg
    PB273071.jpg
    59.4 KB · Views: 24
  • PB273072.jpg
    PB273072.jpg
    65.2 KB · Views: 28
  • PB273077.jpg
    PB273077.jpg
    55 KB · Views: 25
My next goal (probably sometime this weekend) is to rinse all of the dry rock (first I'll spray it down to get any loose debris off, then I'll rinse in RO/DI water). Once that all dries, I can get to the fun part... aquascaping. I'm thinking of doing two large islands in front of the two overflows, with a little valley in the middle. Also plan on keeping plenty of space between the rocks and the glass since I'll have some active swimmers in the tank.

I'll post pics once I get the rocks laid out.

Thanks,

Chad
 
So I got home early from work and was able to rinse the rocks (no surprise that there wasn't much that rinsed off, just a little bit of dust... Marco Rocks are super clean).

Here's some pics of what I'm working with (approximately 150 lbs.- I know I probably got a little too much for what I'm looking to do, but I'd rather have too much than too little).

The first pics are of the "smaller" pieces (they all are pretty good size).
 
There are some pics of the two show pieces (all were hand selected at RAP).
 

Attachments

  • PB303081.jpg
    PB303081.jpg
    63.7 KB · Views: 24
Attached is a photo of the cement/mortar that I got from Marco Rocks at RAP... anyone use this before and, if so, does it work pretty well?

Also any tips in using would be helpful since I'll hopefully be setting it over this weekend.

Thanks,

Chad
 

Attachments

  • Marco Rocks Mortar Kit.jpg
    Marco Rocks Mortar Kit.jpg
    22 KB · Views: 26
Chad everything is looking great! I am very excited to see the progression. Too bad about the scratch on the tank, sounds much too similar to my experiece (But sadly Cadlights CS, is much worse than LeeMar's).

I love the rocks you got, very nice show pieces. Also, I wish I could help with the Mortar from Marco Rocks, but I have never used it. I used acrylic rods, and epoxy for my rocks.

Anyways - everything looks awesome so far. Best of luck for the future projects. :thumbsup:

Thanks Andrew! I might be hitting you up for a small piece or two of that LR (if you still have it) to seed my dry rock. Once I get the tank up and running, we should plan a good time for me to come by.

-Chad
 
Are you going with all dry rock? For my build, I went with BRS rock and fought hair algae for 6 months. All my PO4 test read 0 but I think the algae was consuming it. The only thing I could think of was the dry rock.

That said, your build looks really good and can't wait to see water in it.
 
Are you going with all dry rock? For my build, I went with BRS rock and fought hair algae for 6 months. All my PO4 test read 0 but I think the algae was consuming it. The only thing I could think of was the dry rock.

That said, your build looks really good and can't wait to see water in it.

Yeah... or at least 99% of the rock will be dry. I do plan on seeding it with a small piece or two of LR if I can find some that don't have any unwanted pests/algae (suggestions/offers are welcome).

Did you by chance clean the BRS rock beforehand? I've actually heard of issues with BRS rock (and other dry rock) being relatively "dirty" if not cleaned in a vinegar bath and this was one of the reasons I ended up going with Marco Rocks due to their very thorough cleaning process of the rocks. I still wanted to rinse them and soak them in RO/DI water to make sure any dust/residue created from being shipped across the country was discarded, but hopefully this will help guard against any issues you may have had.

Thanks for the heads up though, I really do appreciate it. What do you think you would have done different? Gone with more LR?

Thanks,

Chad

I did rinse it very well with tap and the gave it a final rinse with RO/DI. I then let it "cook" for 4 weeks with some live rock while my tank was being built. If I were to do it again.... I'd probably still use dry rock but would be more patient and be more aggresive with GFO in the beginning.
 
I did rinse it very well with tap and the gave it a final rinse with RO/DI. I then let it "cook" for 4 weeks with some live rock while my tank was being built. If I were to do it again.... I'd probably still use dry rock but would be more patient and be more aggresive with GFO in the beginning.

Thanks for the tip! I was definitely planning on running GFO early and often... I actually just got the BRS Deluxe Media Reactor for this very purpose, so we'll see how it goes. I also plan on not running the lights for the first couple of weeks so that with the elevated nutrient levels, the algae can't get start taking hold. Then when my levels come down, I'll start running a normal light schedule.

Thanks again for your insight (especially considering you've set up almost the same exact tank already)... your help is much appreciated.

Thanks,

Chad
 
Another quick update... I just ordered one of John's (from Advanced Acrylics) Black Acrylic ATO containers (see picture for representative picture). I missed out on the group buy that was going on in another forum, but really liked the look of them and ended up going with a 25 gallon version. It'll be 10"X24"X24", so it can either be placed in my stand or, since it looks so nice, it can be moved outside of the stand if I need room for more equipment.

This should allow me to go at least a week in the hottest/highest evaporation without refilling the container.

I'll FINALLY be done with the ugly rubbermaid containers!!!

-Chad
 

Attachments

  • Advanced Acrylics ATO.jpg
    Advanced Acrylics ATO.jpg
    51.7 KB · Views: 24
Back
Top